- 2010-2017 MacBook Air Screen Repair How-to Guide
- Options For Repair
- MacBook Air Display Assembly Replacement Guide
- Step 1 – Sourcing the replacement MacBook Air display assembly.
- Step 2 – Purchase the tools needed to complete the repair.
- Step 3 – Plan for the repair.
- Step 4 – Back up your computer and shut it down.
- Step 5 – Removing the bottom cover.
- Step 6 – Disconnect the battery.
- Step 7 – Remove the IO Board Flex Cable.
- Step 8 – Remove the fan.
- Step 9 – Remove the IO board.
- Step 10 – Disconnect iSight Cable.
- Step 11 – Disconnect the antenna cables from the Airport card.
- Step 12 – Disconnect the LVDS cable from the logic board.
- Step 13 – Deroute antenna cable
- Step 14 – Removing the hinge screws.
- Step 15 – Removing the display assembly.
- Step 16 – Reassembly.
- Step 17 – Final testing and troubleshooting tips.
- MacBook Air LCD Only Replacement Guide
- Step 1 – Sourcing the replacement MacBook Air LCD panel.
- Step 2 – Purchase the tools needed to complete the repair.
- Step 3 – Plan for the repair.
- Step 4 – Complete the guide for removing the display assembly.
- Step 5 – Apply heat to the bezel of the MacBook Air
- Step 6 – Remove the bezel.
- Step 7 – Unscrew the screws holding down the LCD panel.
- Step 8 – Disconnect the backlight and LVDS cable.
- Step 9 – Remove the LCD panel.
- Step 10 – Remove the mount from the original LCD panel.
- Step 11 – Apply adhesive to replace any removed adhesive.
- Step 12 – Installing the new LCD panel.
- Step 13 – Connect the backlight and LVDS connector.
- Step 14 – Screw in the 2 black screws
- Step 15 – Apply 12mm tape.
- Step 16 – Install the bezel.
- Step 17 – Reassembly.
- Step 18 – Final testing and troubleshooting tips.
- Professional MacBook Air Screen Repair
2010-2017 MacBook Air Screen Repair How-to Guide
The 2010-2017 MacBook Air was a popular model while it was in production. The lightweight, long battery life, and affordable price point made them a great buy for a large group of people. This model is aging quite well and has very few issues. They continue to be a very usable computer, especially for people who don’t need a lot of power to meet their computing needs.
I have an article with all the common issues I see on this particular model MacBook Air if you want to learn more about the machine. See my A1466 MacBook Air common issues page for detailed information on what may happen as your computer ages.
One of the issues these MacBook Airs do have is a fragile display. The LCD panel is more easily cracked than other models of Macs, and the repair options are more difficult due to the design of the screen. The light design is partly to blame, as well as the thin design of the display assembly itself.
The cost of repairing common MacBook Air issues is generally very affordable, especially as the computer ages. For screen repairs, the cost of a professional repair is quite affordable.
Options For Repair
When it comes to the A1466 MacBook Air, you have two options for screen repair. You can either replace just the cracked LCD (as long as the display assembly is still in good shape), or you can replace the entire display assembly.
Replacing the entire display assembly is what Apple offers at the Apple Store, as it is a much easier method than replacing the LCD panel only. Replacing the LCD panel only is a difficult procedure that requires a lot of skill and patience. Usually replacing the display assembly is faster, but not always.
I will cover both methods of MacBook Air screen repair in this article. I will start with the easier and more expensive display assembly replacement, then move on to the more difficult, but cheaper, LCD-only repair. But first, we will go over some reasons you may choose one type of repair over another.
Display Assembly Replacement
There are a few reasons you might need to replace the entire display assembly rather than just the LCD panel. I have an article I wrote about the types of damage done to a MacBook that would make the screen need repair, but the two main issues are liquid damage and dents.
Basically, if the display assembly is damaged to a point where it should be replaced, then replacing the entire display assembly is going to be the best way forward. The display assembly includes the LCD panel, back housing, bezel, iSight, hinges, and more.
If there is liquid damage that caused the screen to not work properly, it is very likely that the components inside the display assembly are damaged which is best to repair by replacing the entire display assembly. If there are major dents or a bend to the display housing, then a new LCD panel will likely not fit nicely into the original display assembly.
It is very rare to have to replace the display assembly. Over 95% of the people who contact me looking for a MacBook Air screen repair just require an LCD replacement.
LCD Panel Replacement
LCD panel replacement is by far the most common type of service that is necessary for a MacBook Air screen repair. Generally, the LCD panel is cracked or broken in some way, and by replacing the LCD panel we are able to fix the computer completely.
There are many ways that the LCD panel in a MacBook Air can fail, but the most common is cracking or bending to the point of cracking. The bending on this model can even come from something as simple as opening and closing the computer from the corner of the display instead of the center.
While LCD replacement on a 2010-2017 MacBook Air is a much more difficult job than replacing the display assembly, it does save you a lot of money to perform this repair. Due to the difficulty in completing this repair, I do recommend you utilize a good repair shop to complete it for you.
MacBook Air Display Assembly Replacement Guide
Step 1 – Sourcing the replacement MacBook Air display assembly.
Finding a good part to replace your broken part with can be a little daunting. There are a lot of places you can source these display assemblies, but most are on used markets like eBay, or from sellers that source refurbished models from China.
In my experience, going with a used display is better than going with a refurbished display. The workmanship on the refurbished models are not very good in most situations. For that reason, I recommend looking at eBay and finding a seller that offers a warranty on their used display that is for sale.
I have an entire page dedicated to sourcing the display assembly for a 2010-2017 MacBook Air. Check it out for how to tell what years are compatible with which display assemblies, places to purchase that give you the best chance of having a good outcome, and more.
Step 2 – Purchase the tools needed to complete the repair.
Apple uses odd screws on their MacBook Air line (and most of their laptops created after 2011). These more specialty screws require more specialty screwdrivers that you are not likely to have laying around the house. The tools needed for the display assembly replacement are:
- P5 Pentalobe Screwdriver
- T5 Torx Screwdriver
- TR8 Torx Security Screwdriver
- Plastic Spudger
- Precision tweeters (optional but helpful)
Step 3 – Plan for the repair.
It is important that you set aside enough time to complete the repair in one sitting. You want to set aside enough time to deal with any problems or difficulties you may run into without having to rush at all. I recommend setting aside 4 hours for this project. It takes most experienced technicians less than 30 minutes to complete this repair, but you want to be able to relax and focus, especially if it is your first time completing this repair.
Step 4 – Back up your computer and shut it down.
Usually, the most important aspect of anyone’s computer is the data that is stored on it. Be sure you back up any important data before completing any repair. It is best to always have a backup of your important data, but you want to double-check that absolutely everything you would want is backed up before opening the machine up.
Once you have all your important data backed up, go ahead and shut your computer down. This is done by clicking on the Apple logo at the top left of the screen and selecting “Shut Down…” from the list. Confirm you want to shut your computer down when prompted, and wait about 10 seconds after the display goes black before closing the lid of your computer.
Step 5 – Removing the bottom cover.
This is where it starts getting exciting. Remove the screws from the bottom of your laptop and place them in the order that you removed them. This will help you remember which screw goes where. The only ones that are really important to get right are the two longer screws that go right above the text printed on the bottom of the computer.
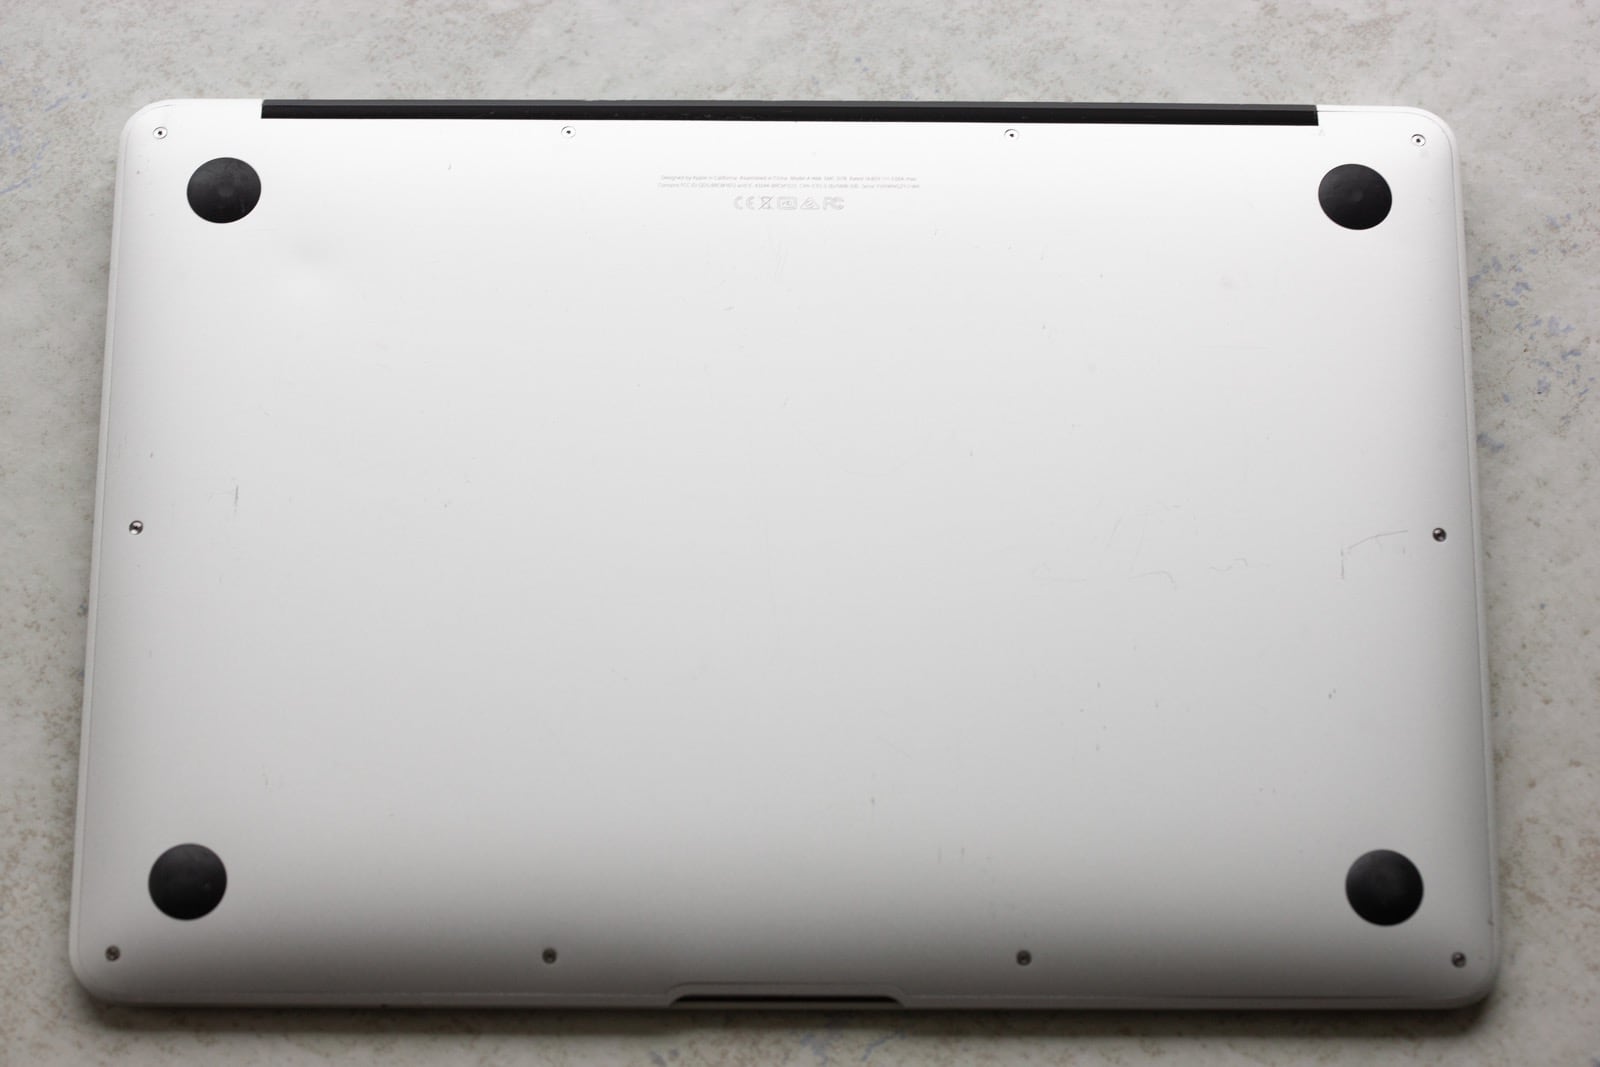
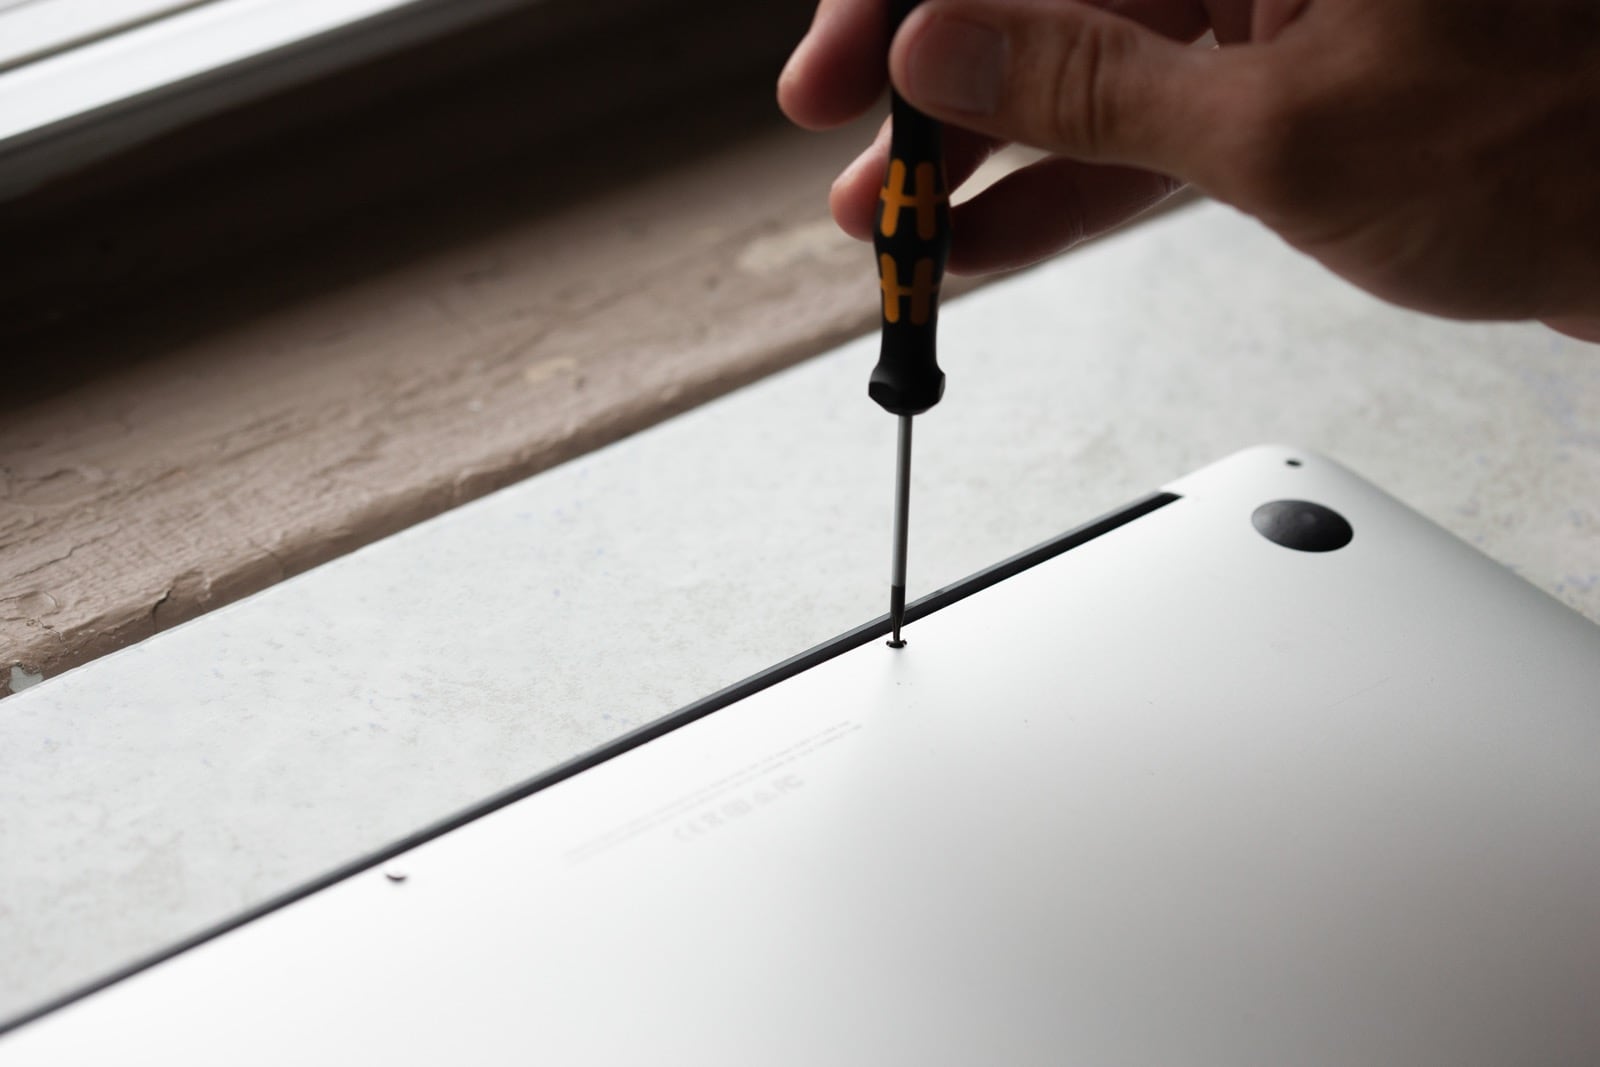
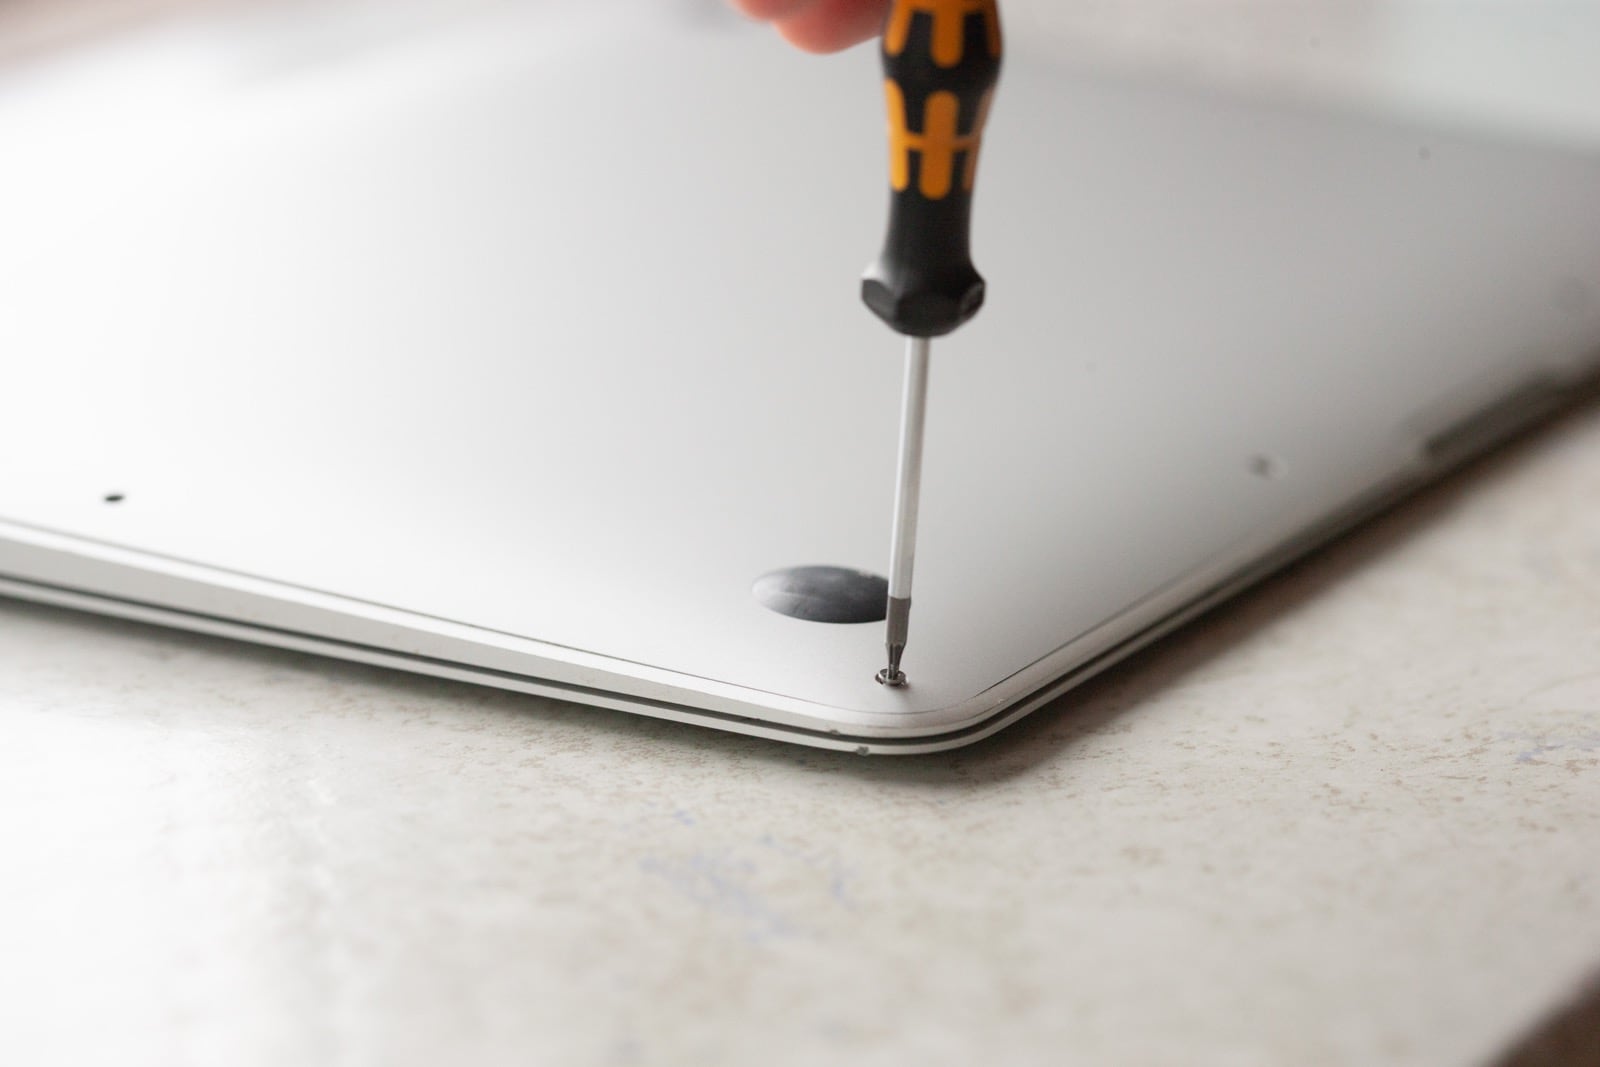
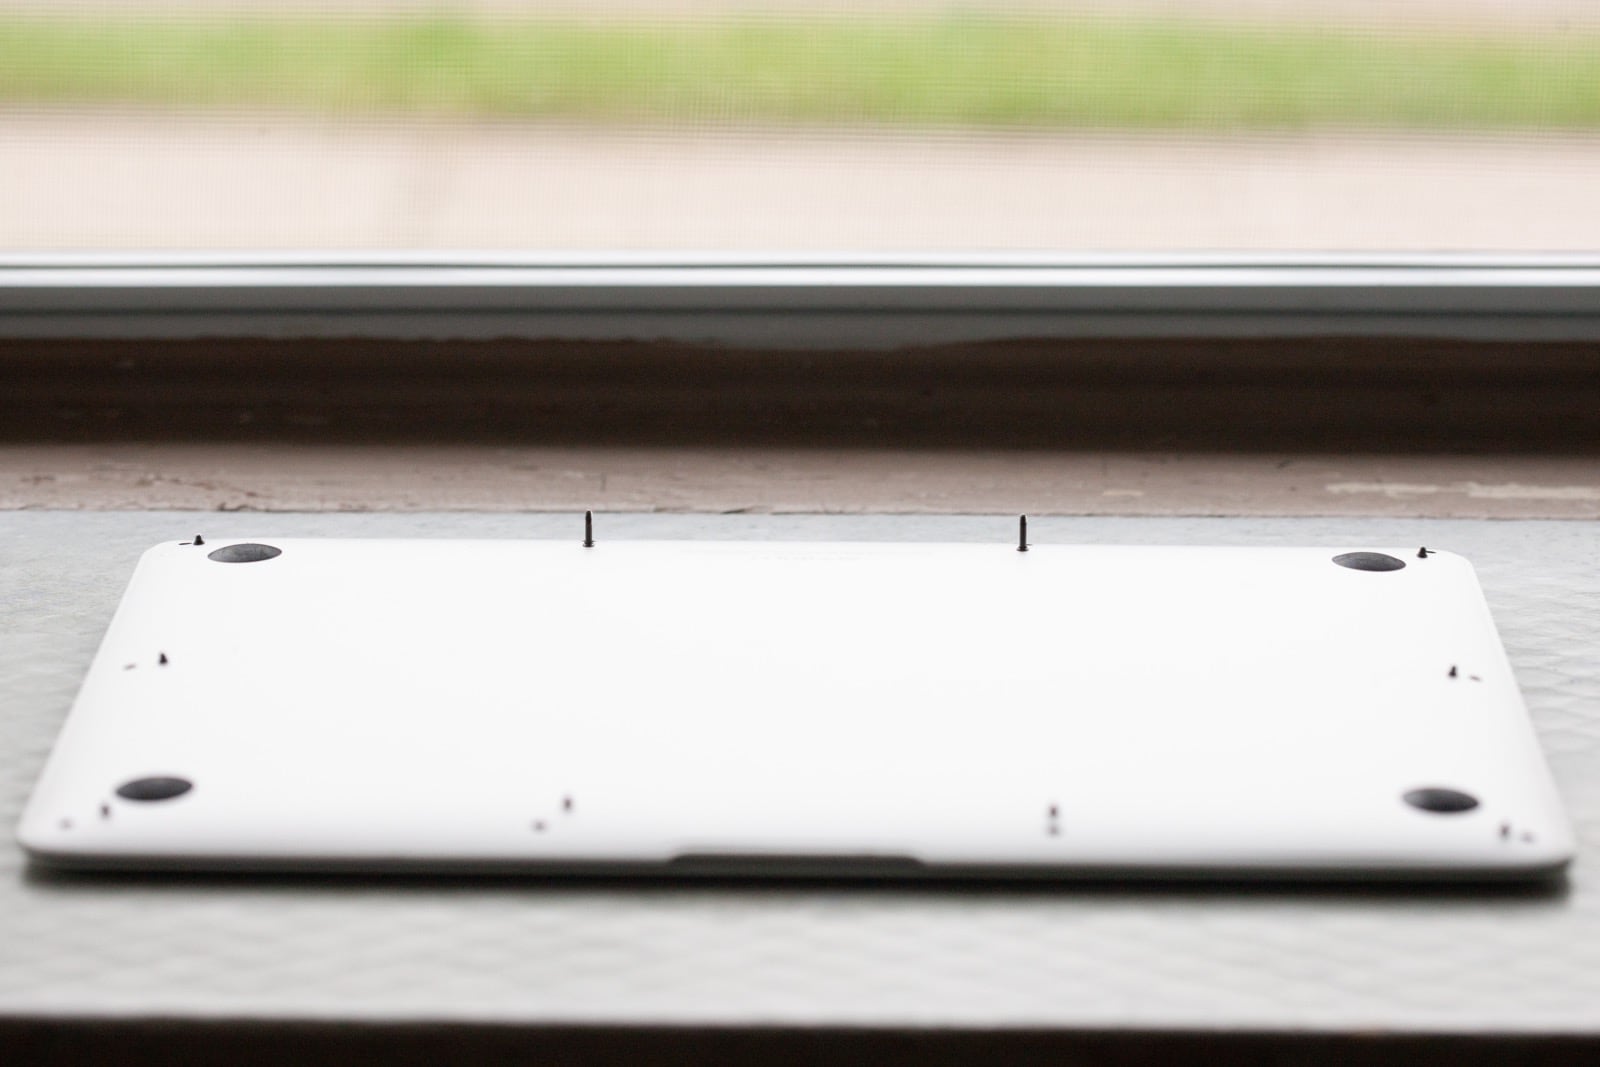
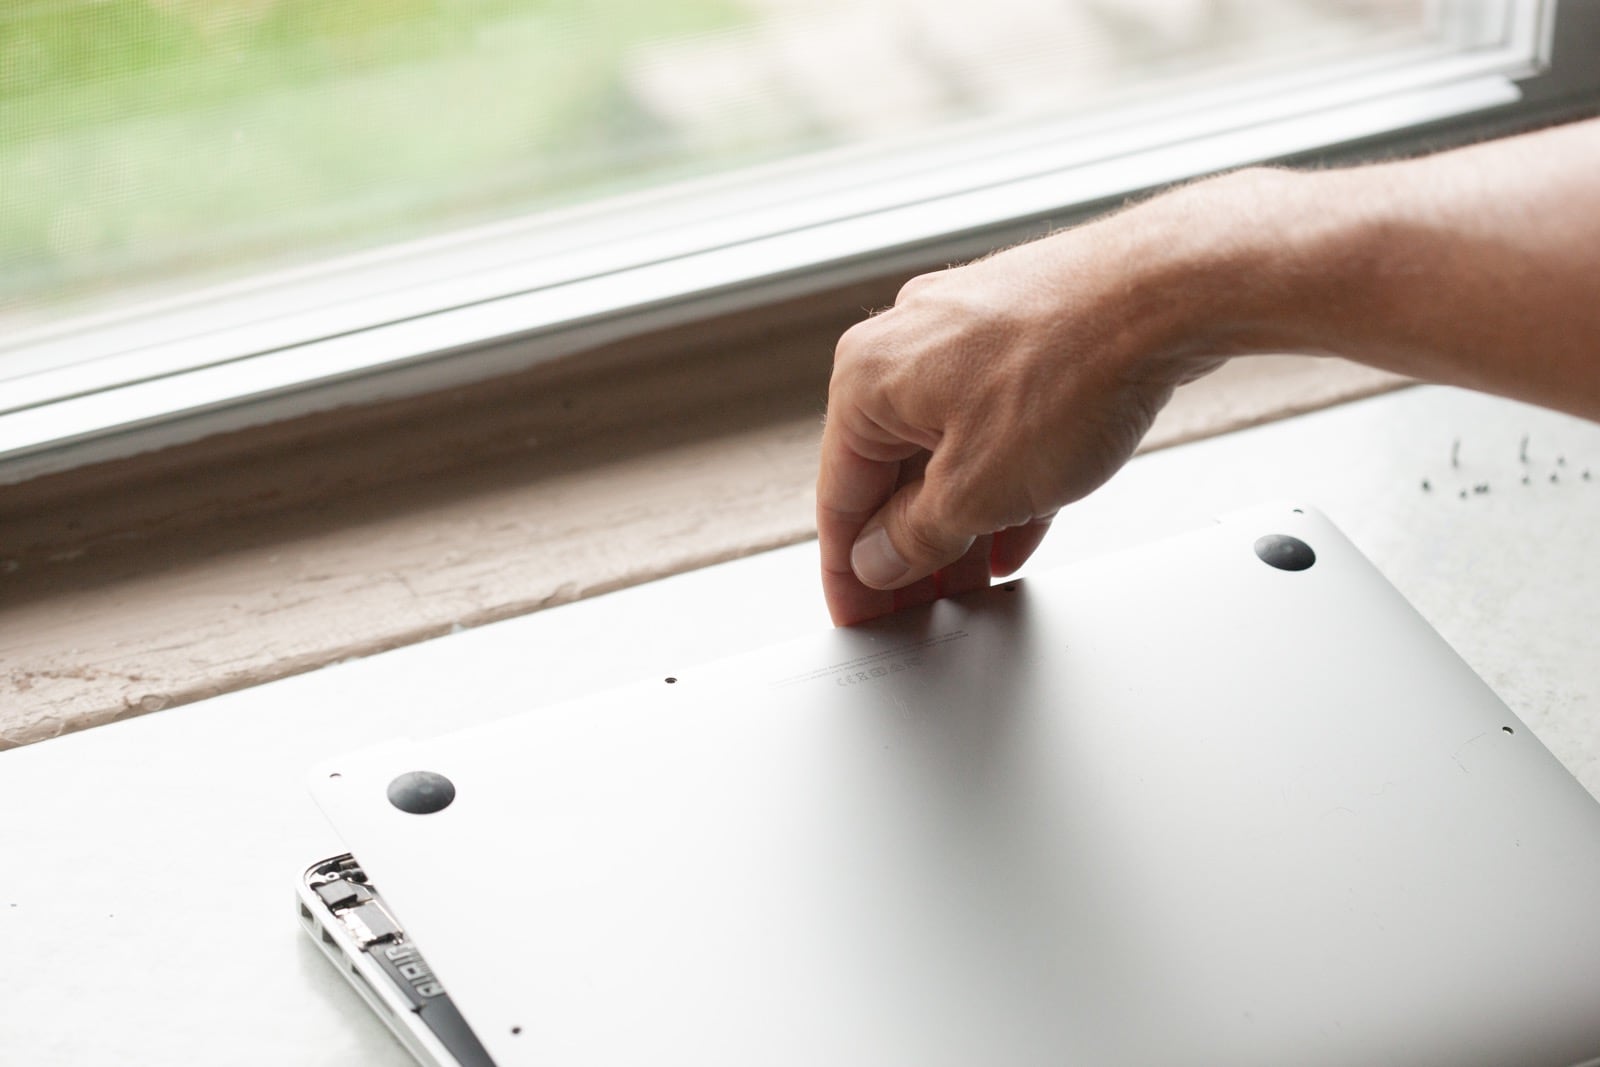
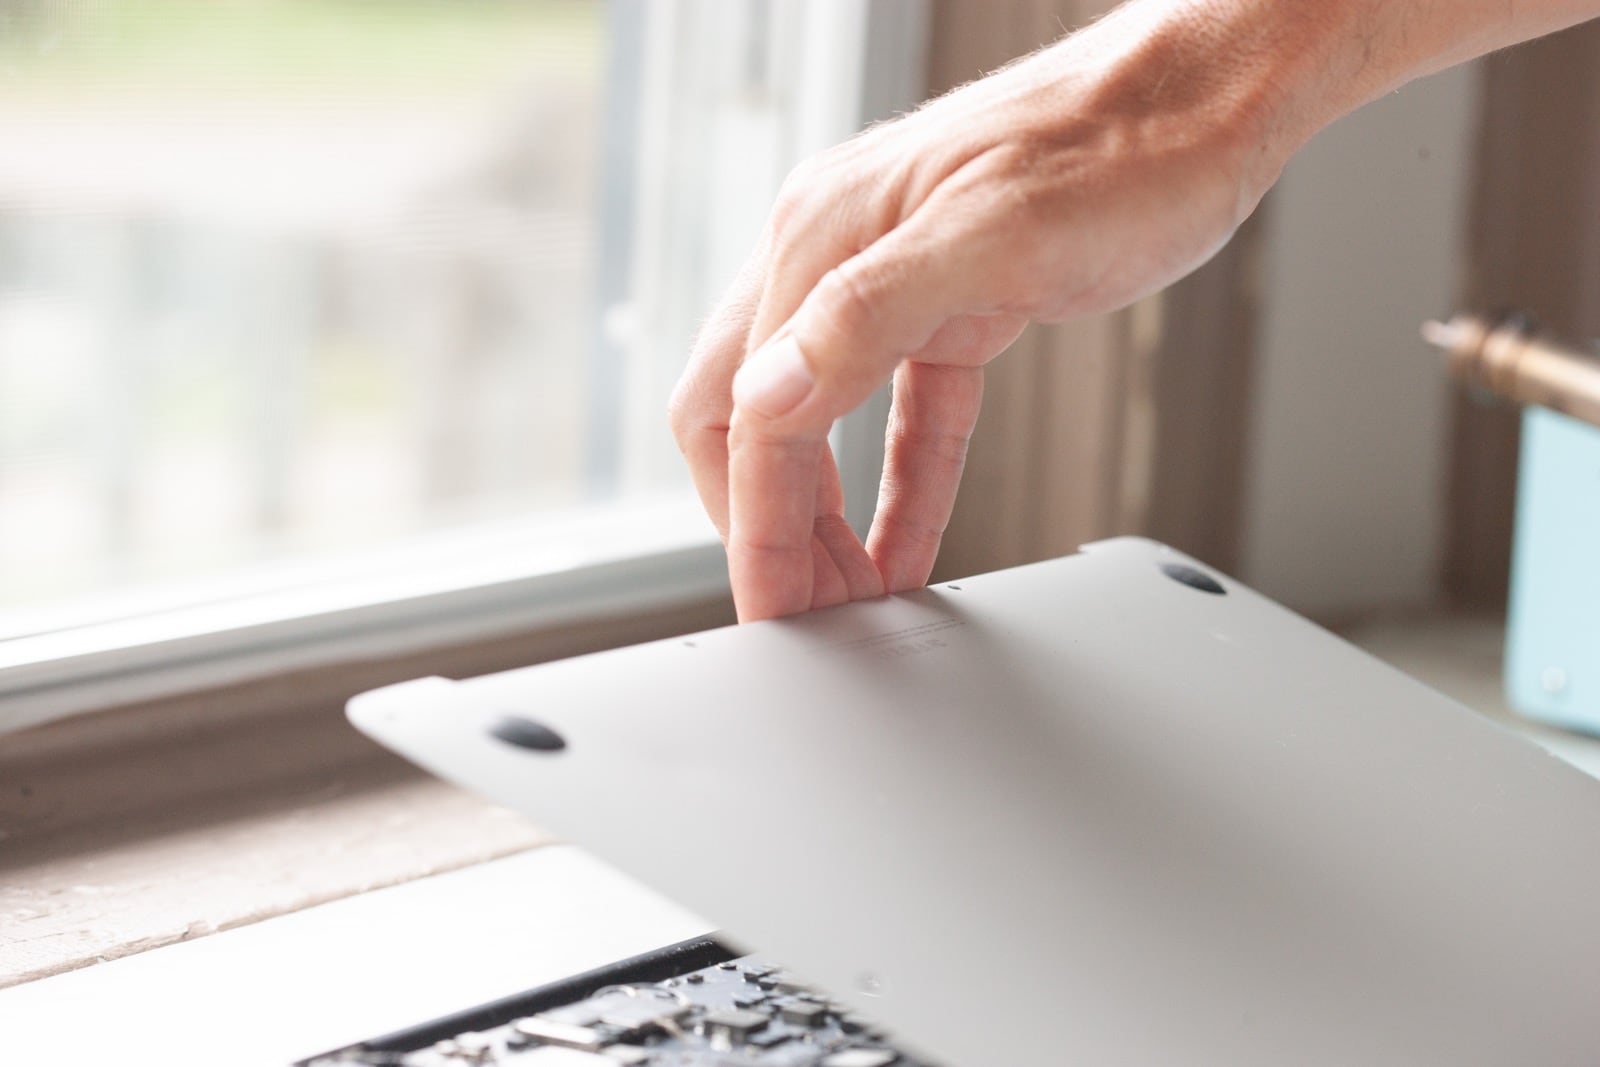
Once the screws are removed, you can lift the bottom cover off the MacBook Air as shown in the picture below. Simply grasp the bottom cover from right behind where the two long screws came out, and lift it towards yourself. There are a few plastic tabs holding the cover in place, so it does take some force to remove the bottom cover.
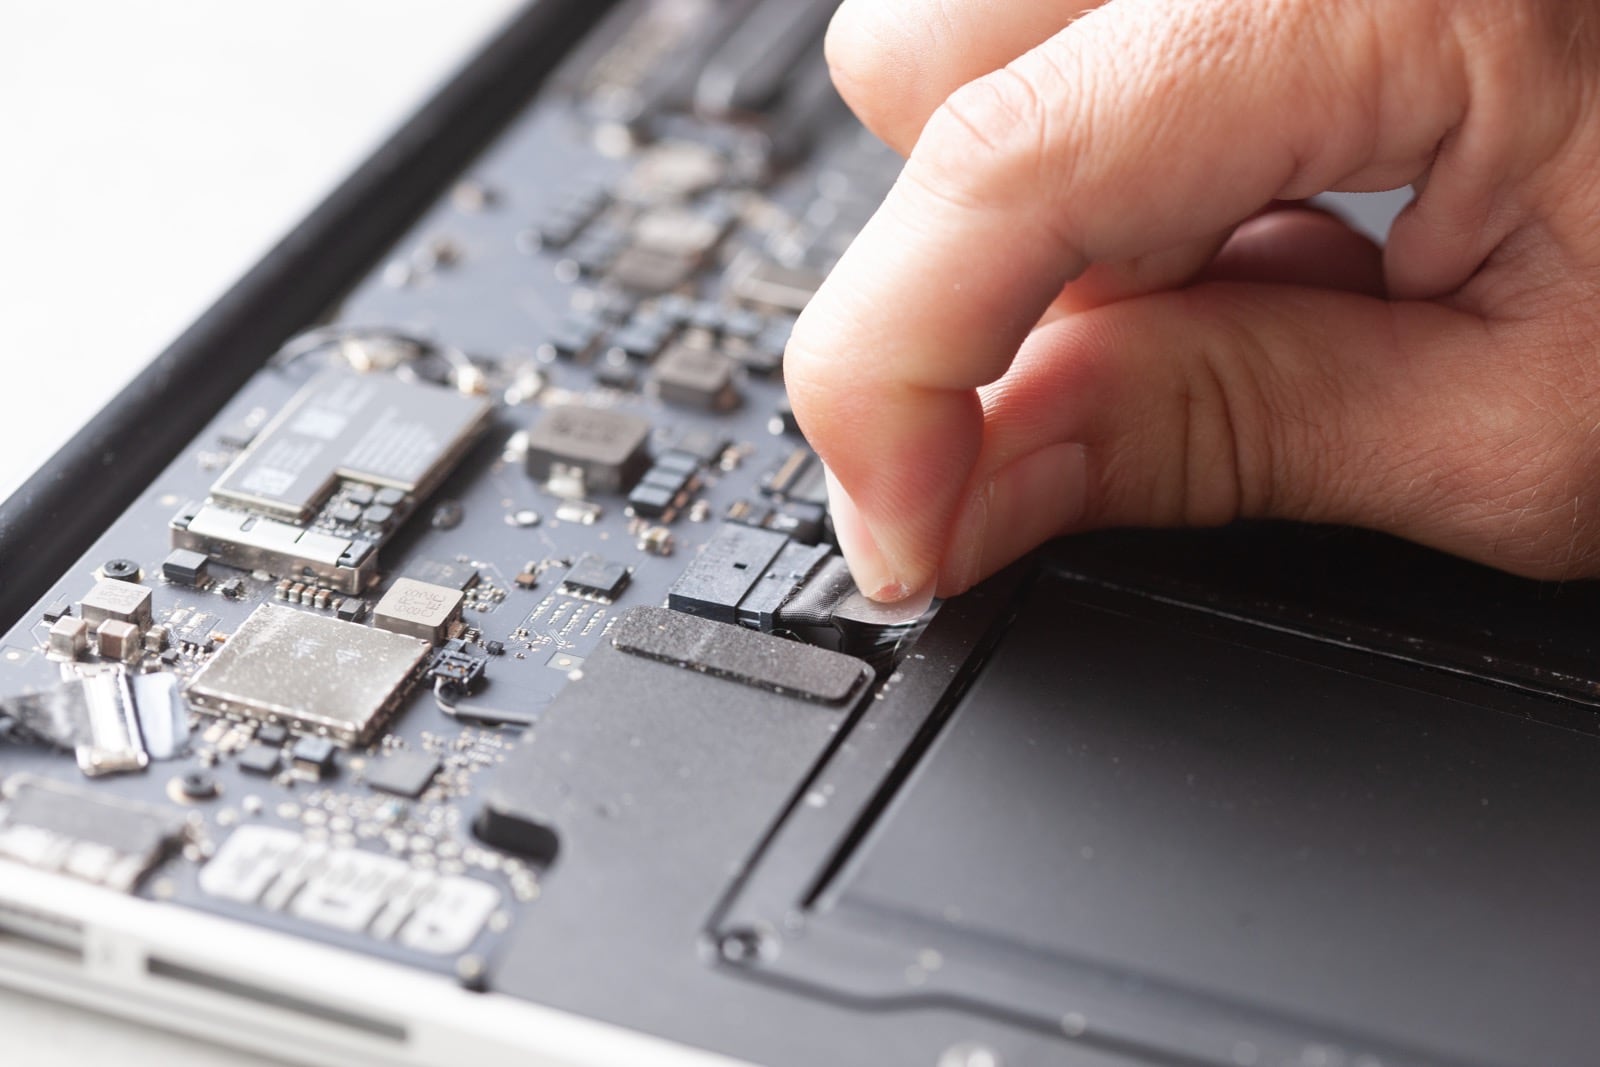
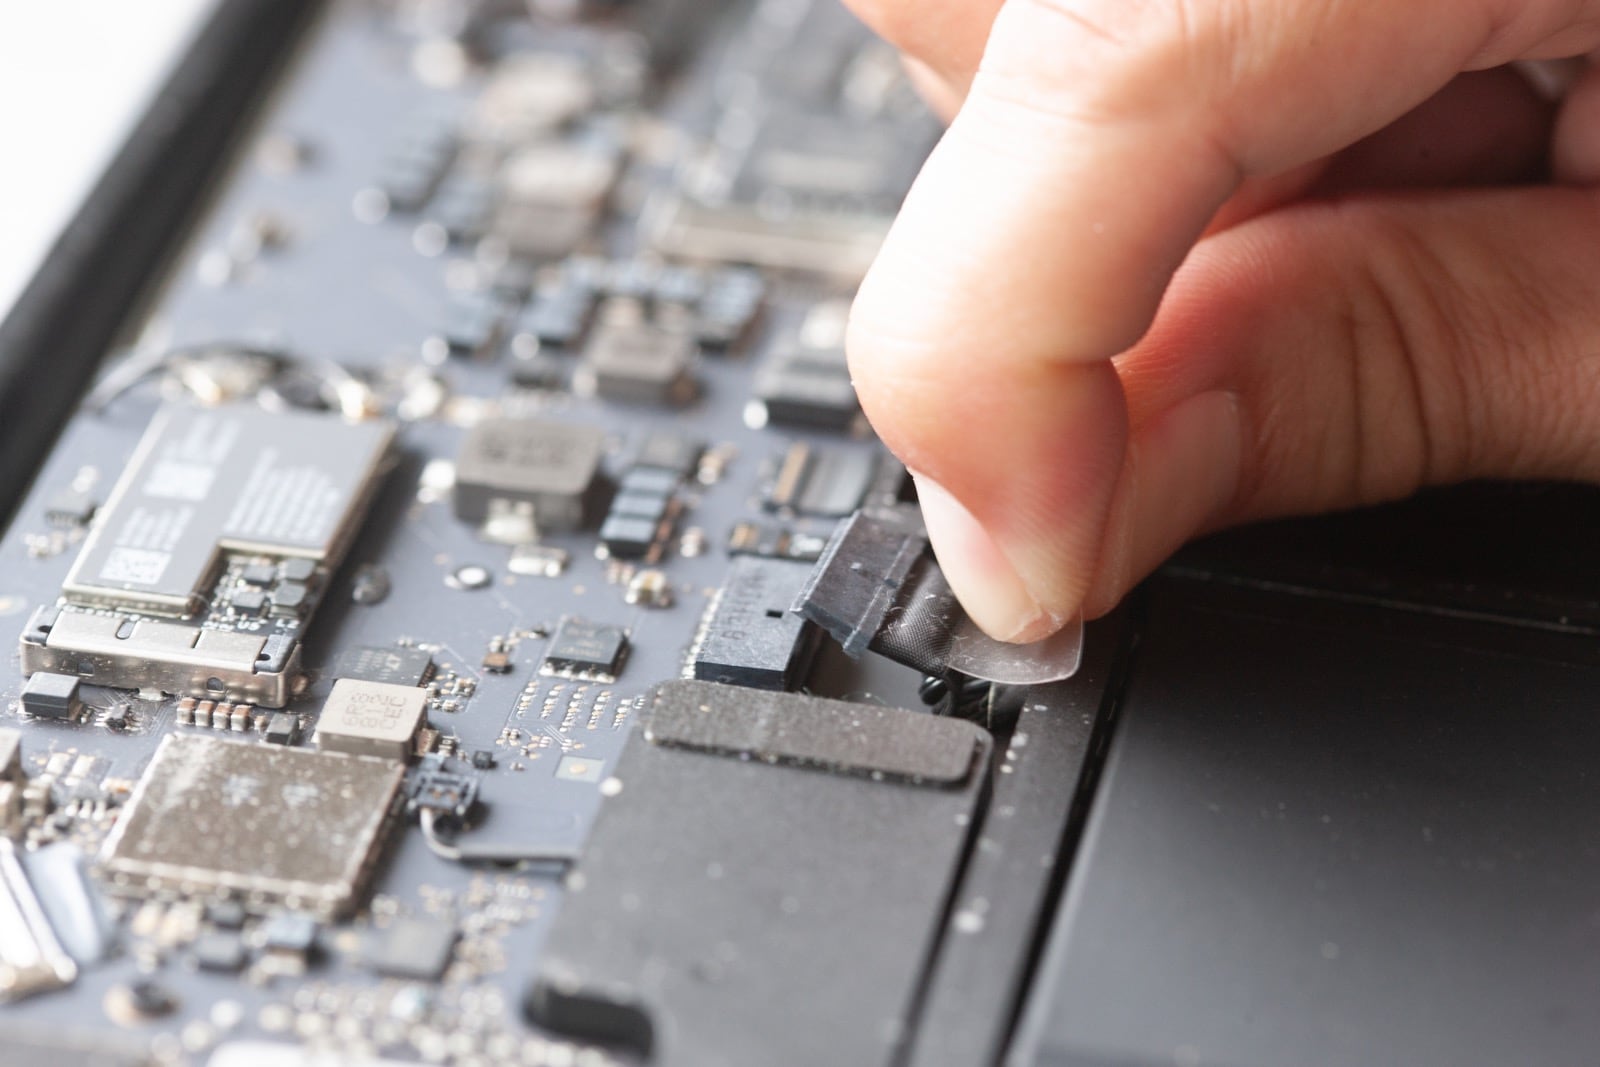
Step 6 – Disconnect the battery.
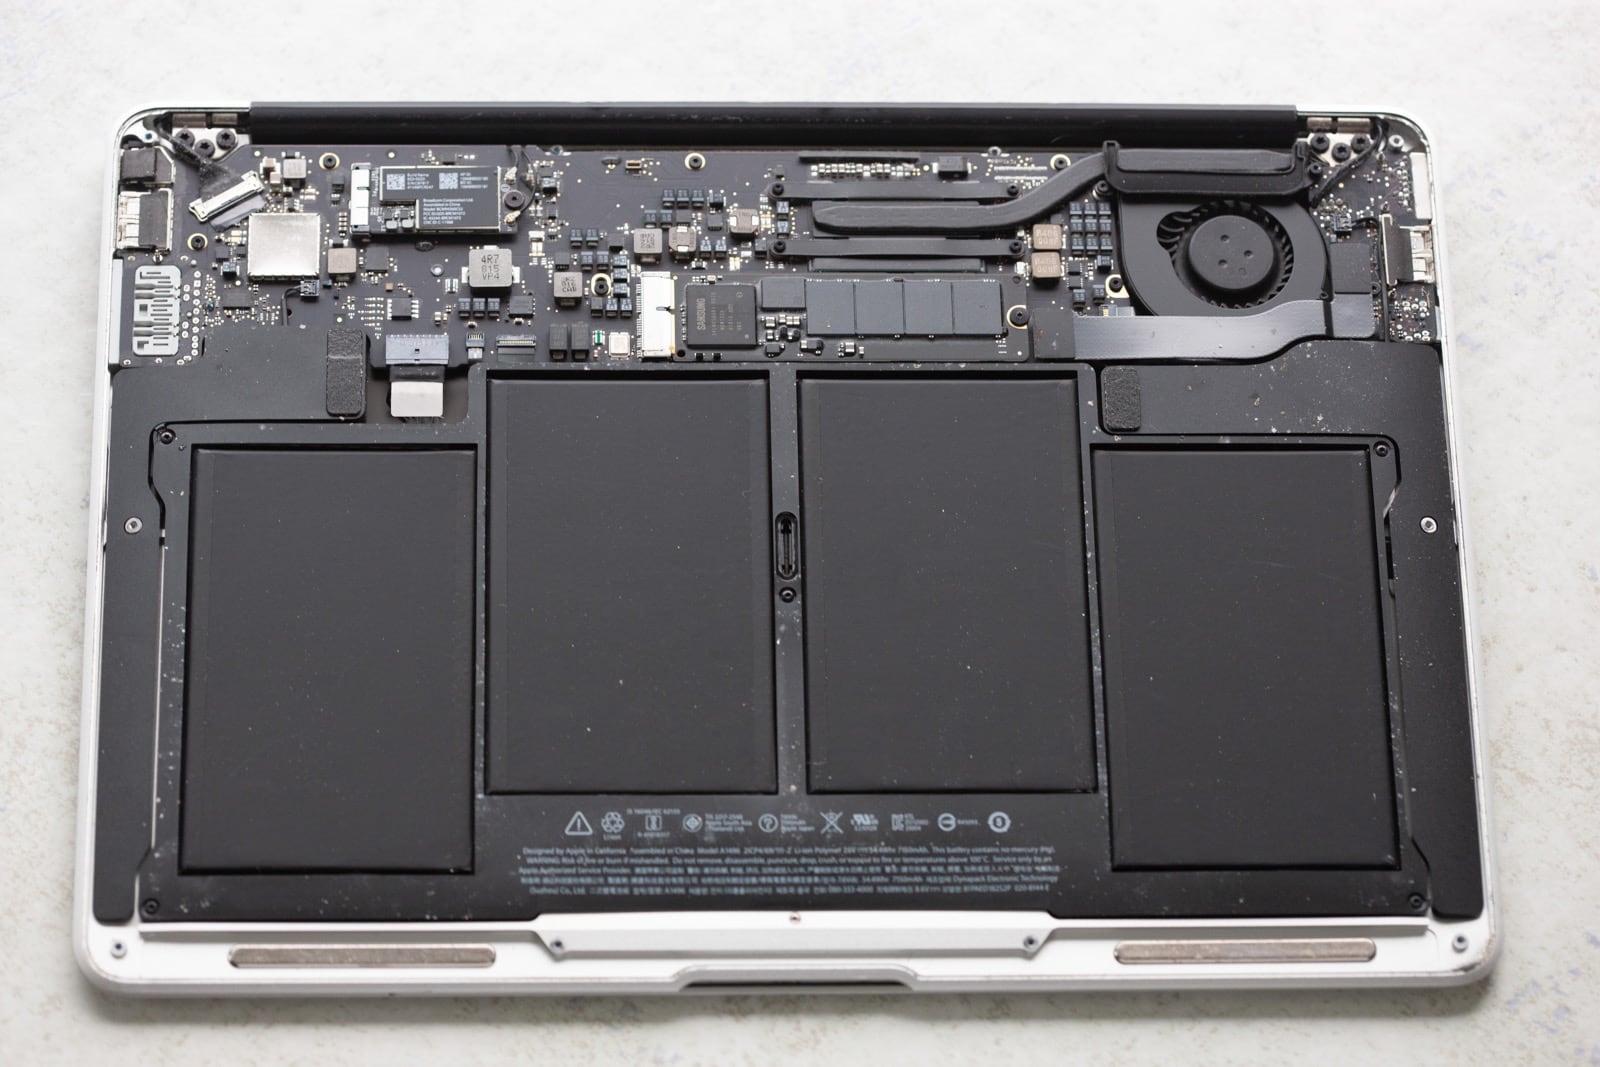
The first thing you want to do once the bottom cover is removed is to disconnect the battery cable from the logic board. This connection is pulled out as shown in the picture below. Note that the connection is pulled towards the battery, not lifted straight up. Do not lift the connector at all during the removal.
Step 7 – Remove the IO Board Flex Cable.
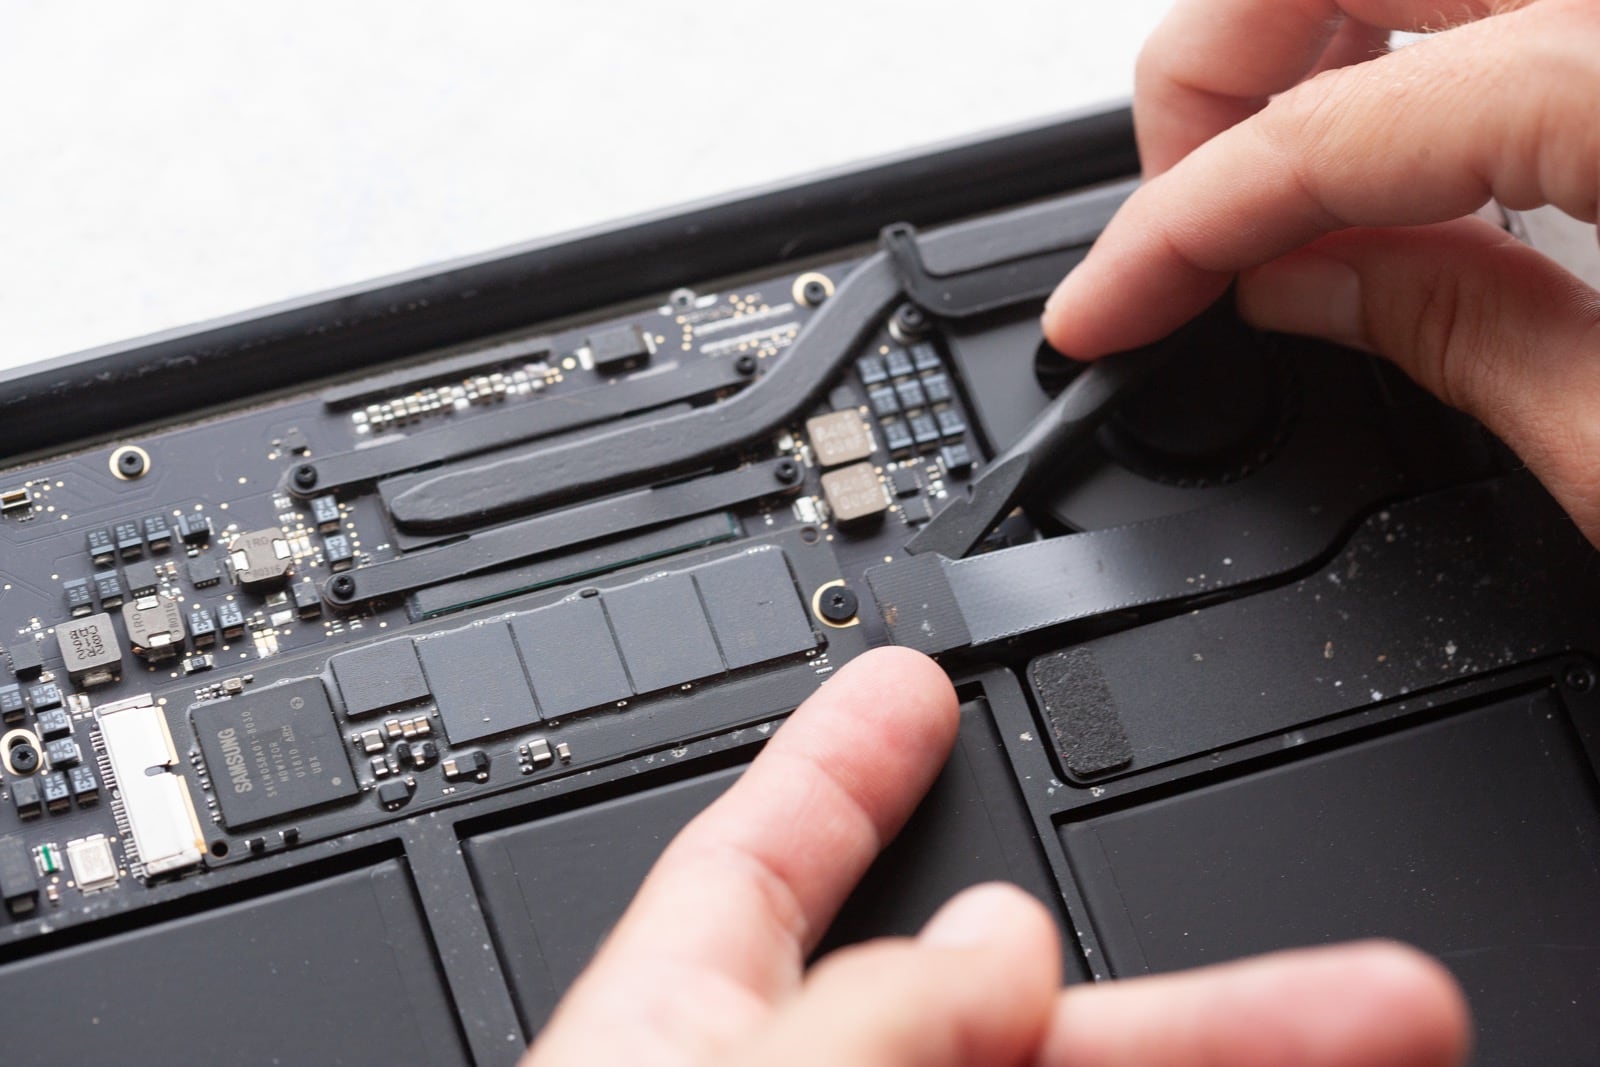
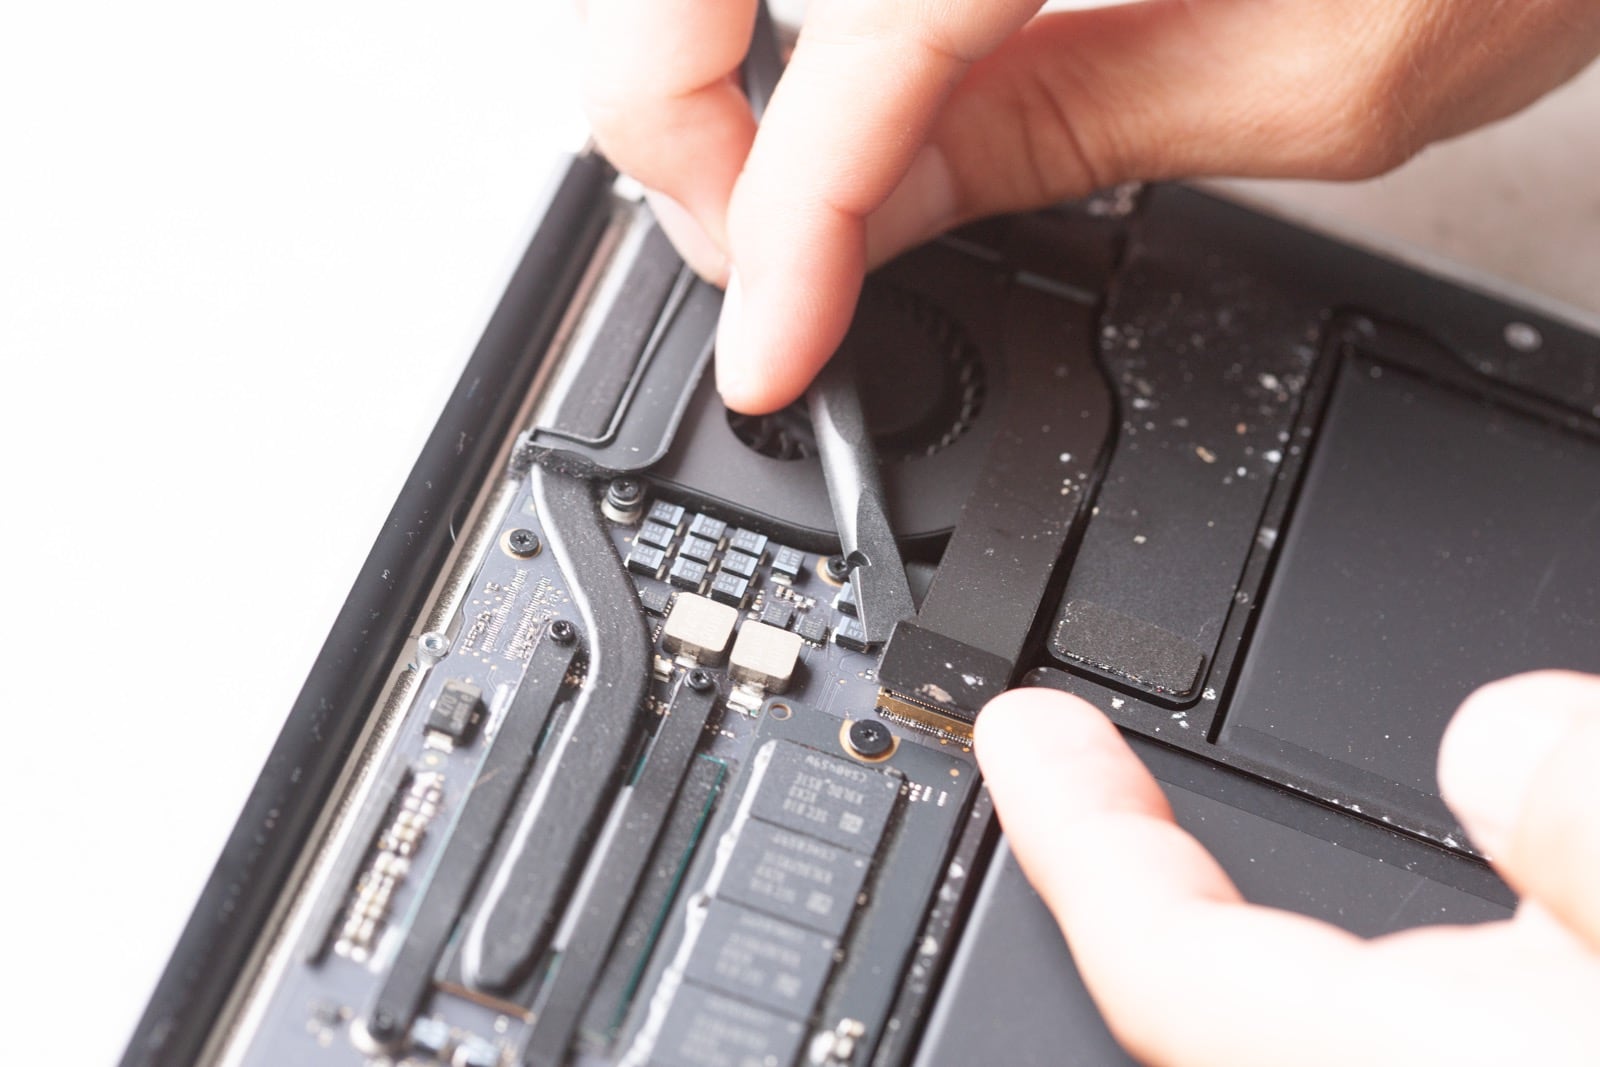
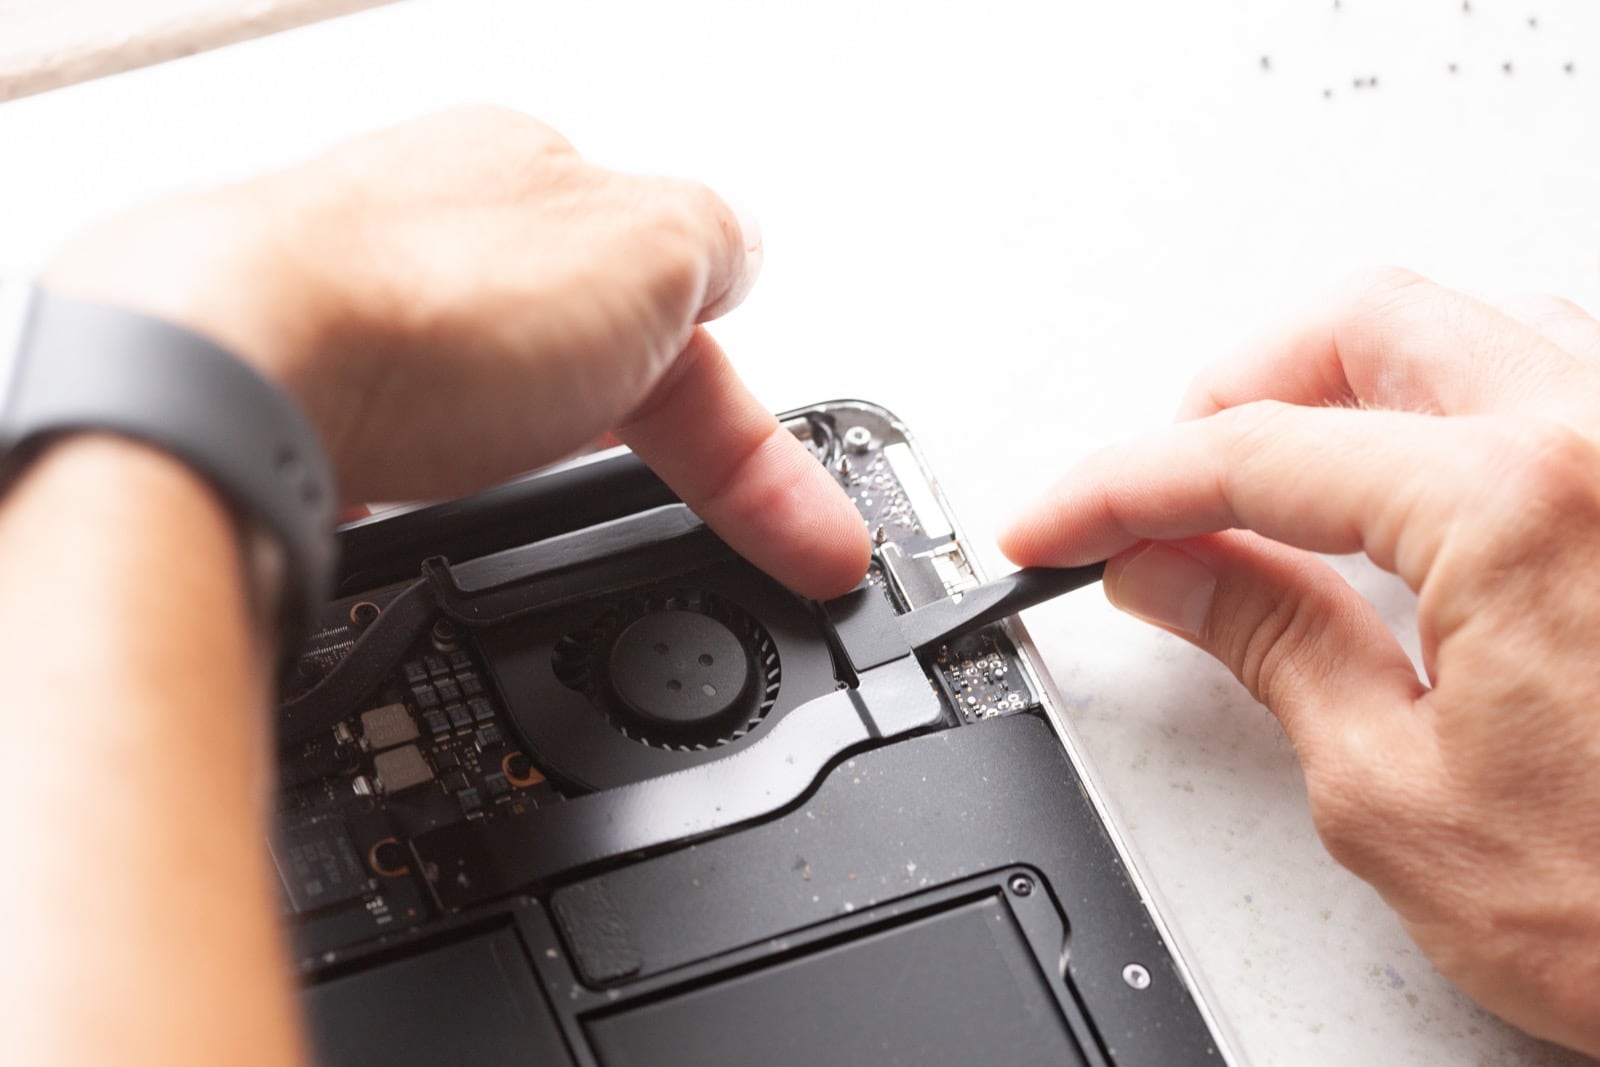
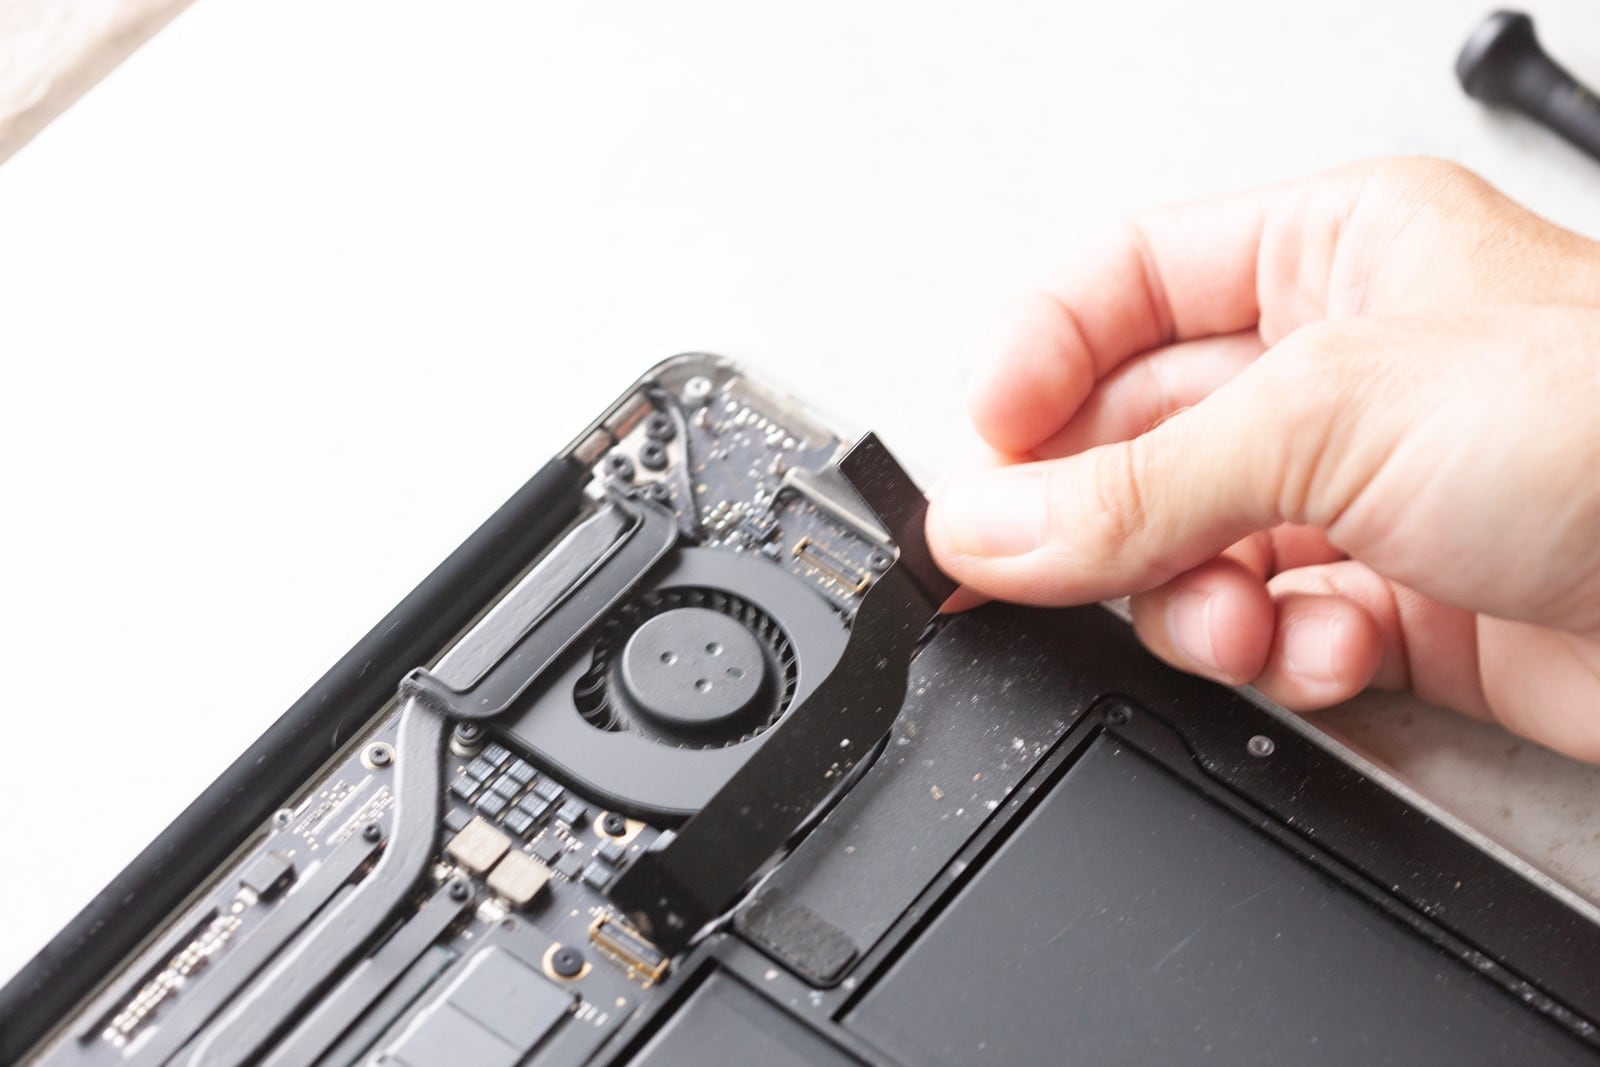
Lift directly up on the connections of this cable to lift it out of its connection. As the picture shows it can be helpful to use two spudgers or the spudger and tweezers to complete this step. Just be extra careful not to damage the cable during the removal. If you are going to use the tweezers for one side, have them be on the outside of the connector as shown, that way you don’t scratch the cable at all.
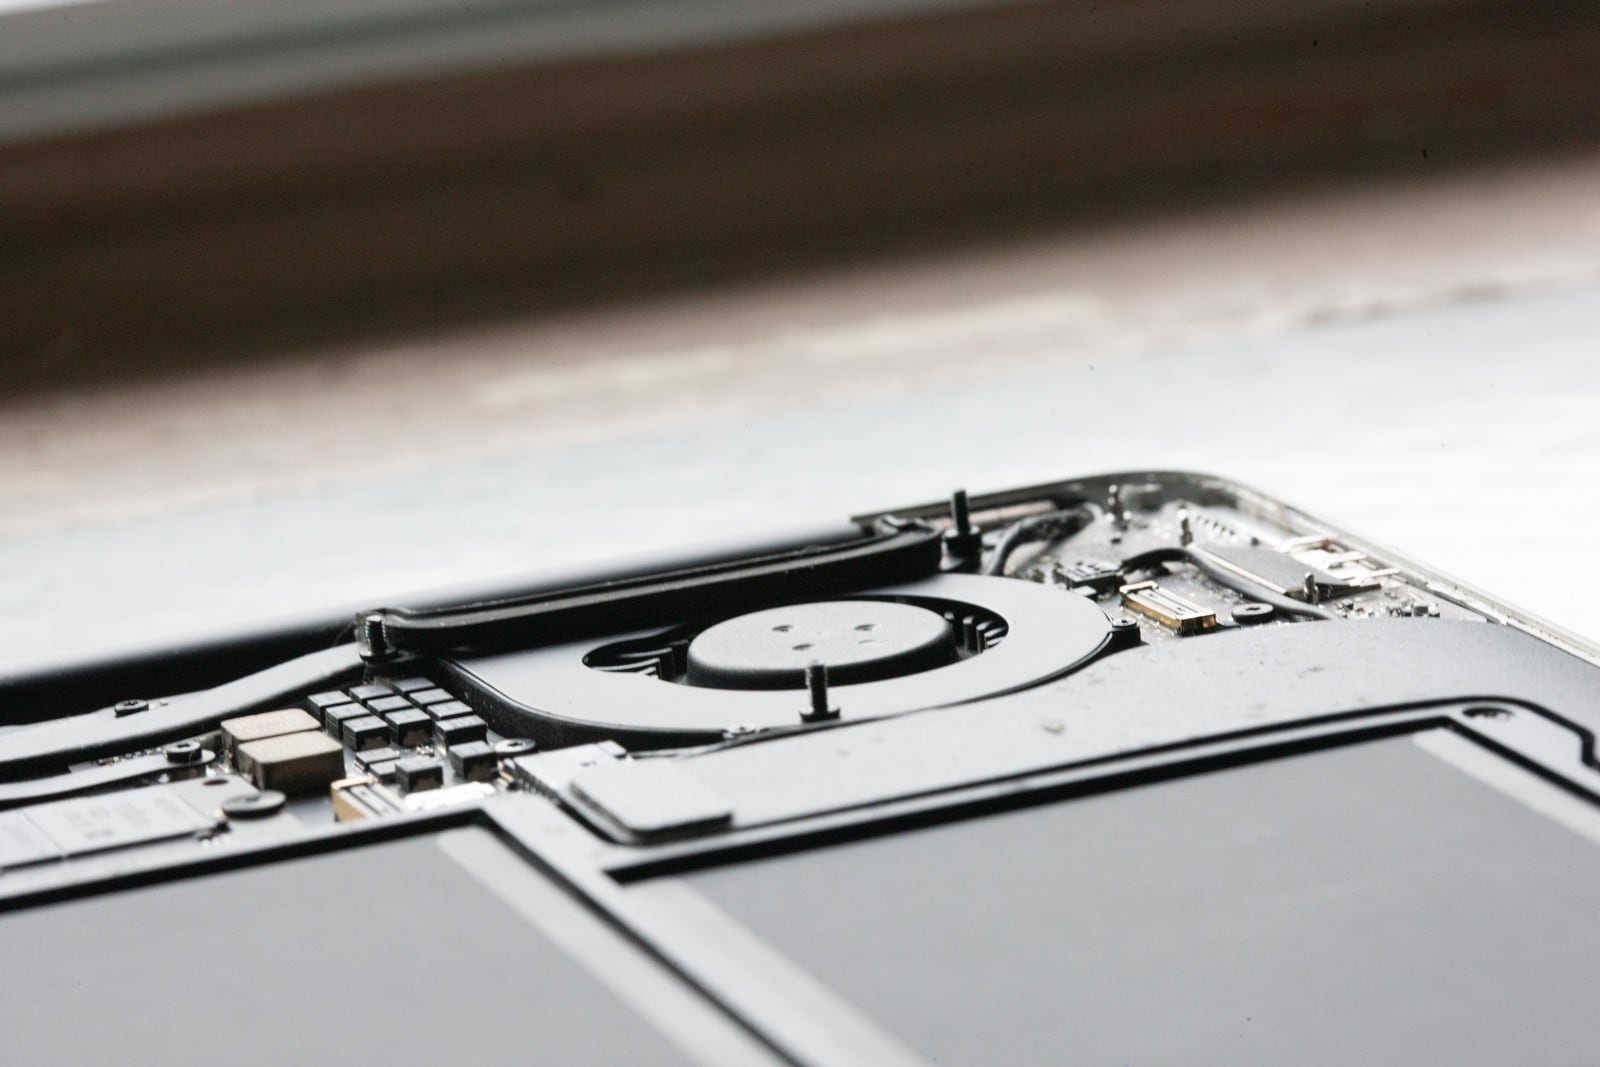
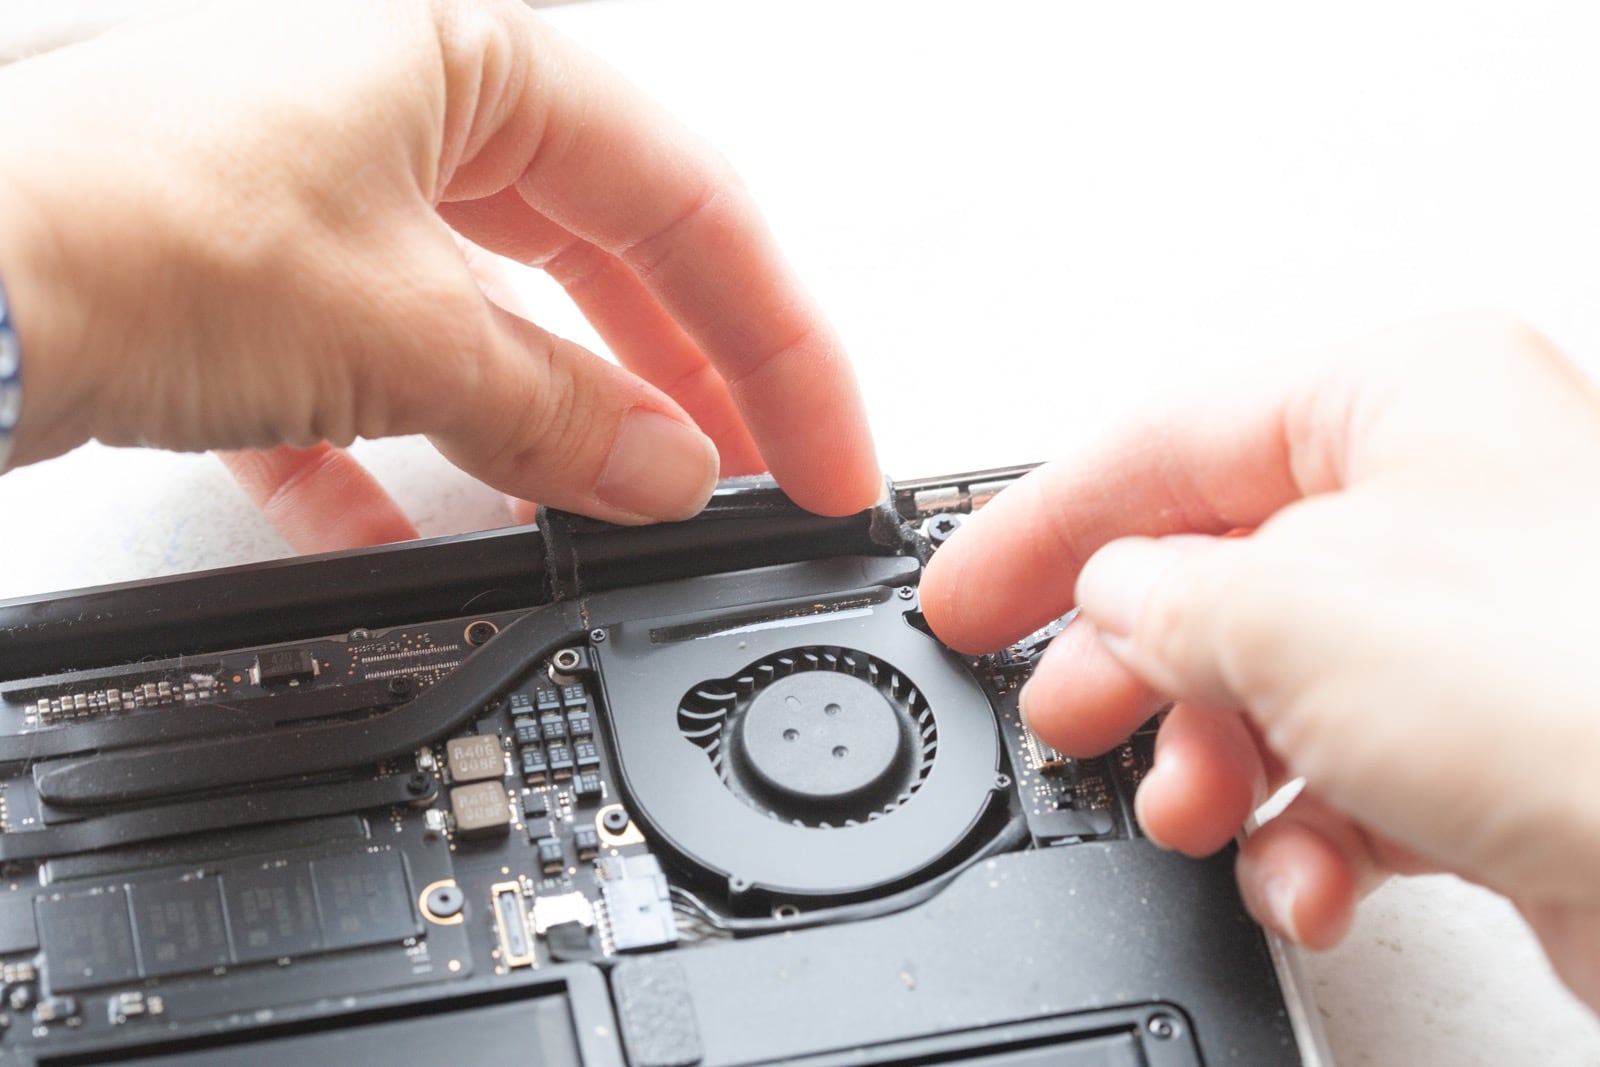
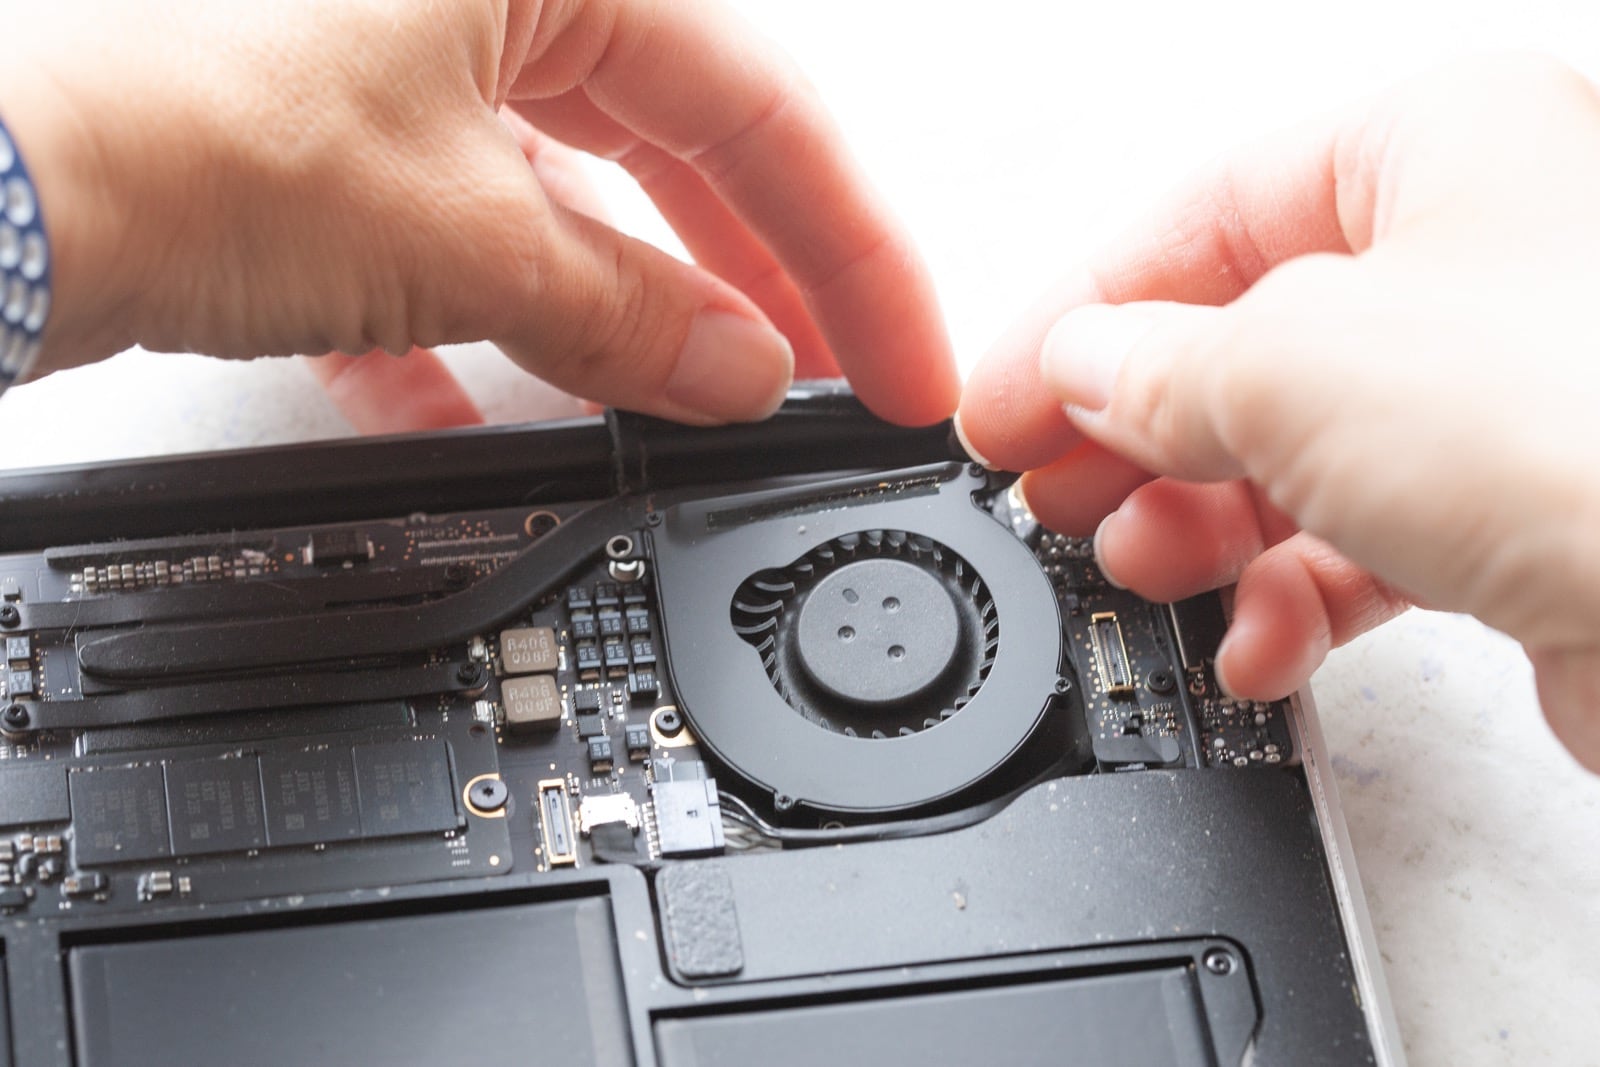
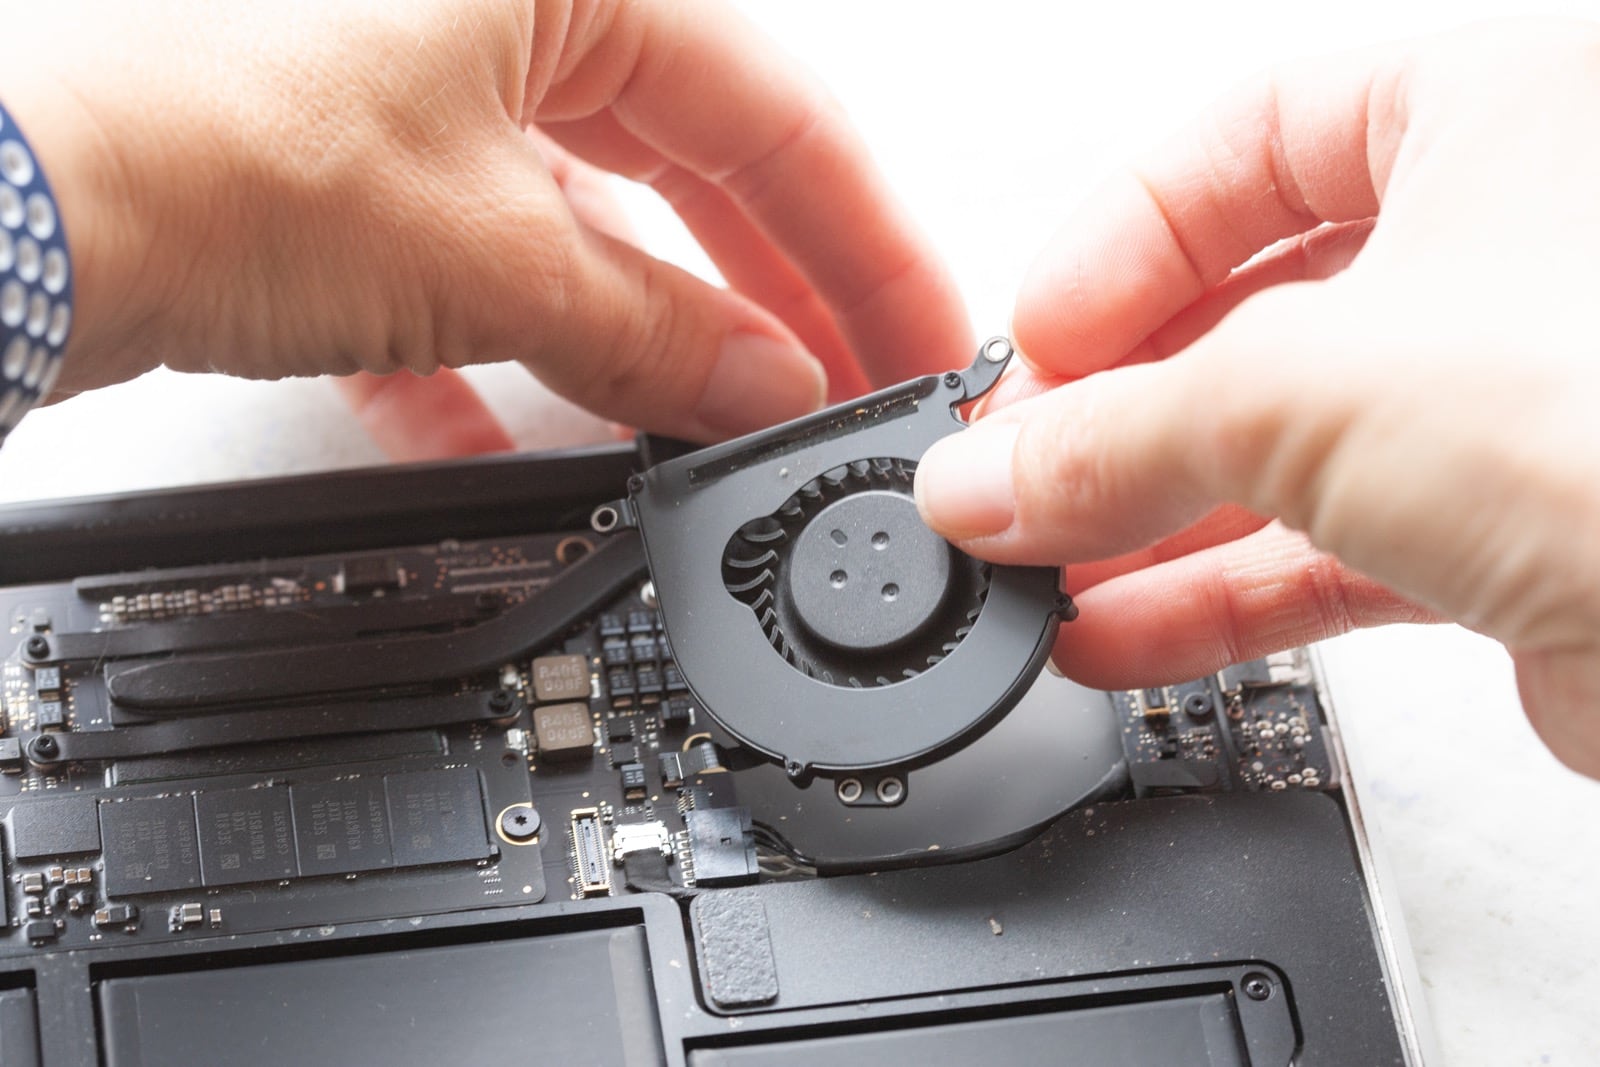
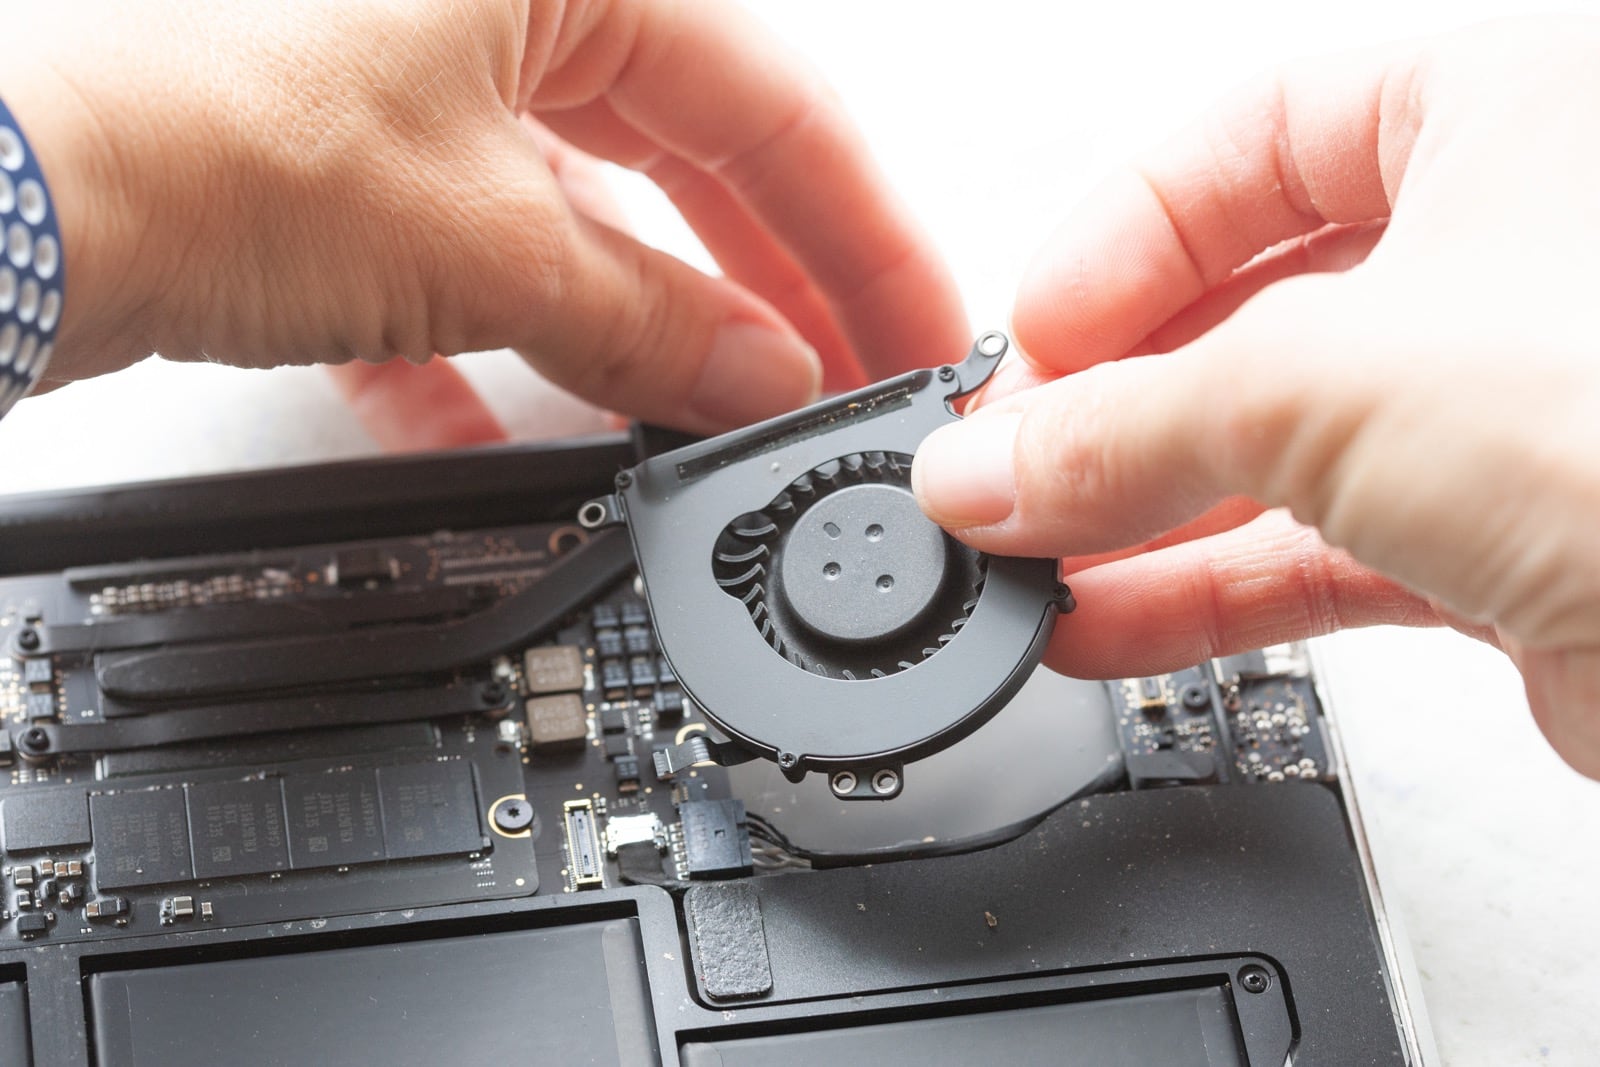
Step 8 – Remove the fan.
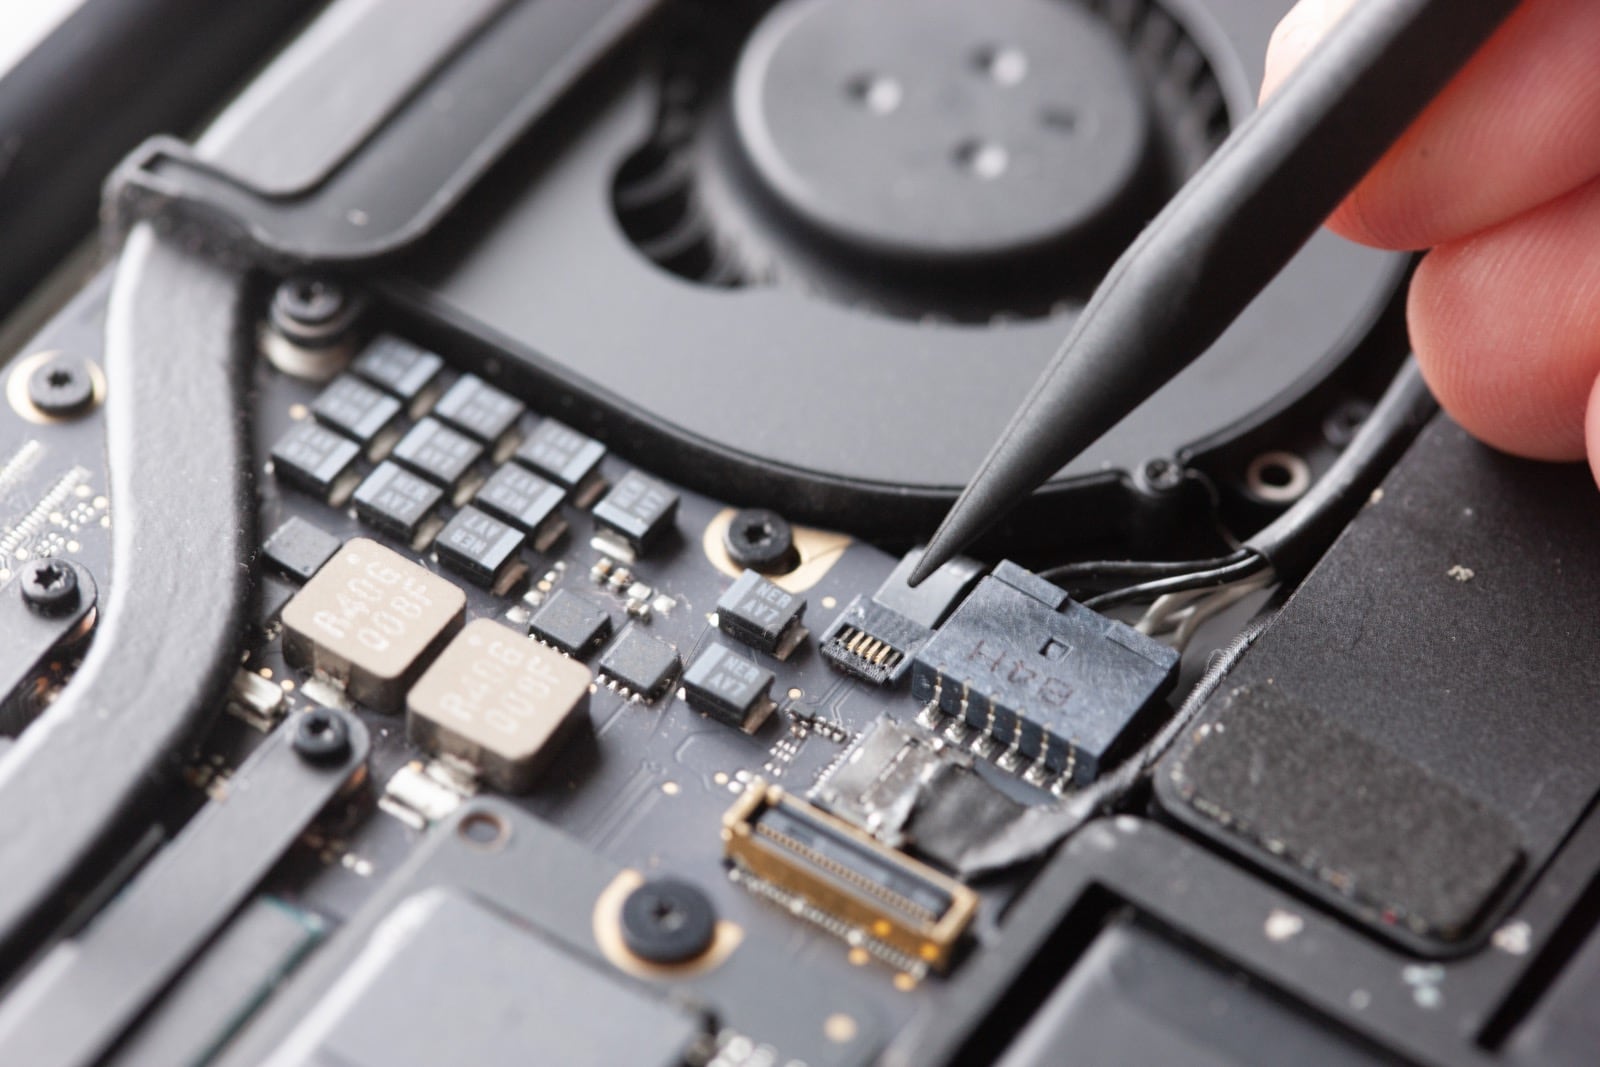
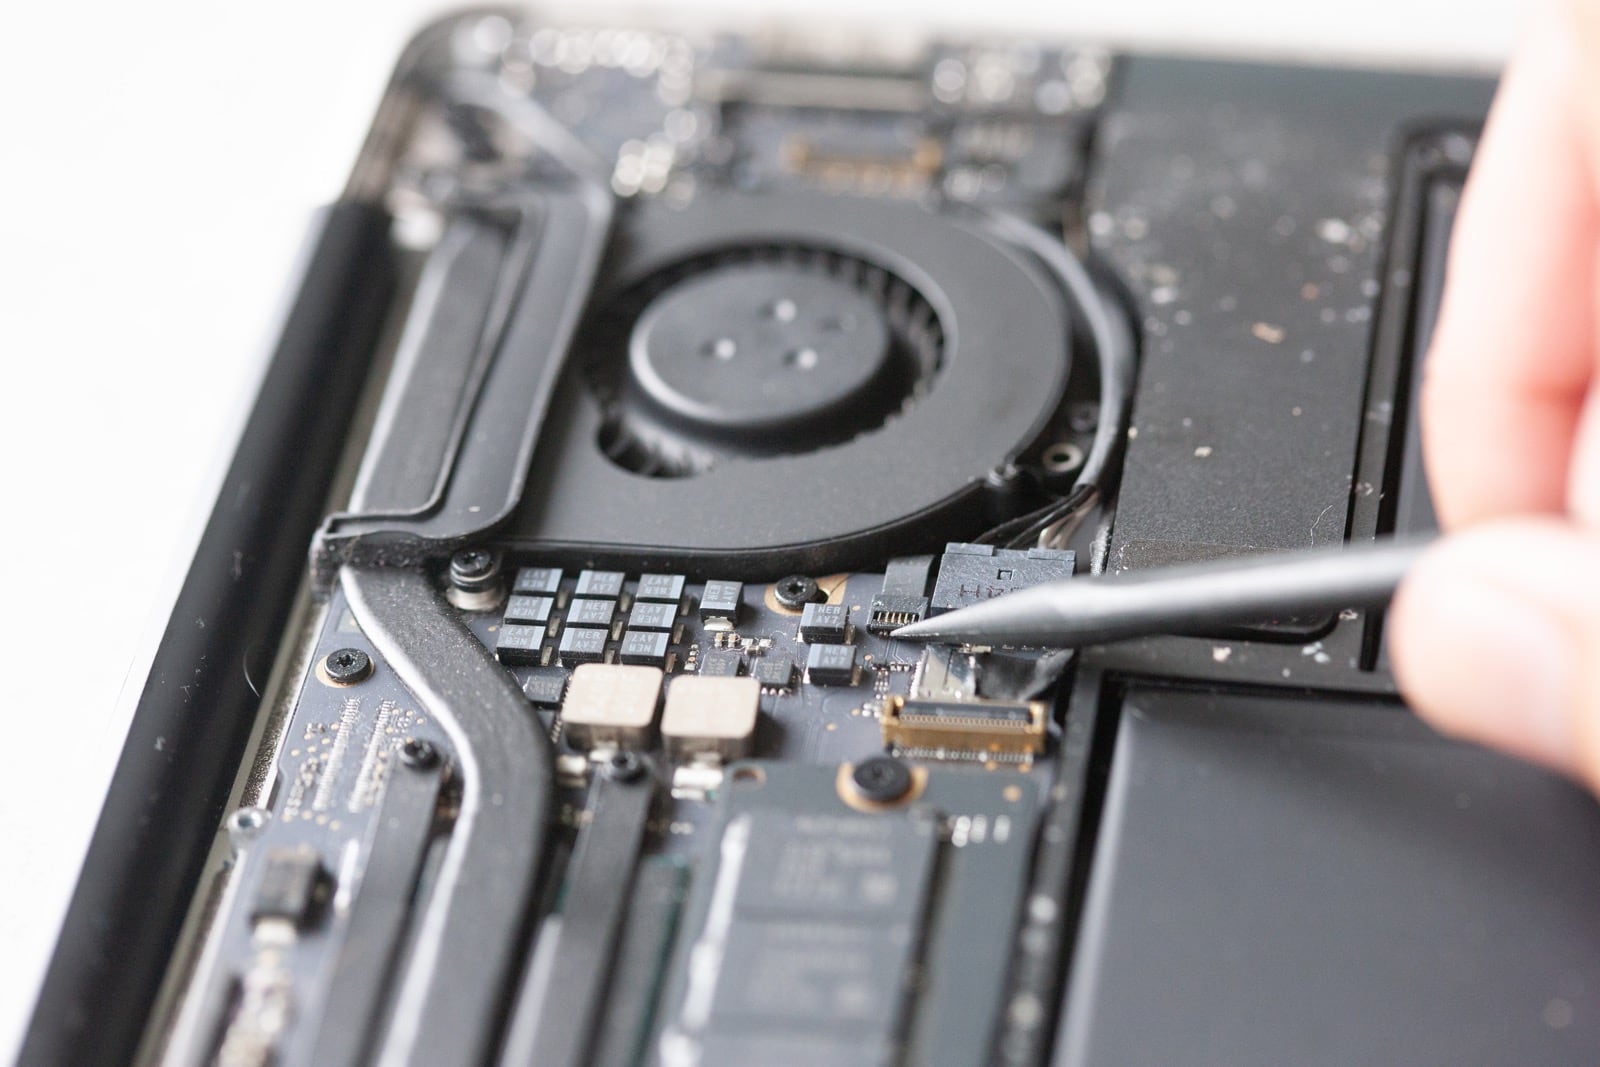
First, disconnect the fan cable. The fan is connected via a ZIF socket, so there is a little plastic flap on the connector that needs to be carefully lifted before removing the connector. The pictures show how to lift the plastic flap using the pointy end of the spudger.
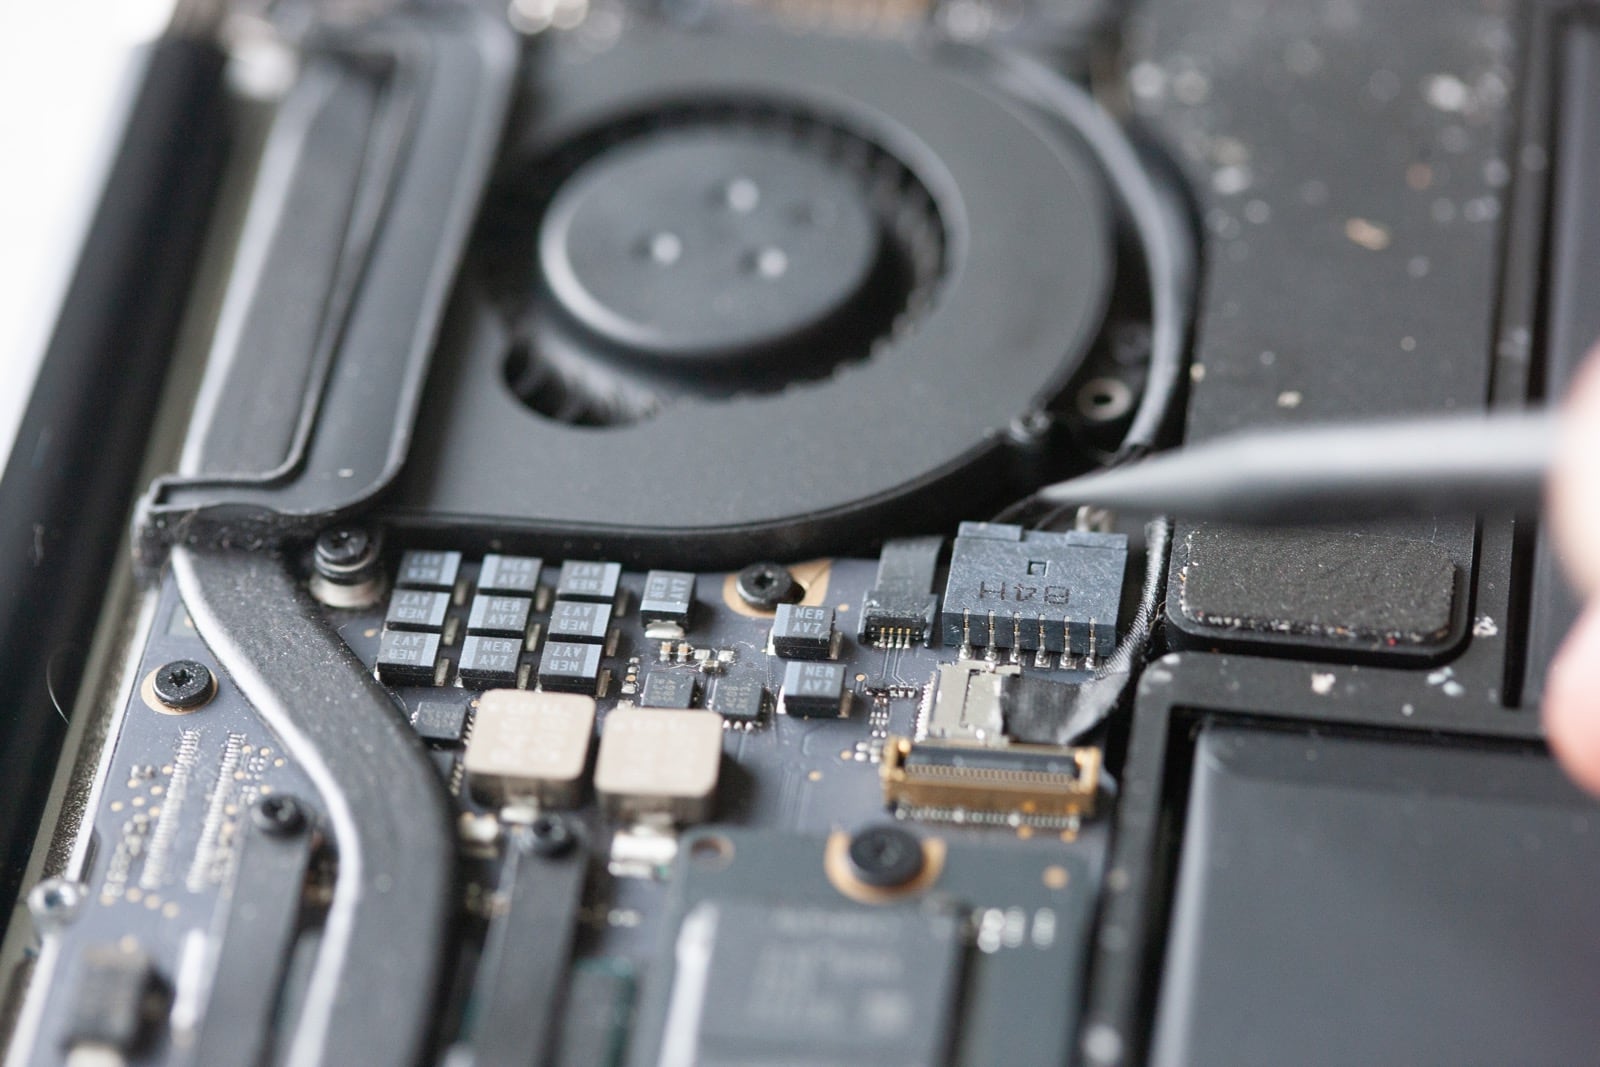
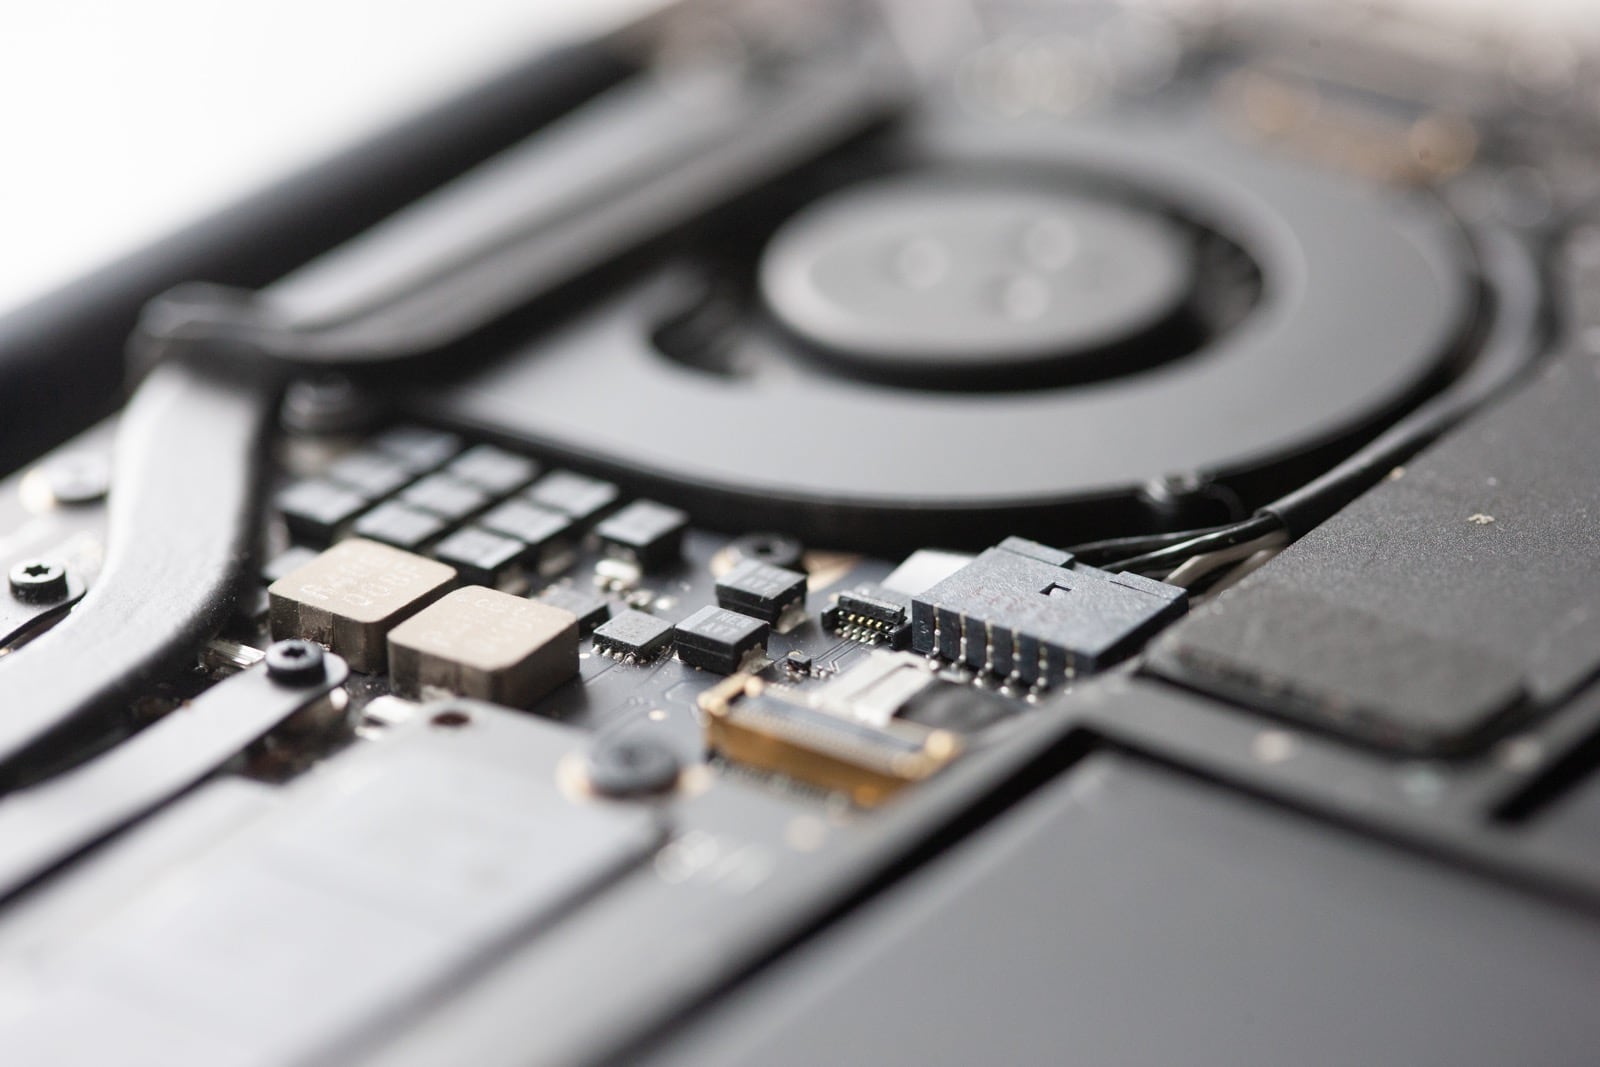
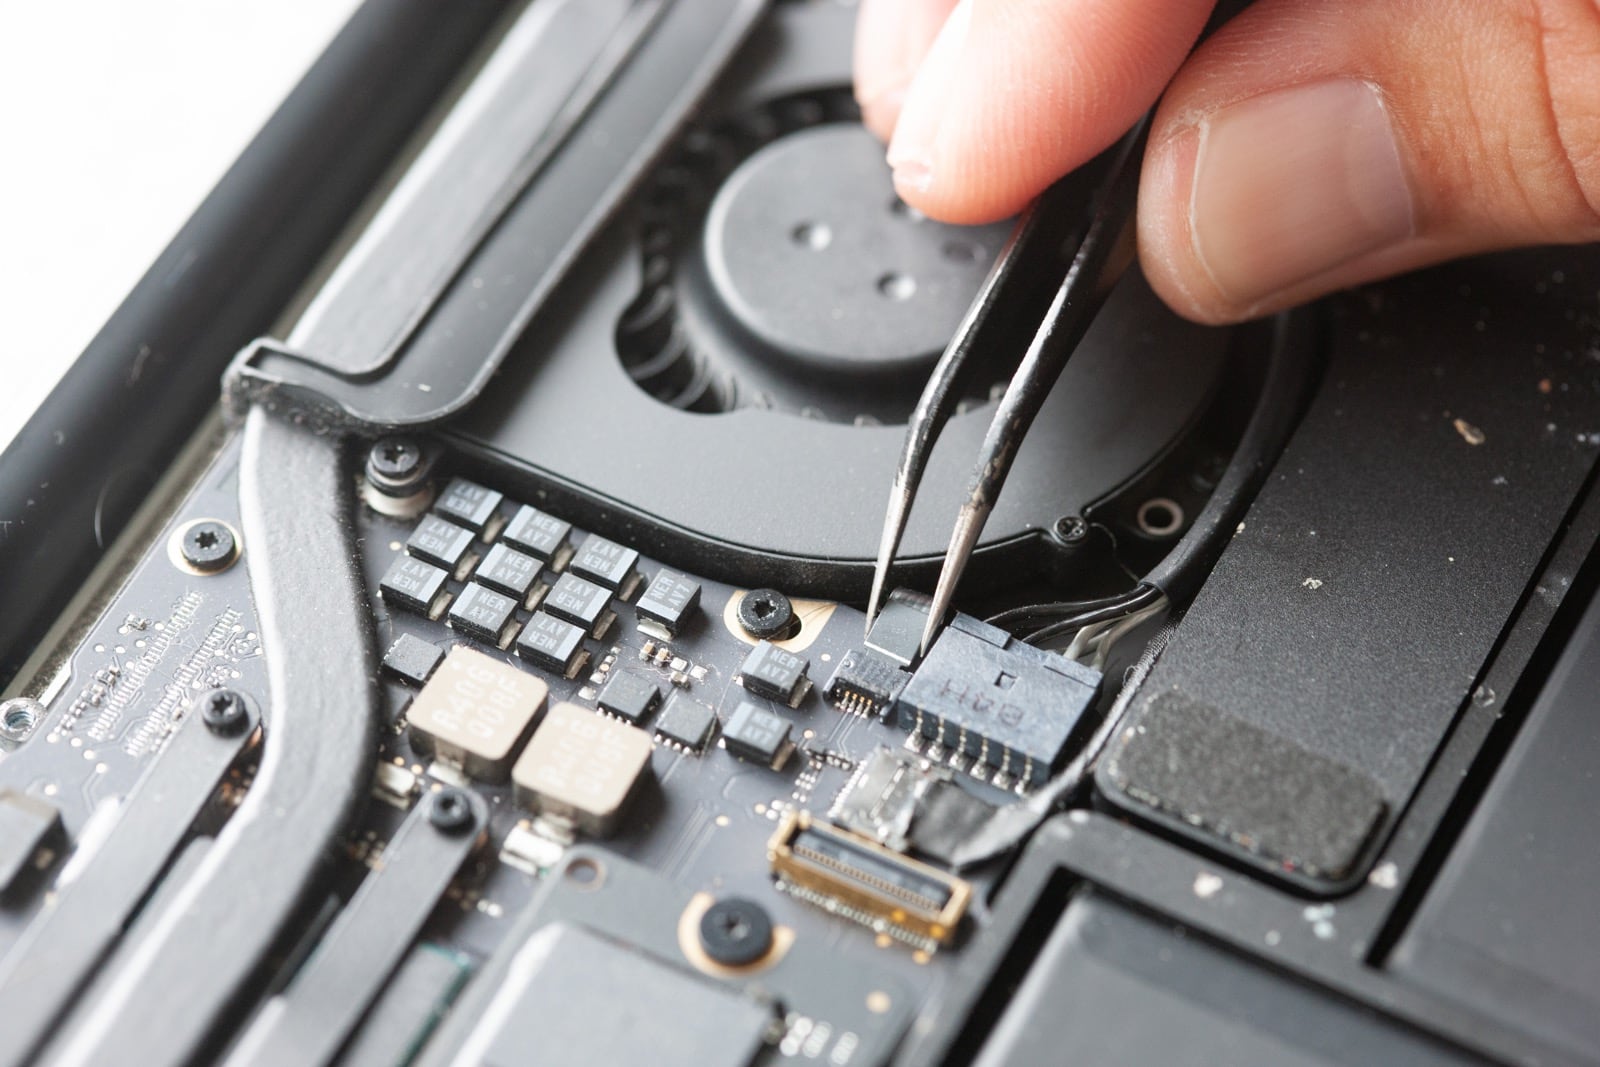
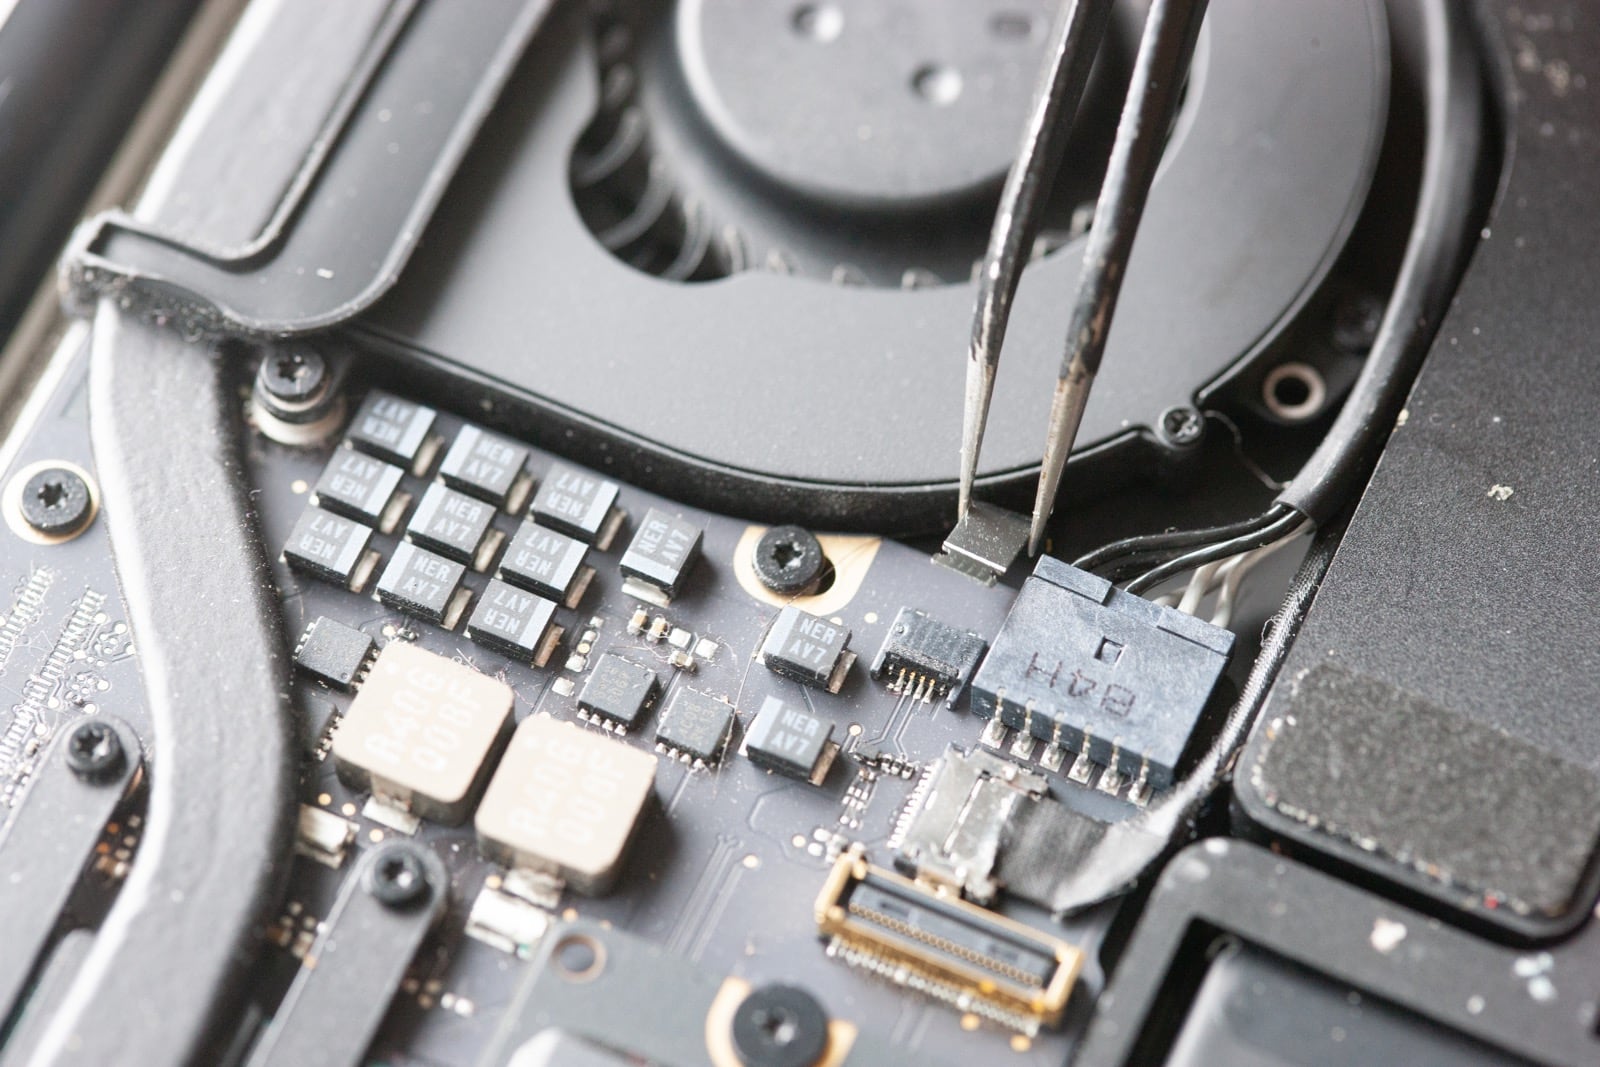
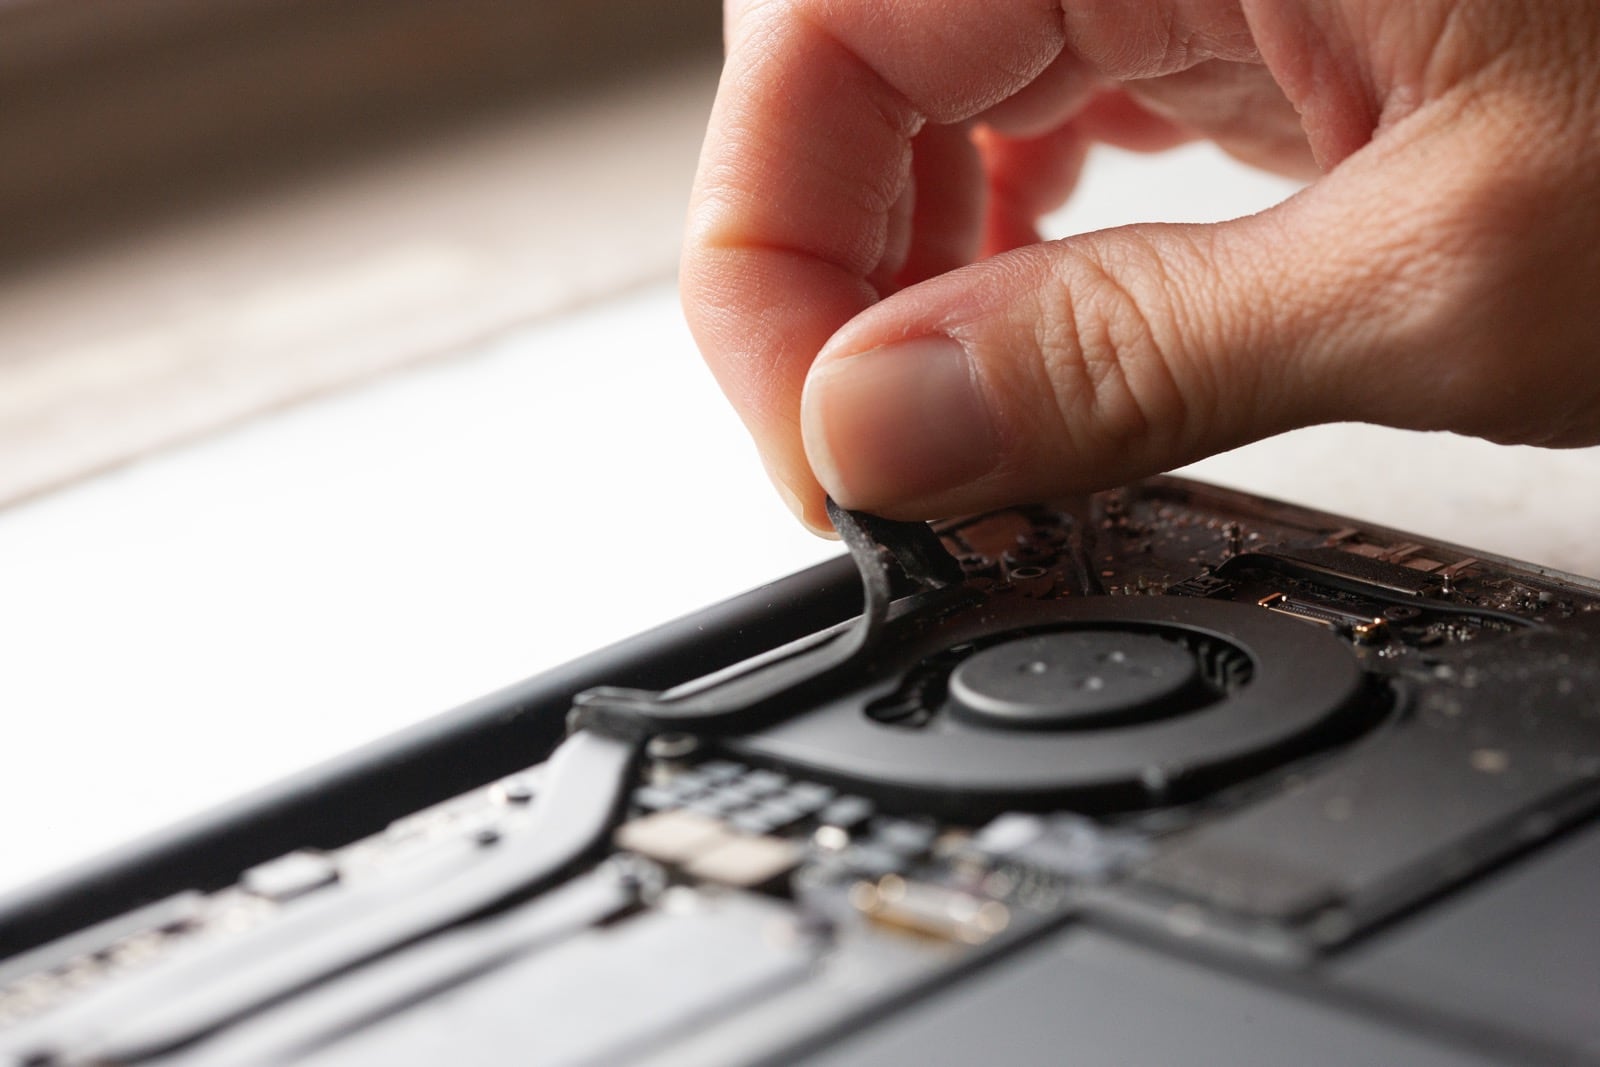
Remove the three screws holding the fan down. Place the screws in the same configuration on your desk so you can remember which one goes where. I have a picture below of the different sizes to help you in case you get them mixed up.
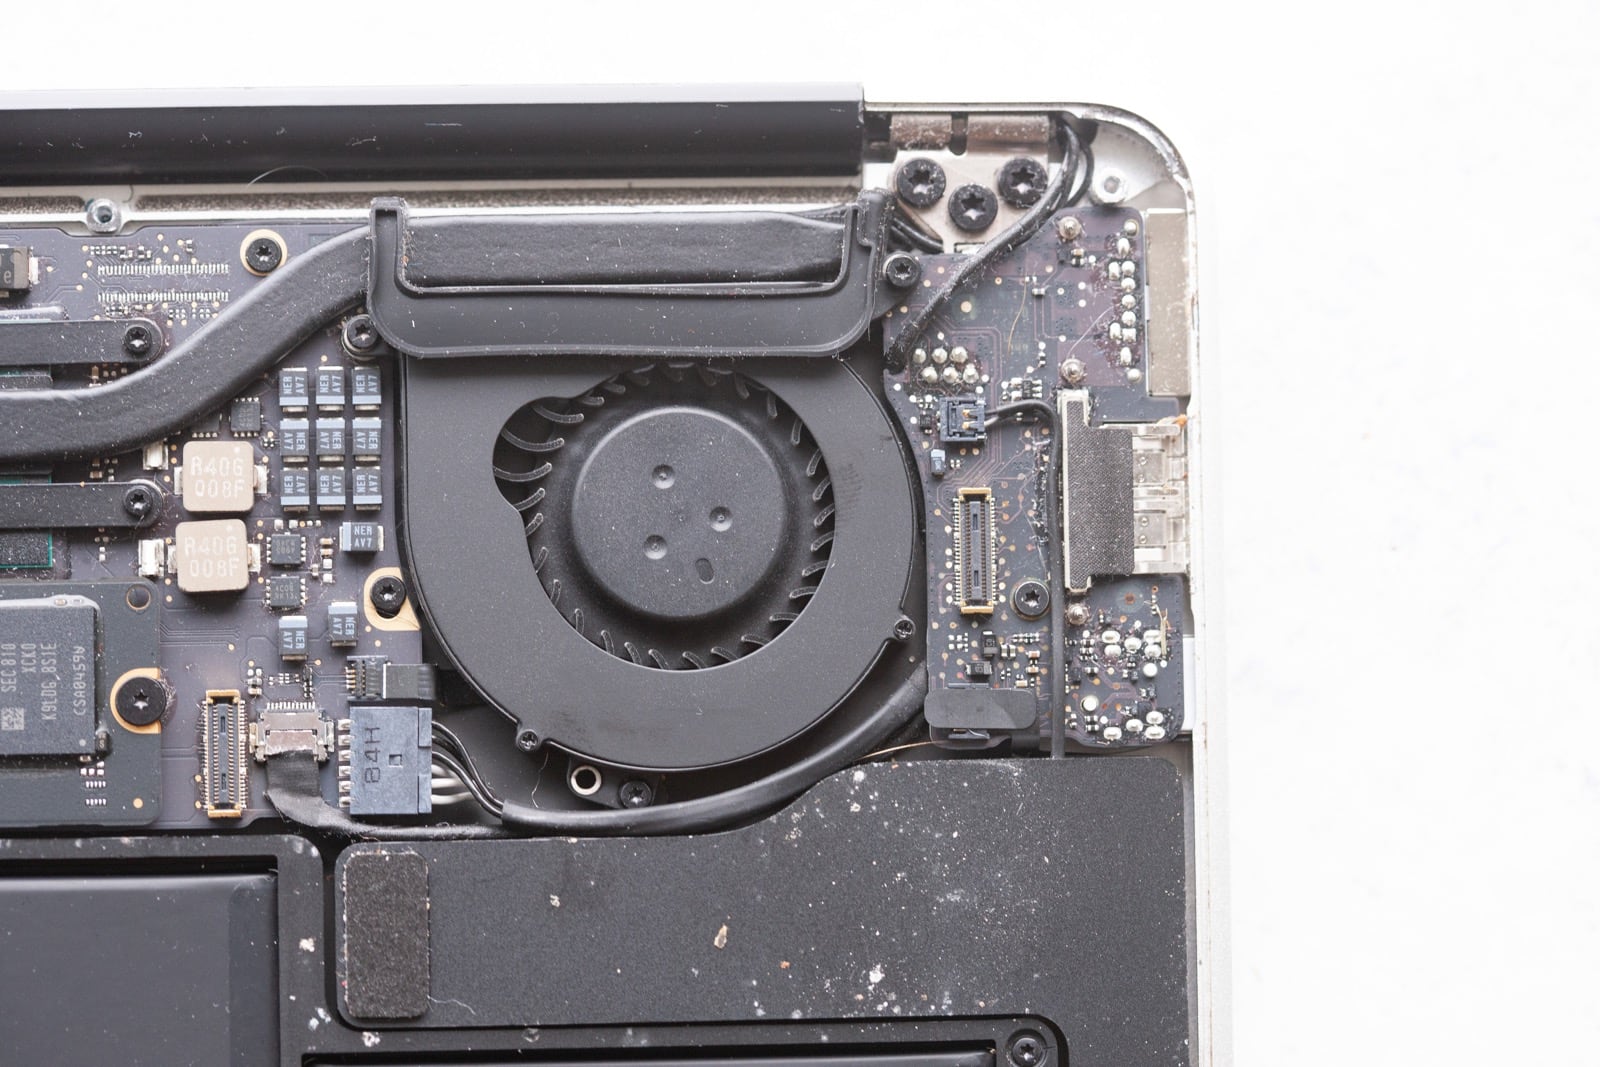
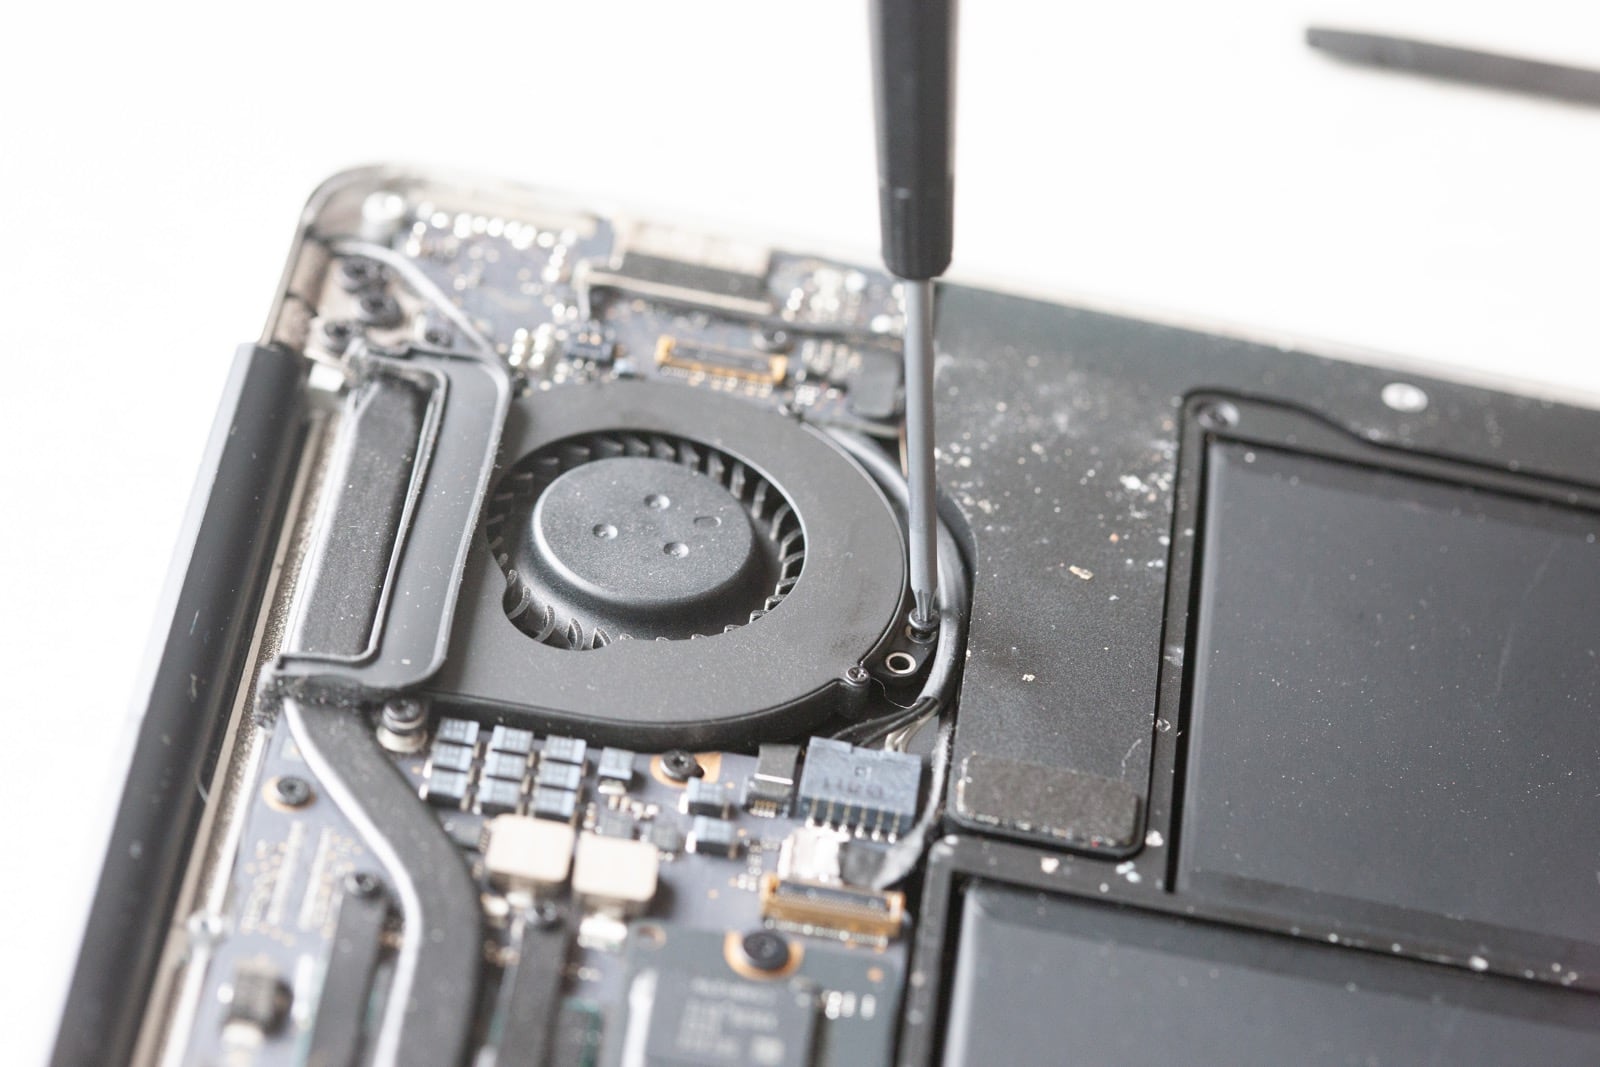
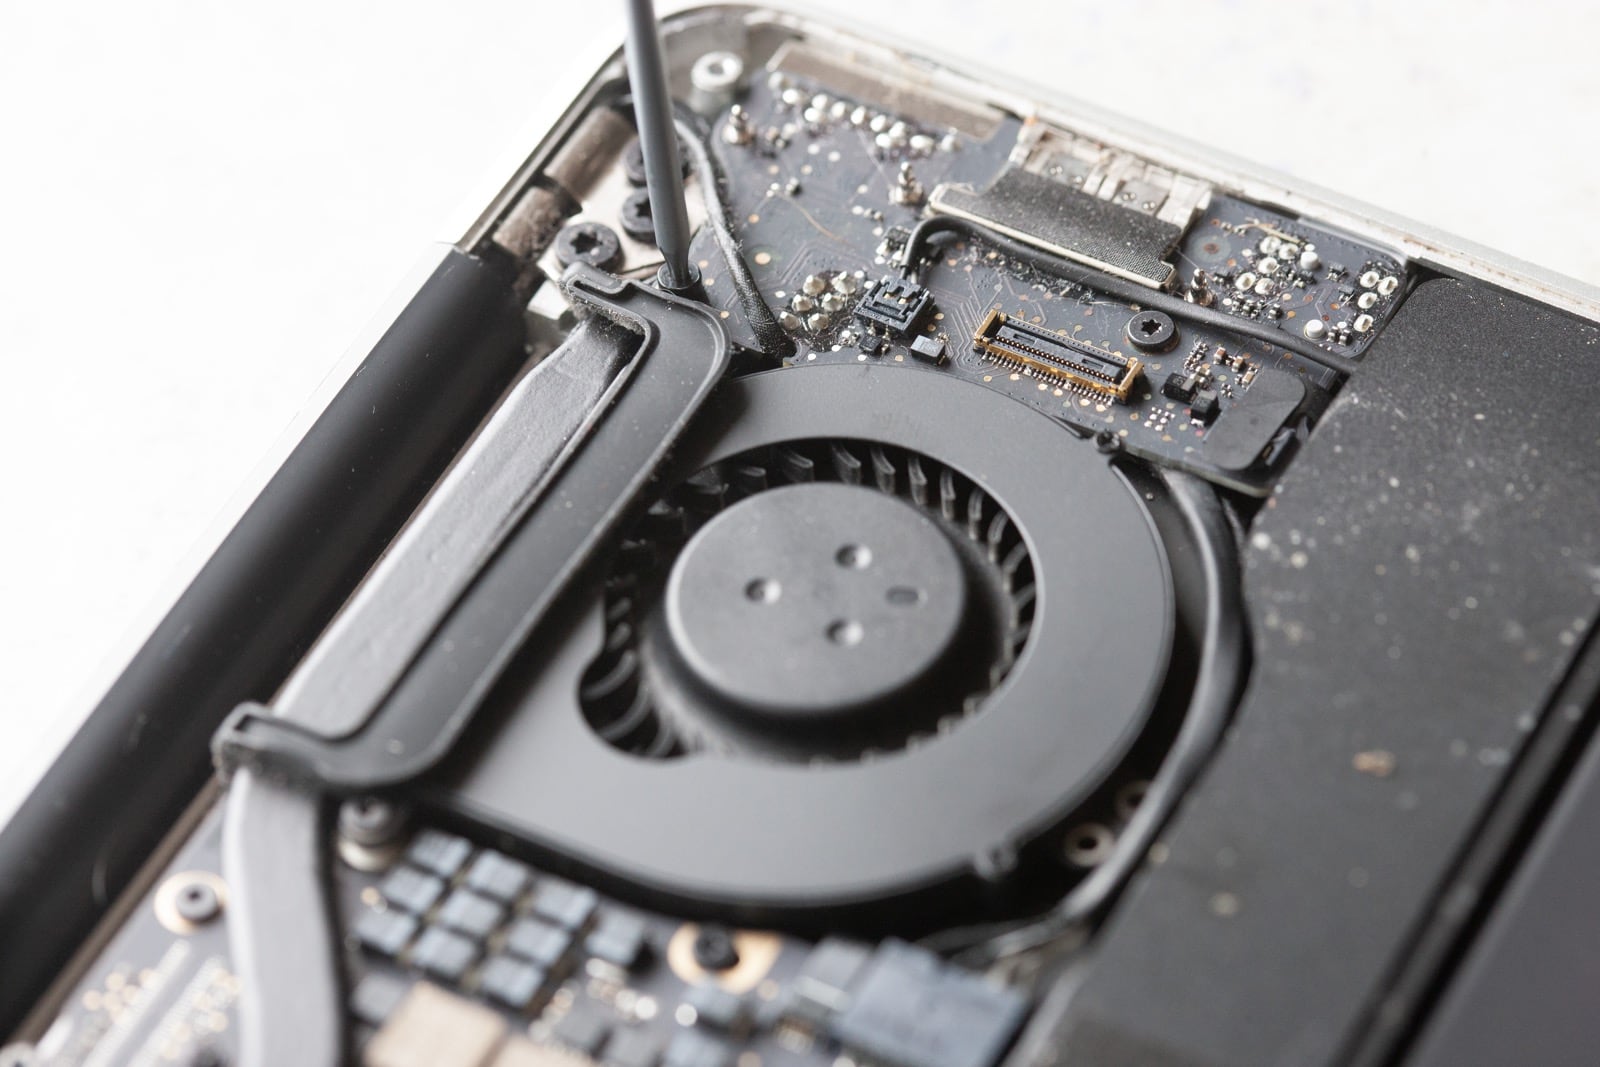
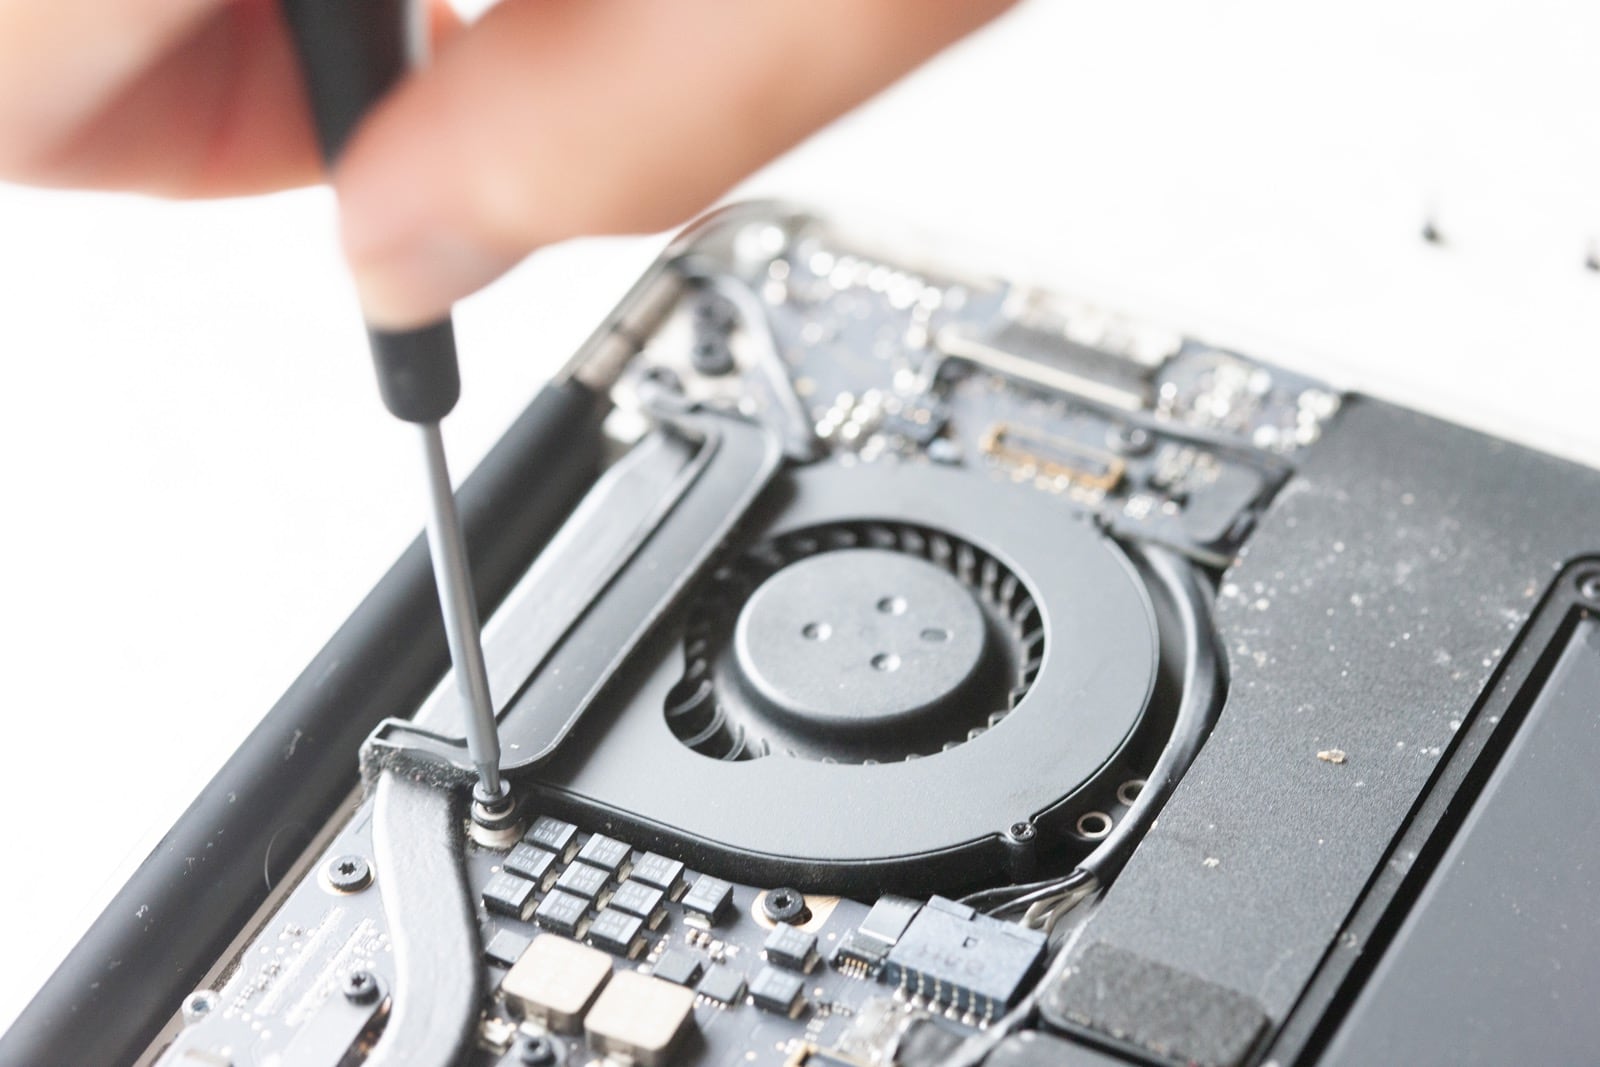
Finally, lift the rubber gasket off the fan so you can lift the fan out. The rubber gasket is held in place by double-sided sticky tape, so lift it slowly to remove it without having it tear.
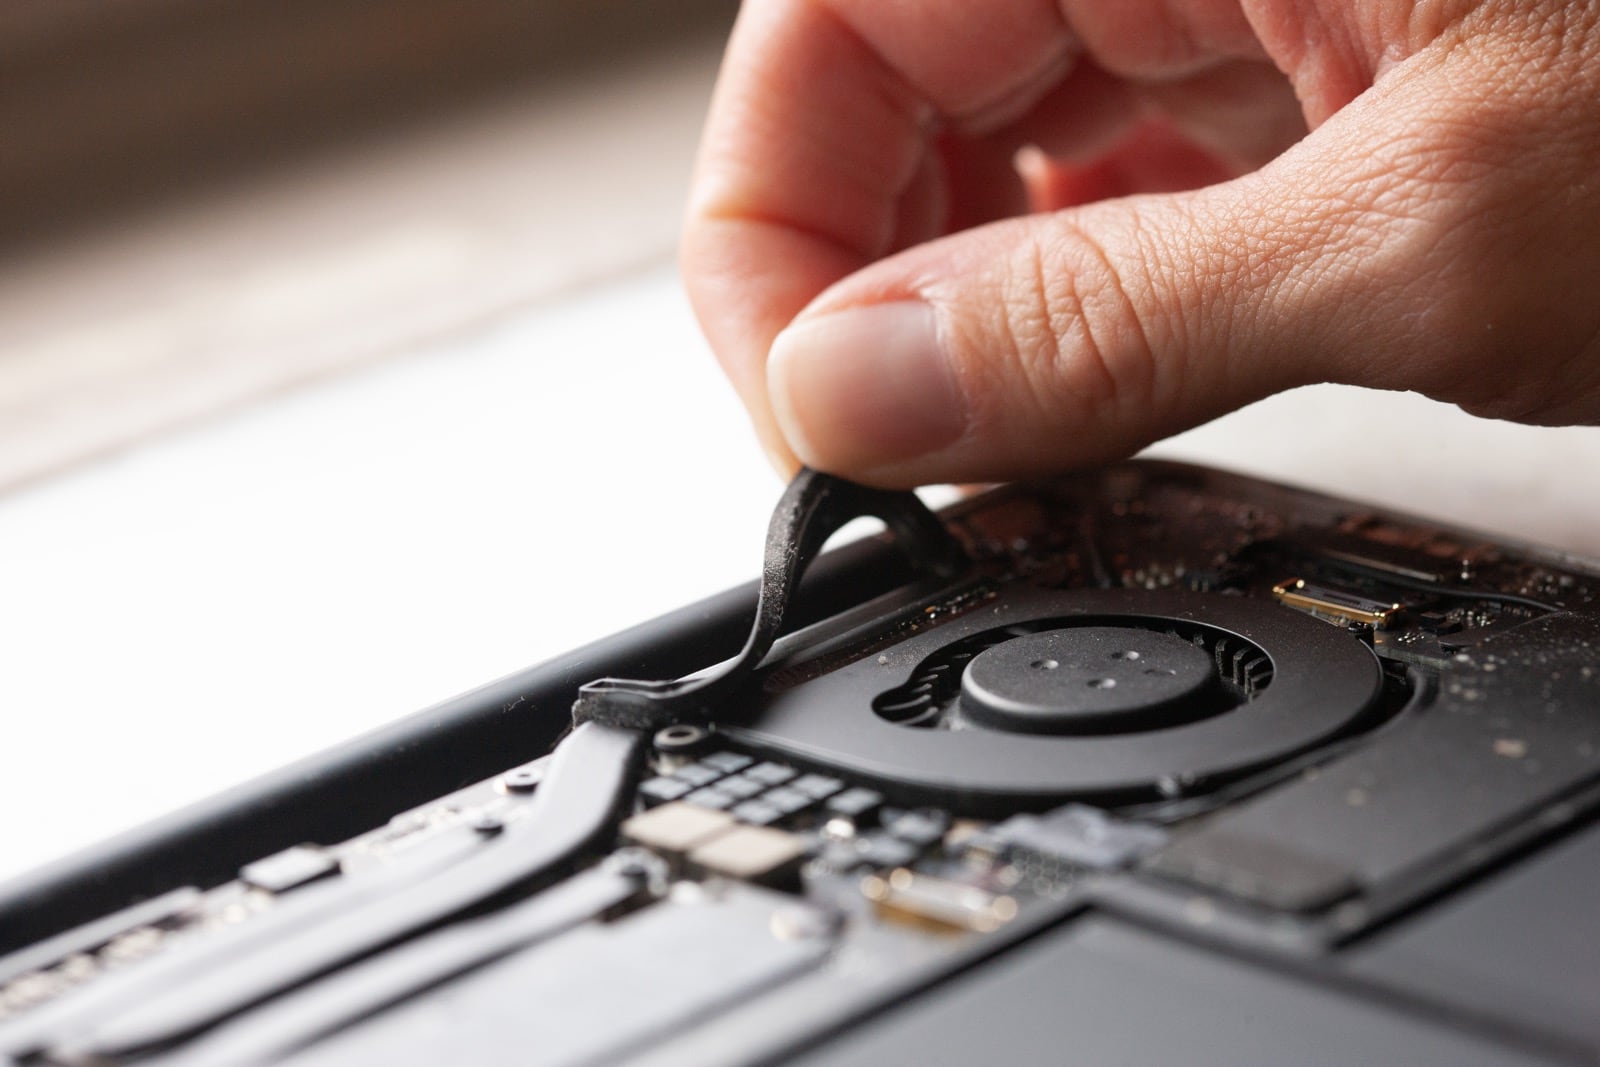
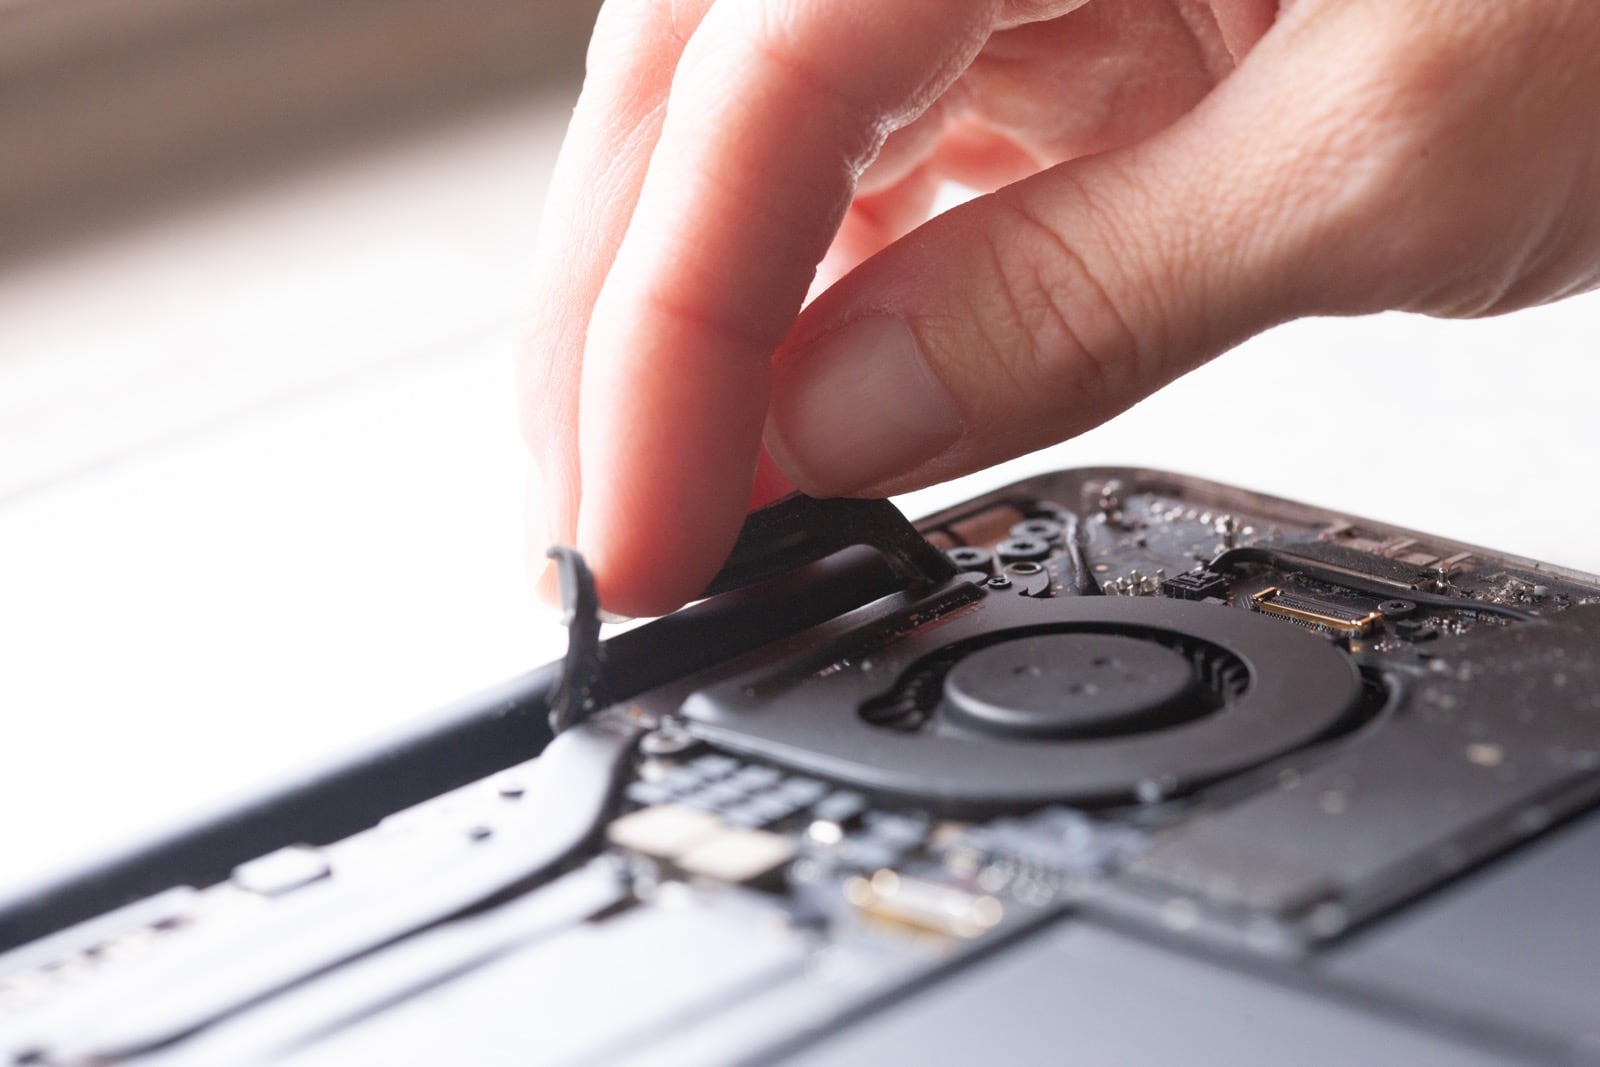
Now you can lift the fan out and you are ready to move on.
Step 9 – Remove the IO board.
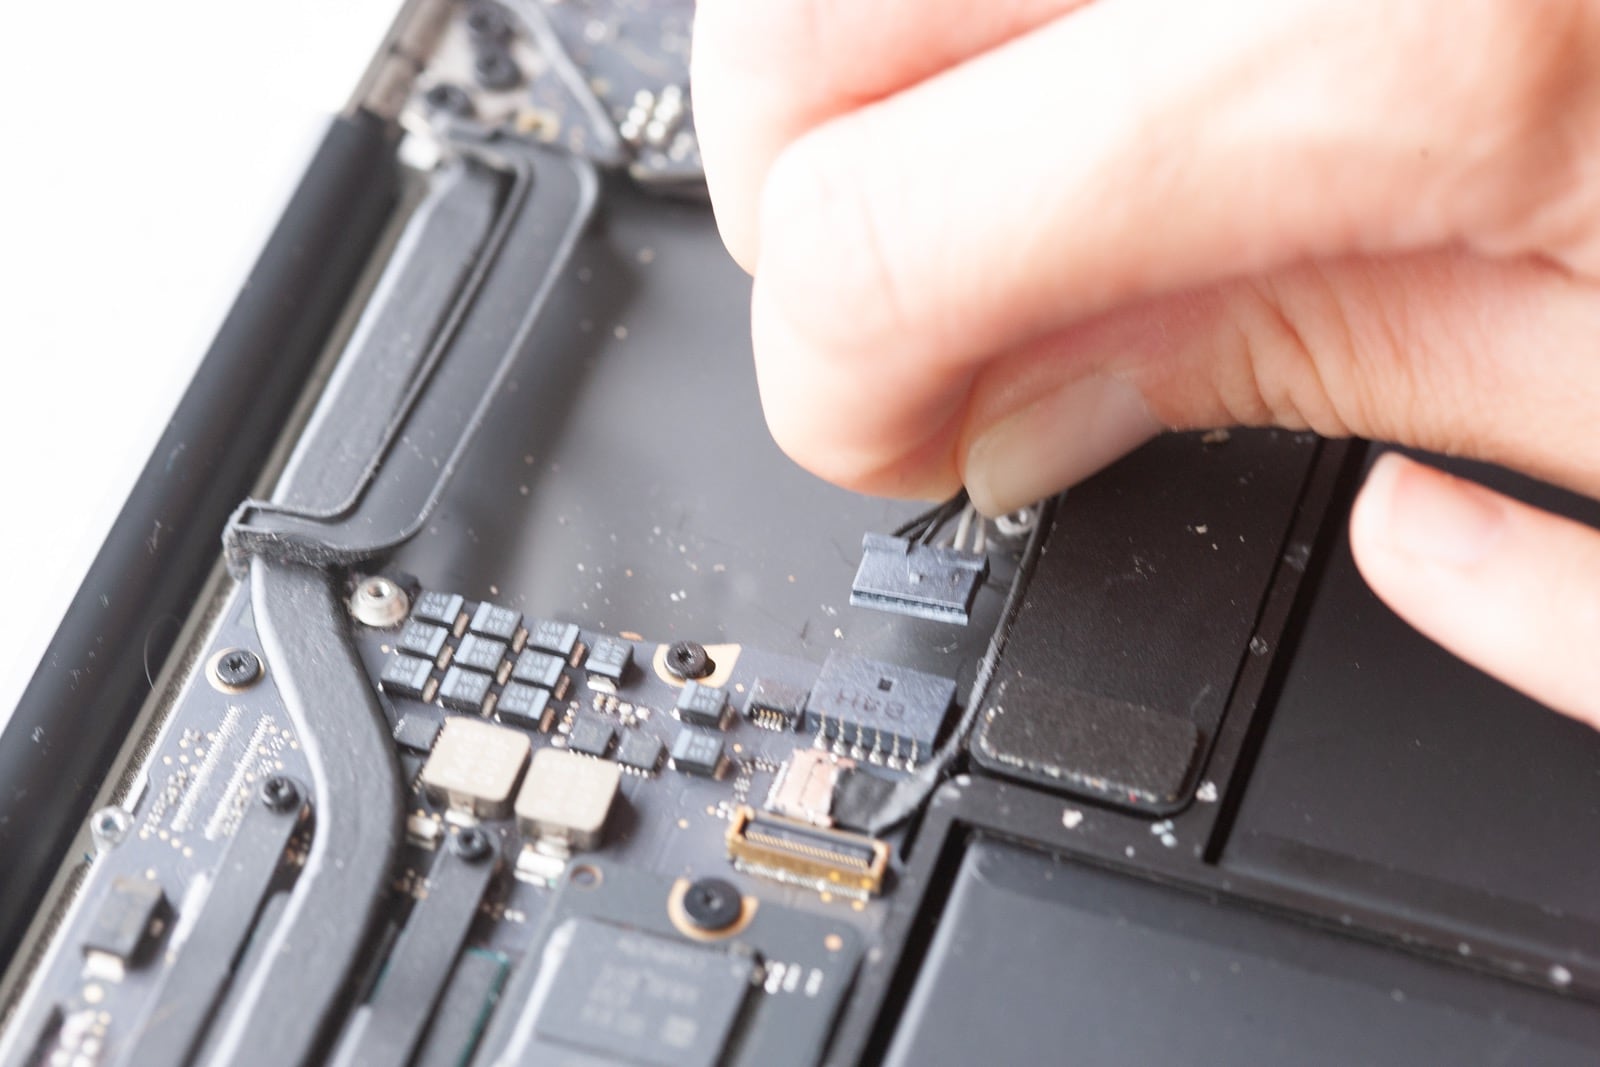
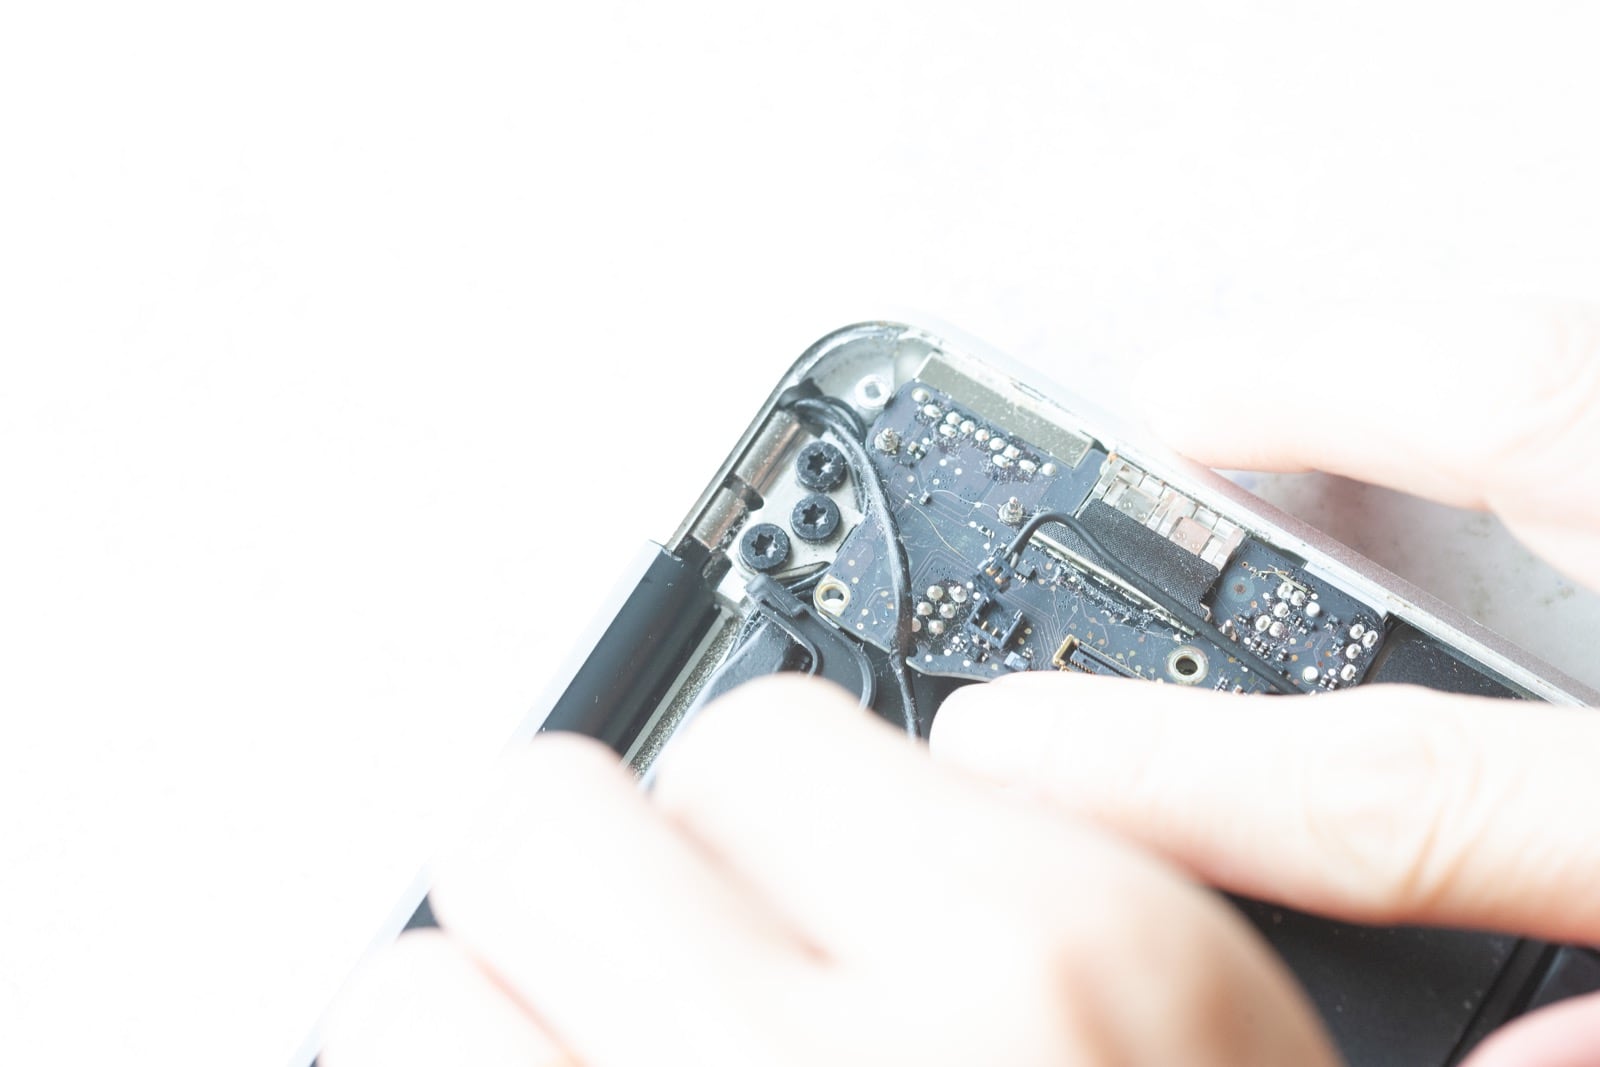
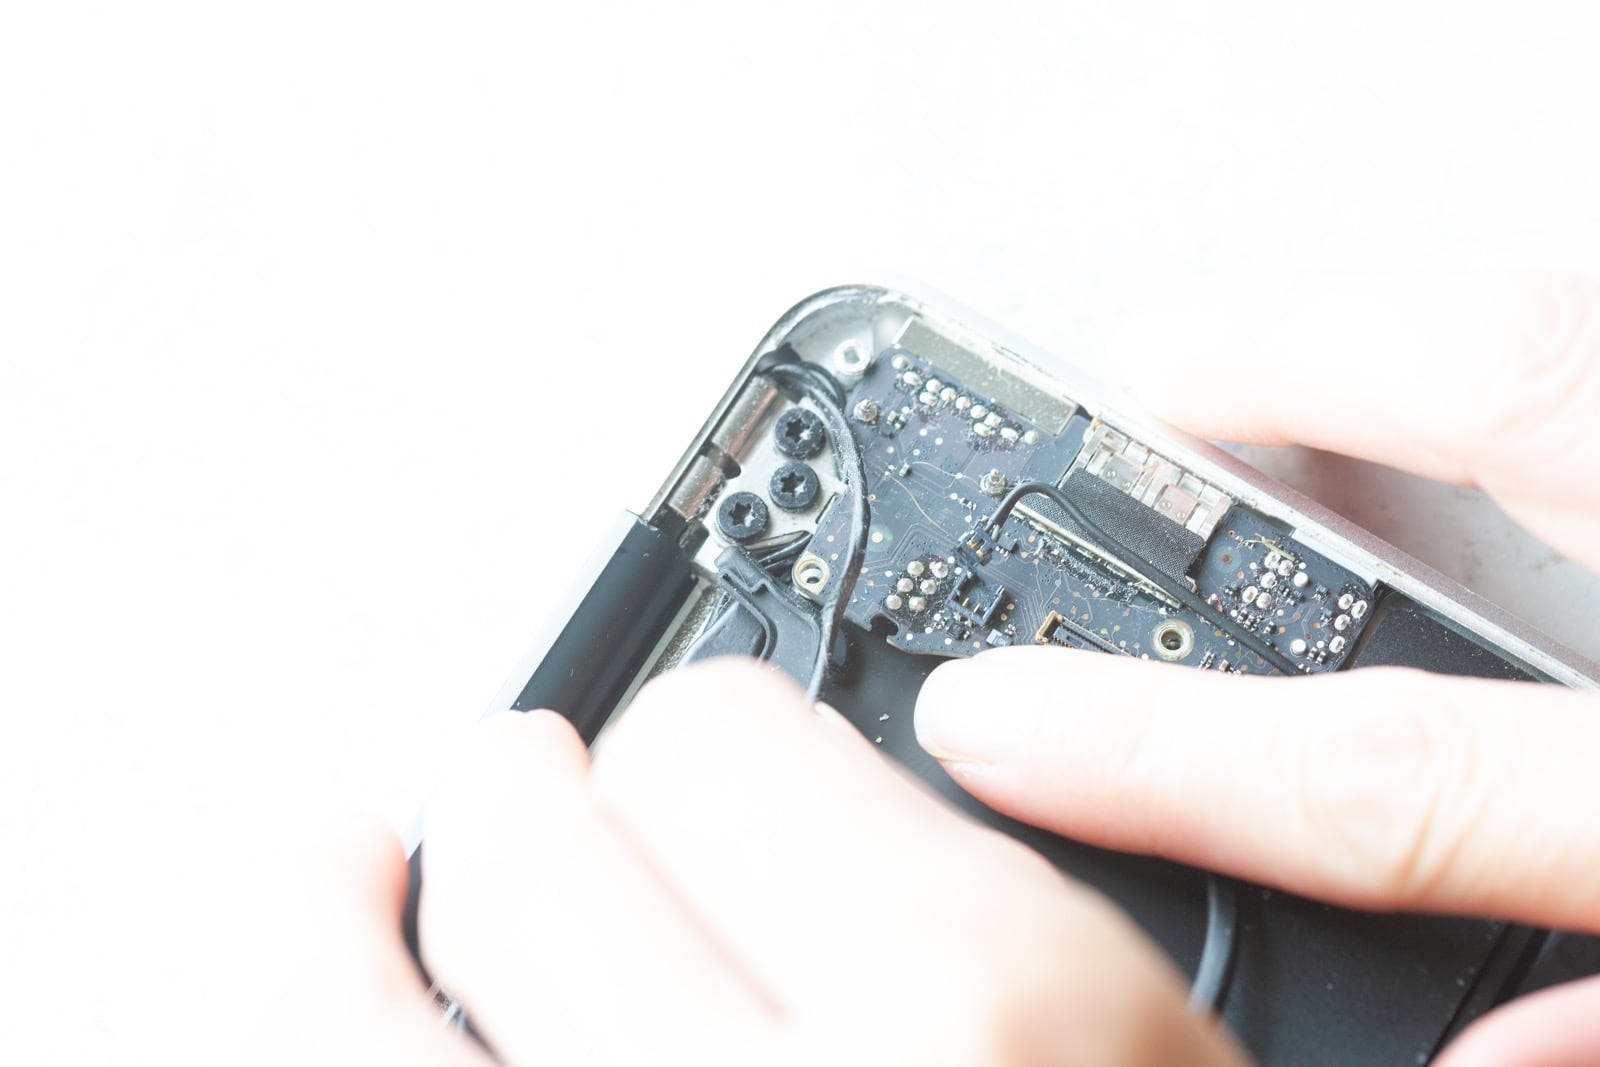
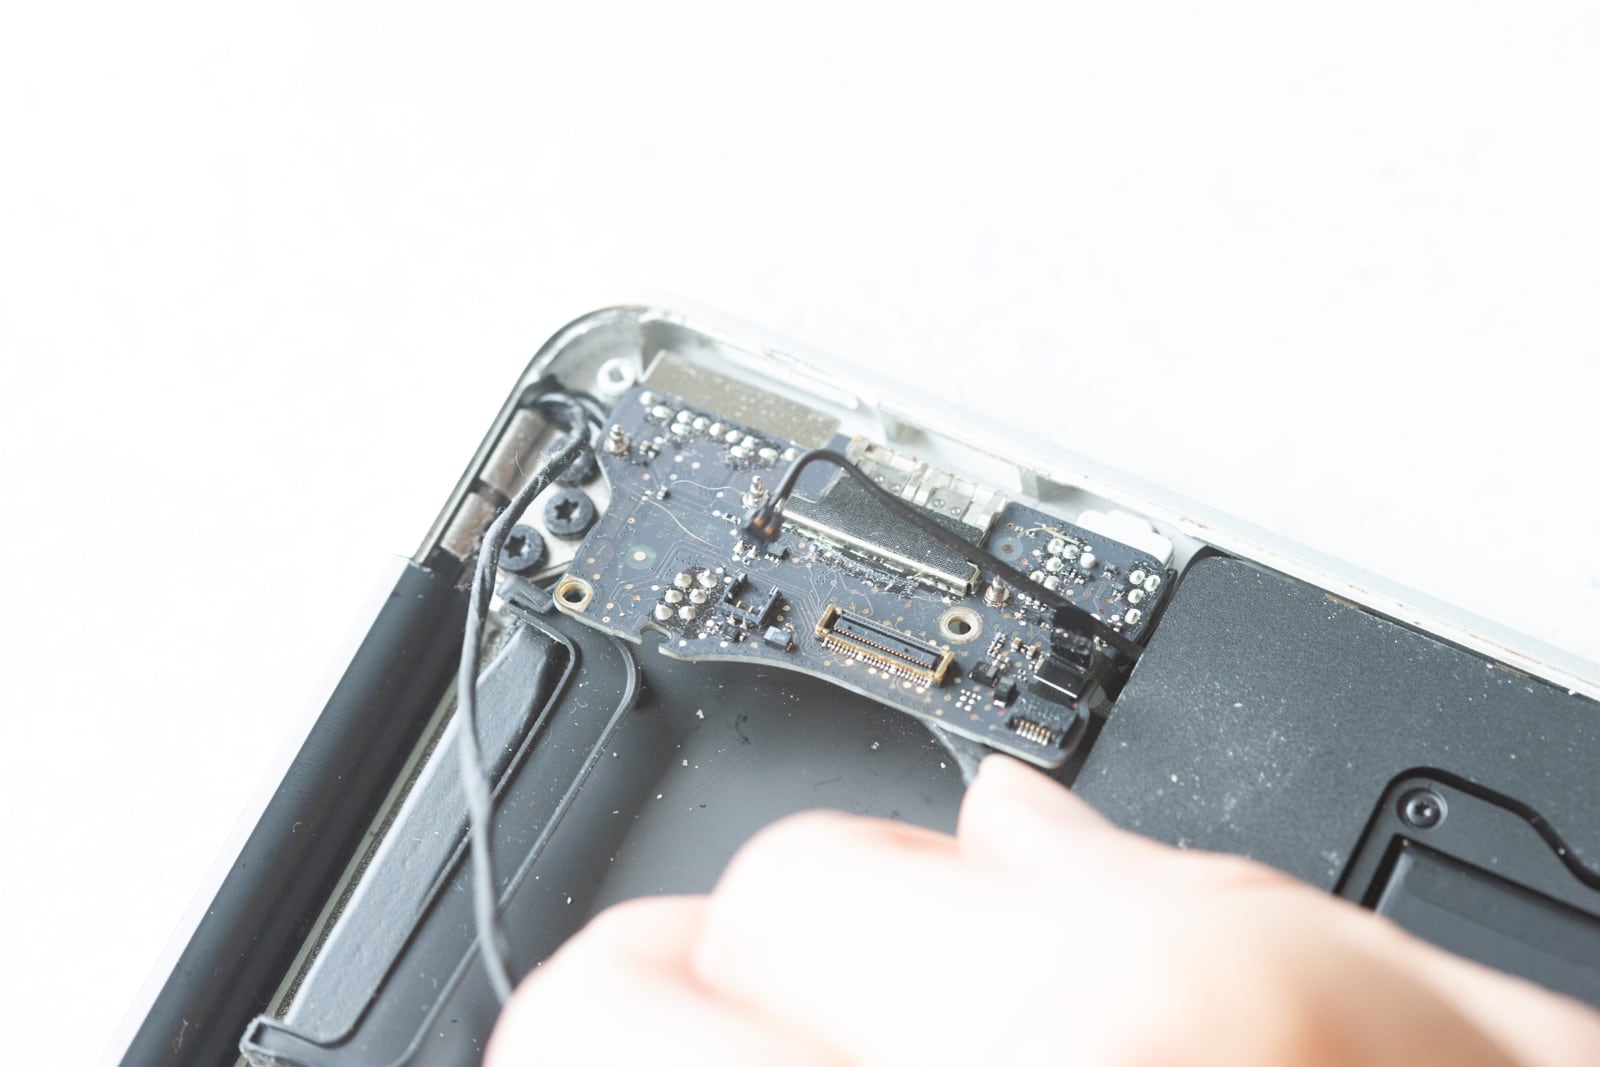
First, remove the cables connected to the IO board. Start with the speaker cable which gets lifted directly up from the connector as shown in the picture.
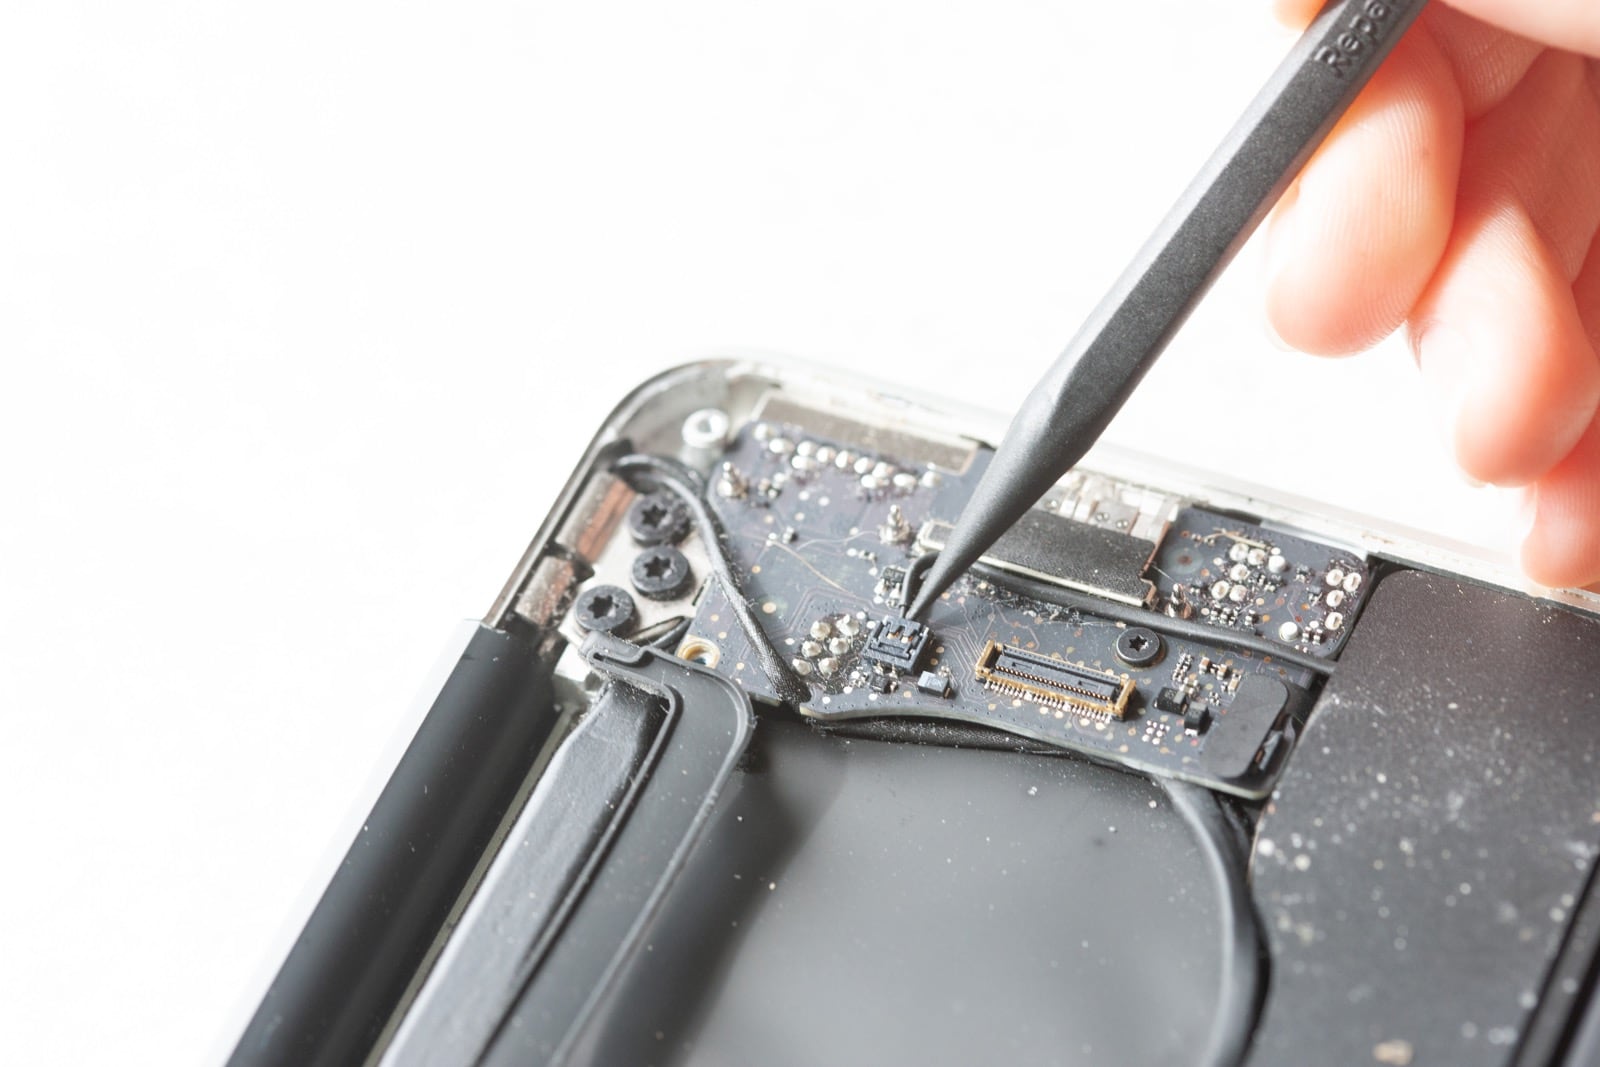
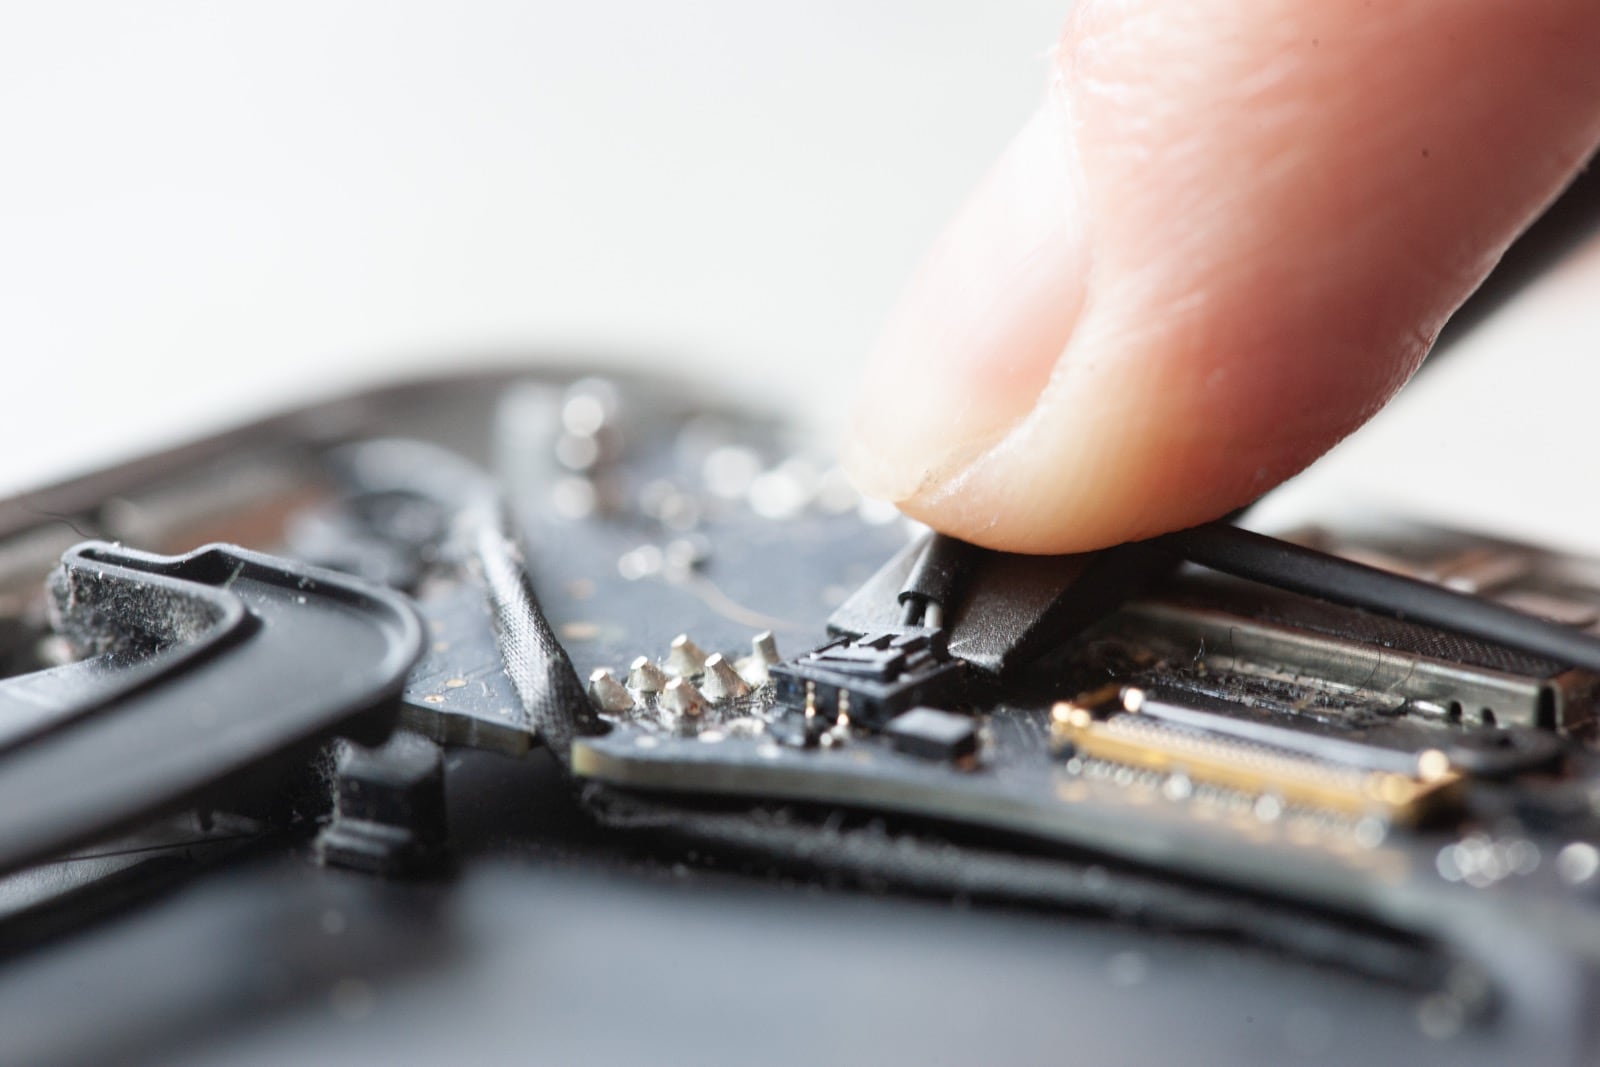
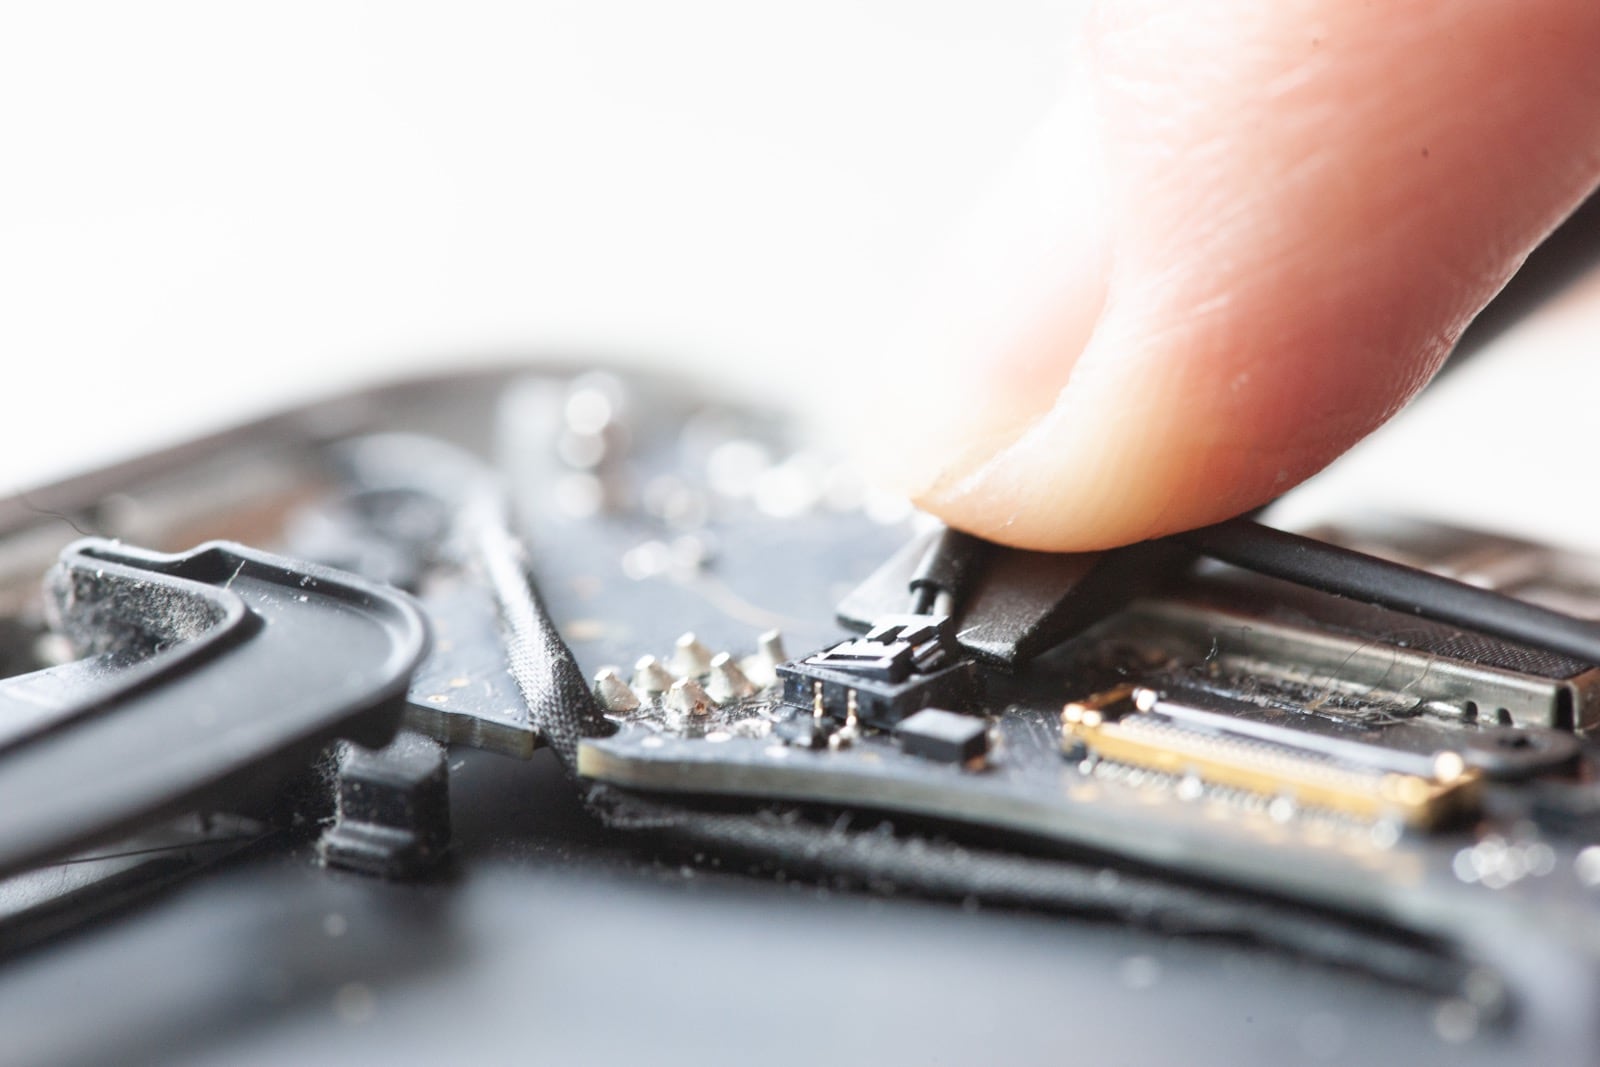
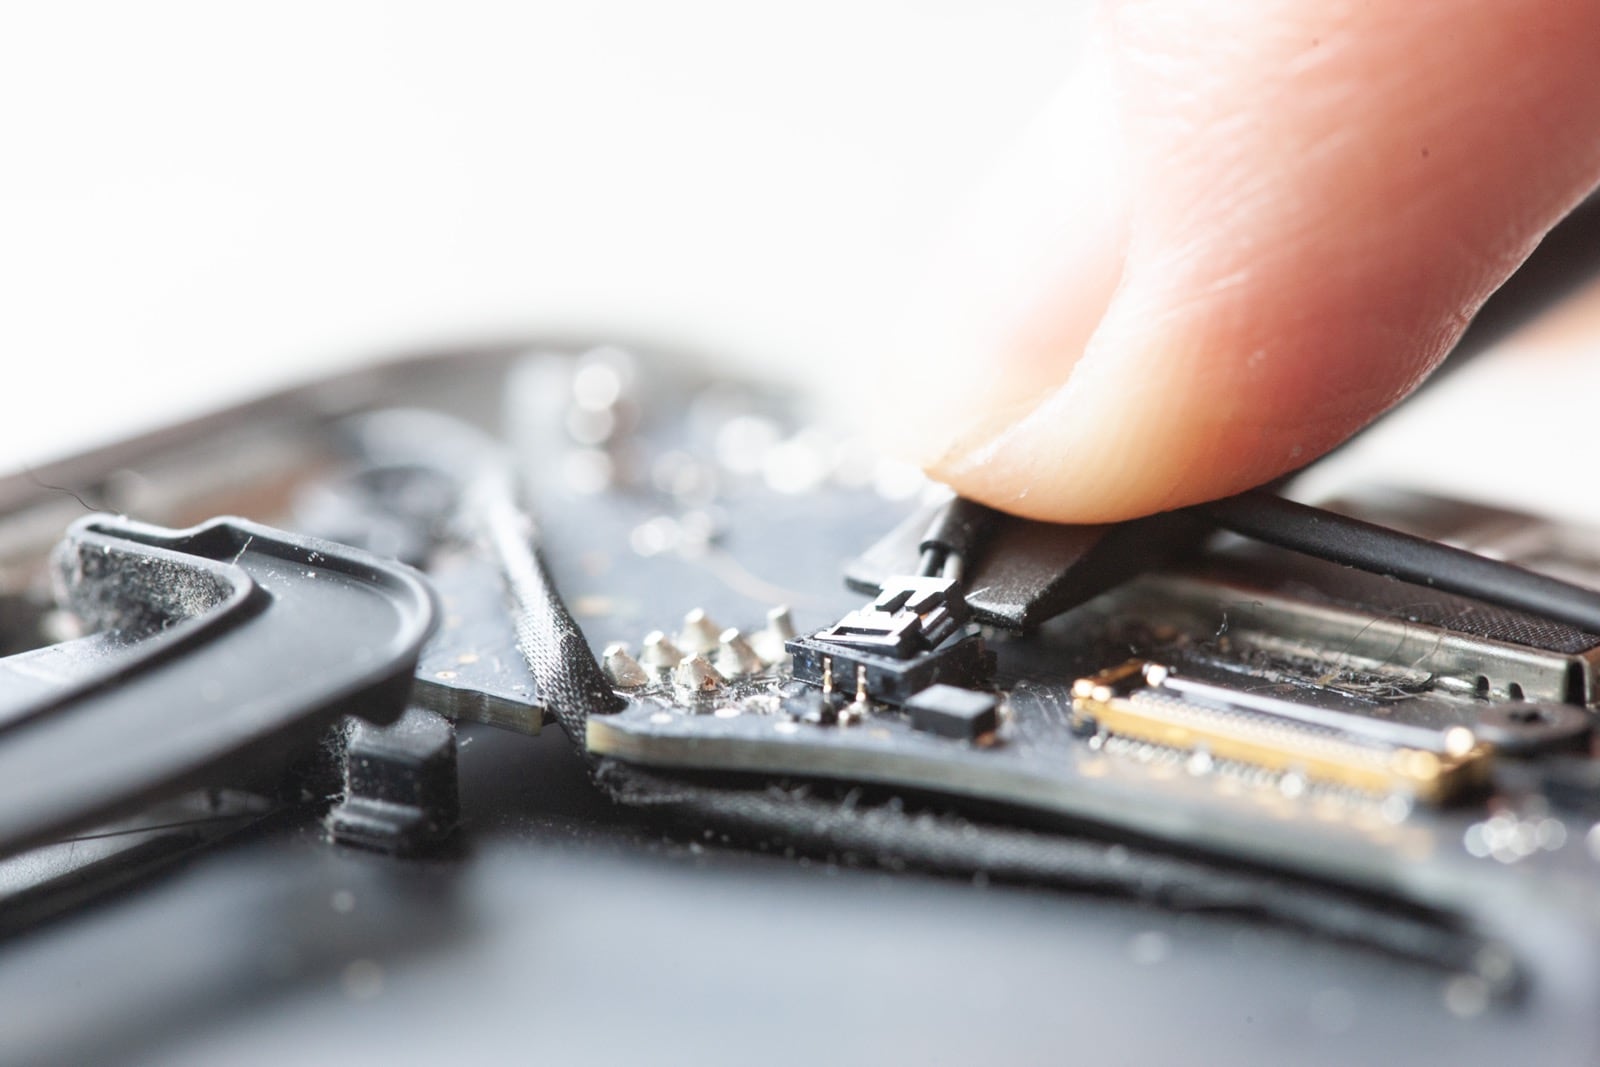
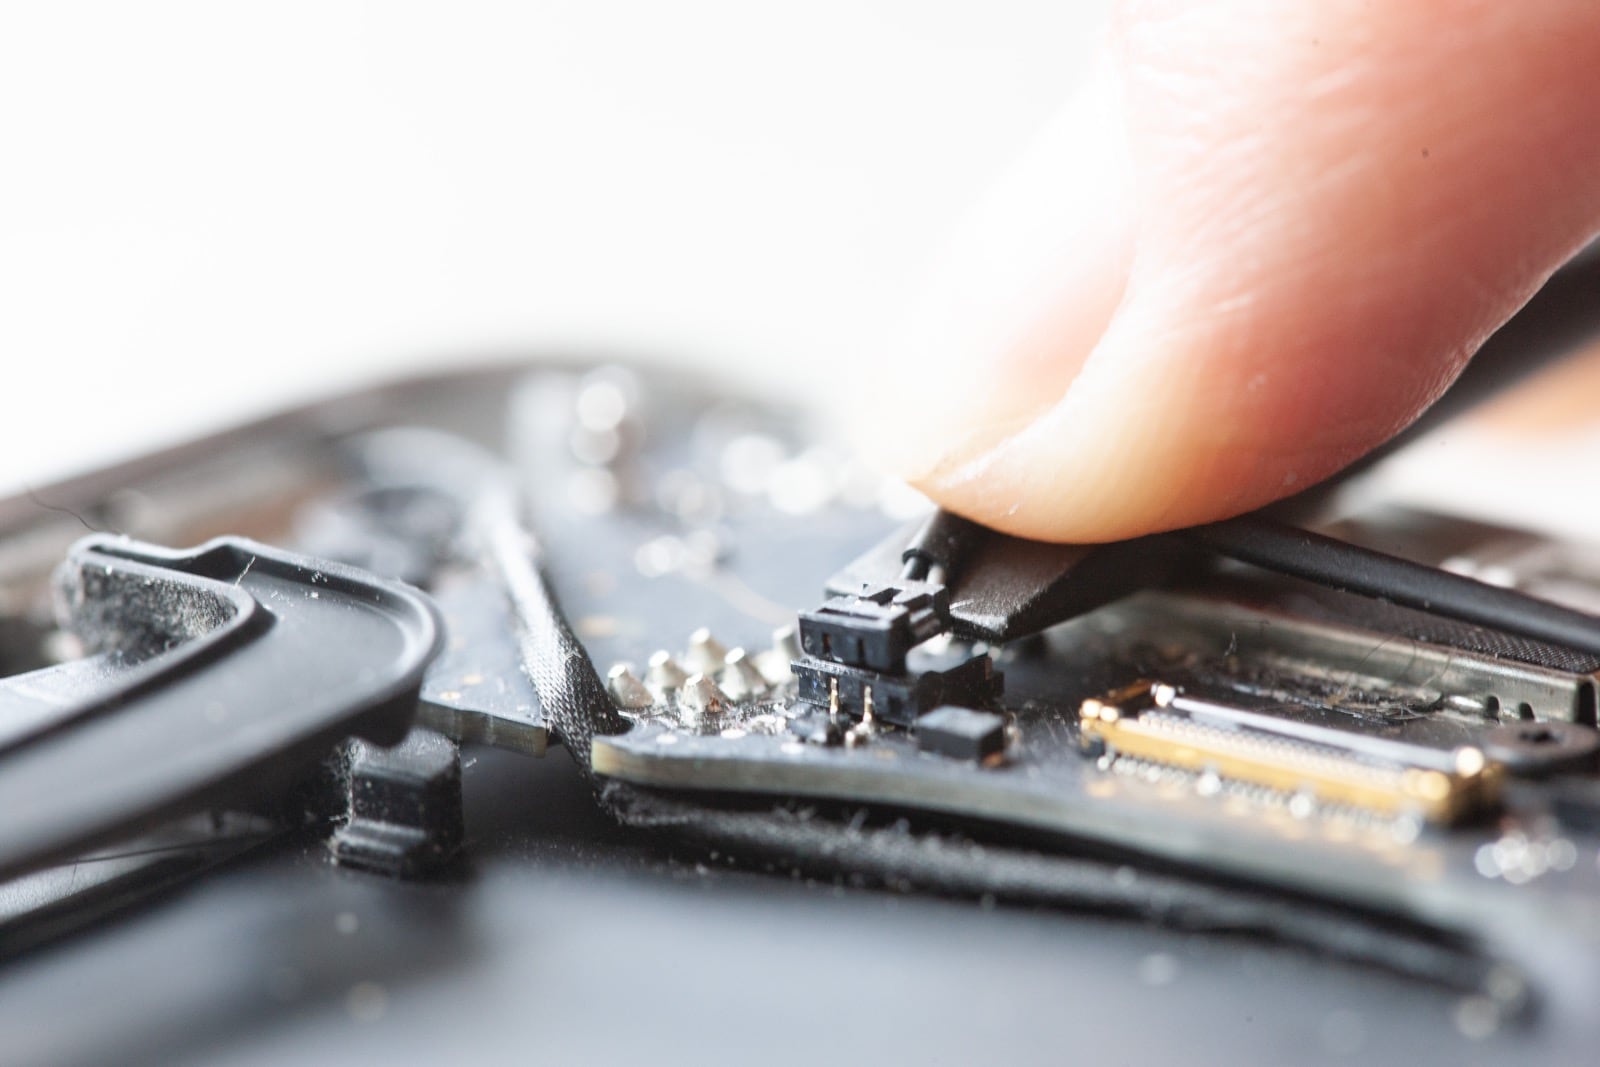
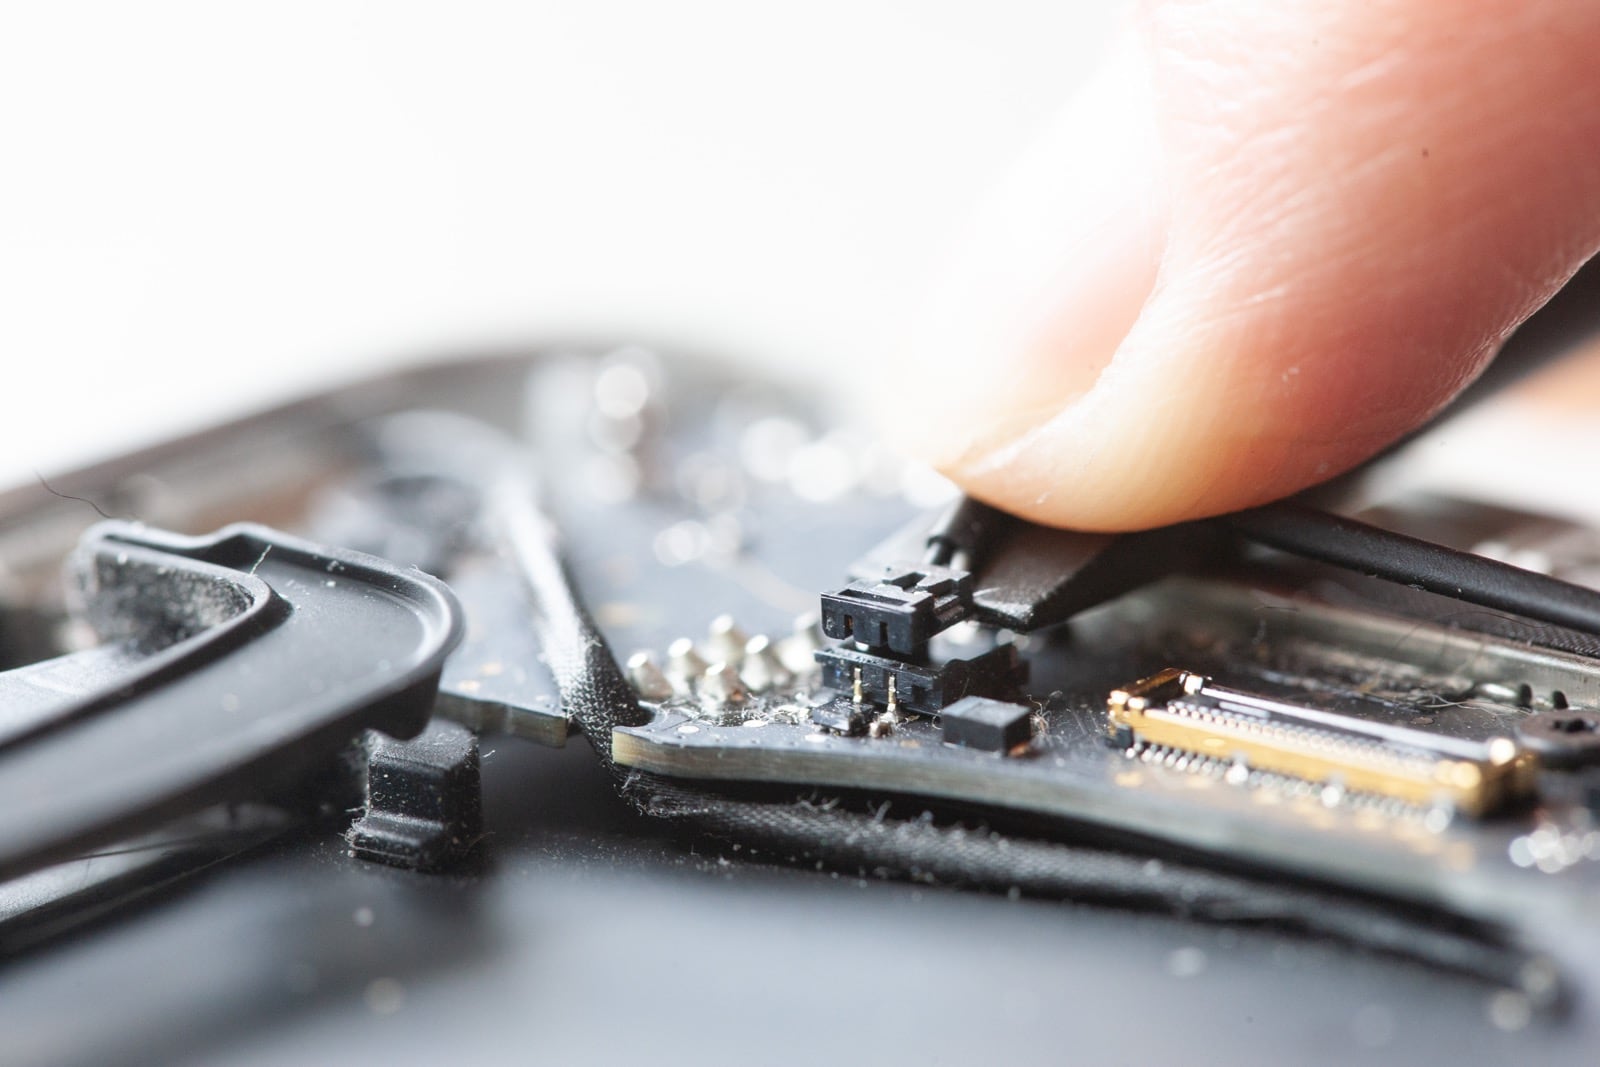
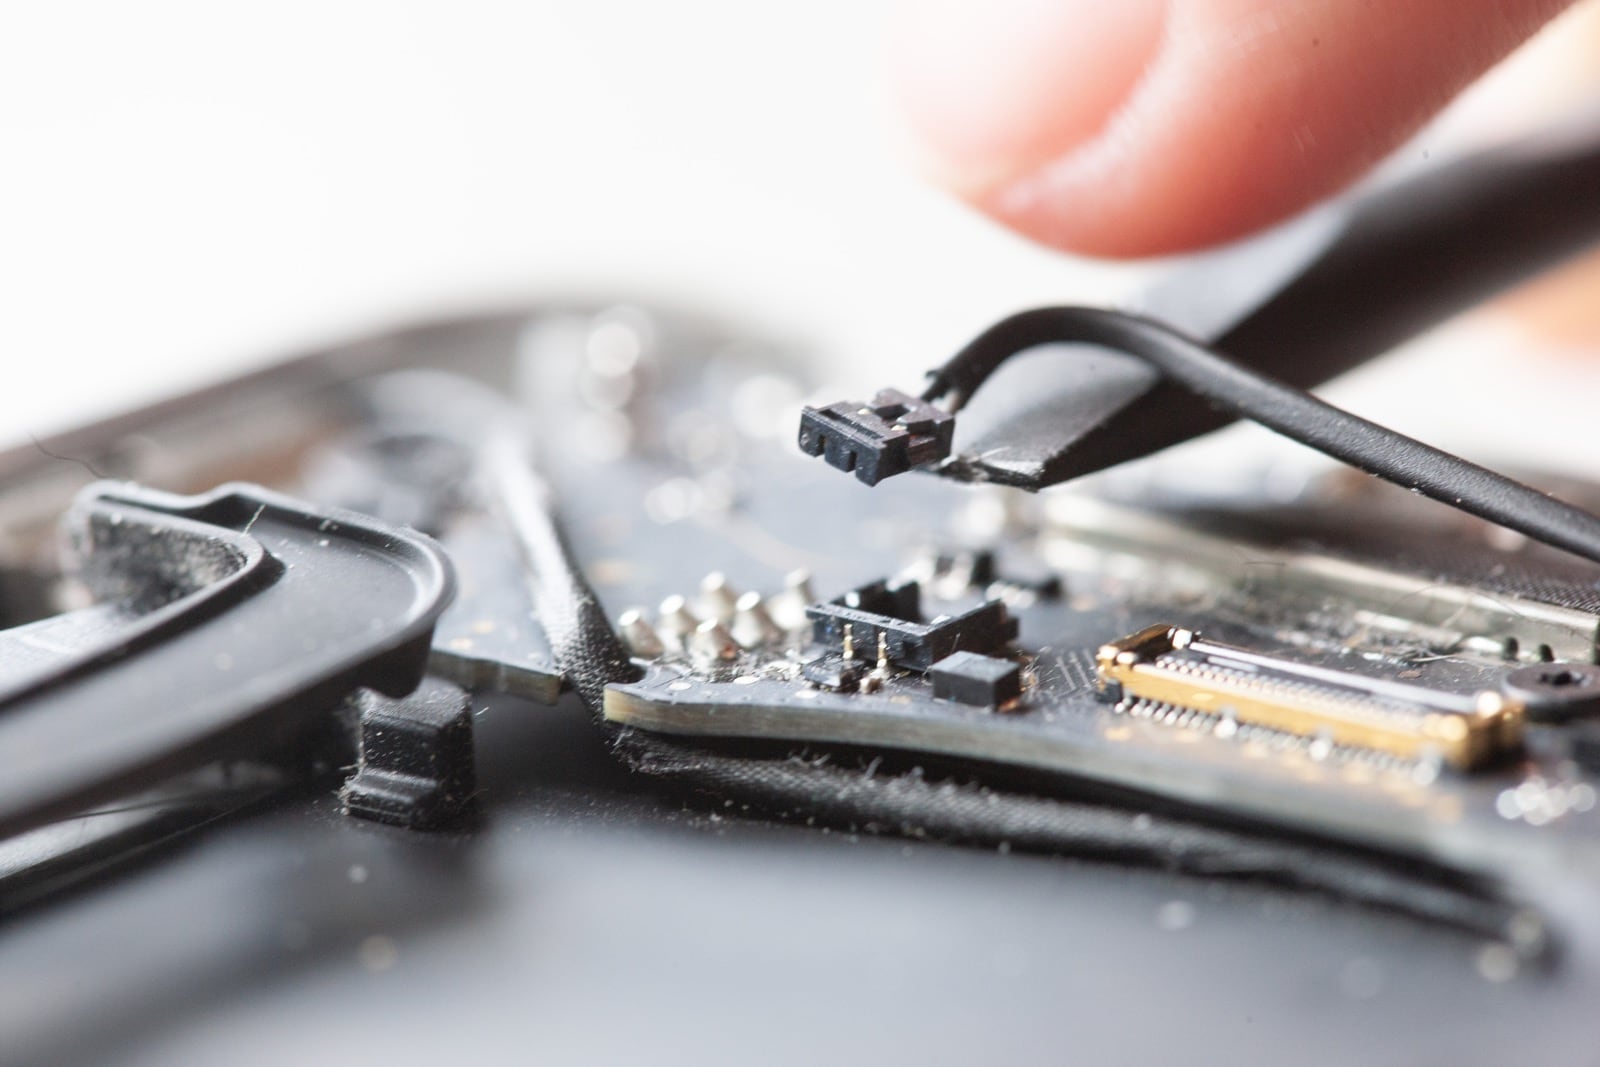
Next, remove the ZIF connector for the microphone in the same way you did for the fan. Pictures below.
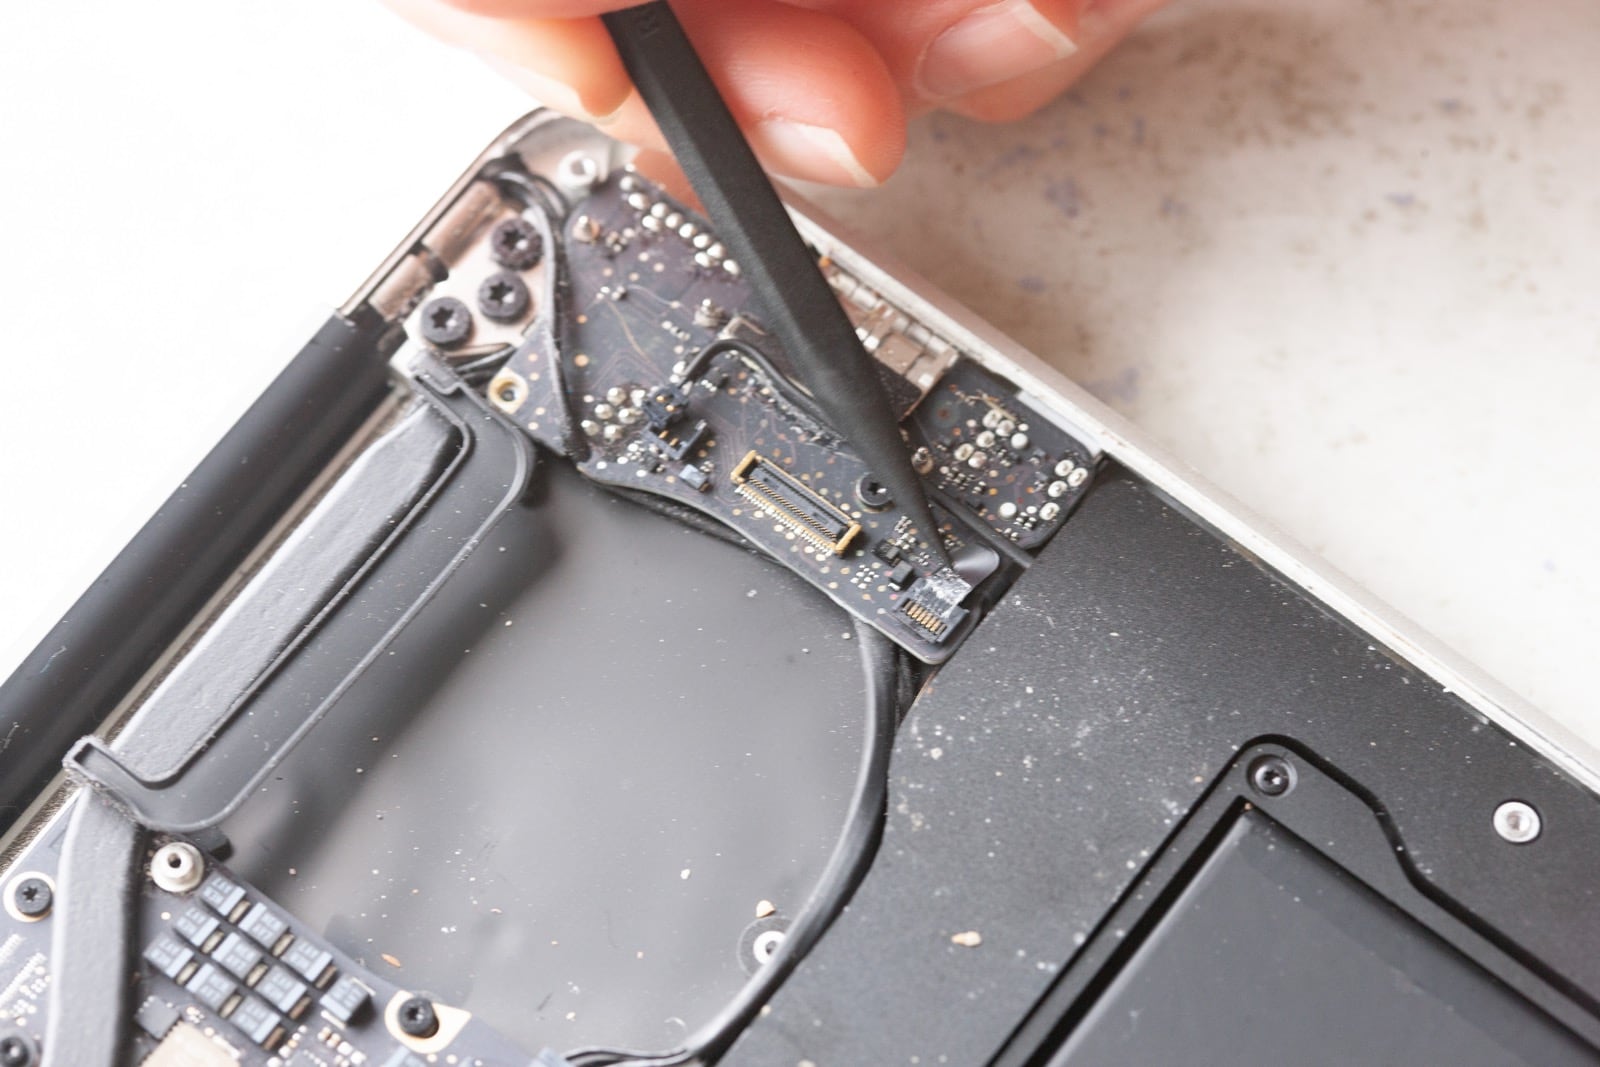
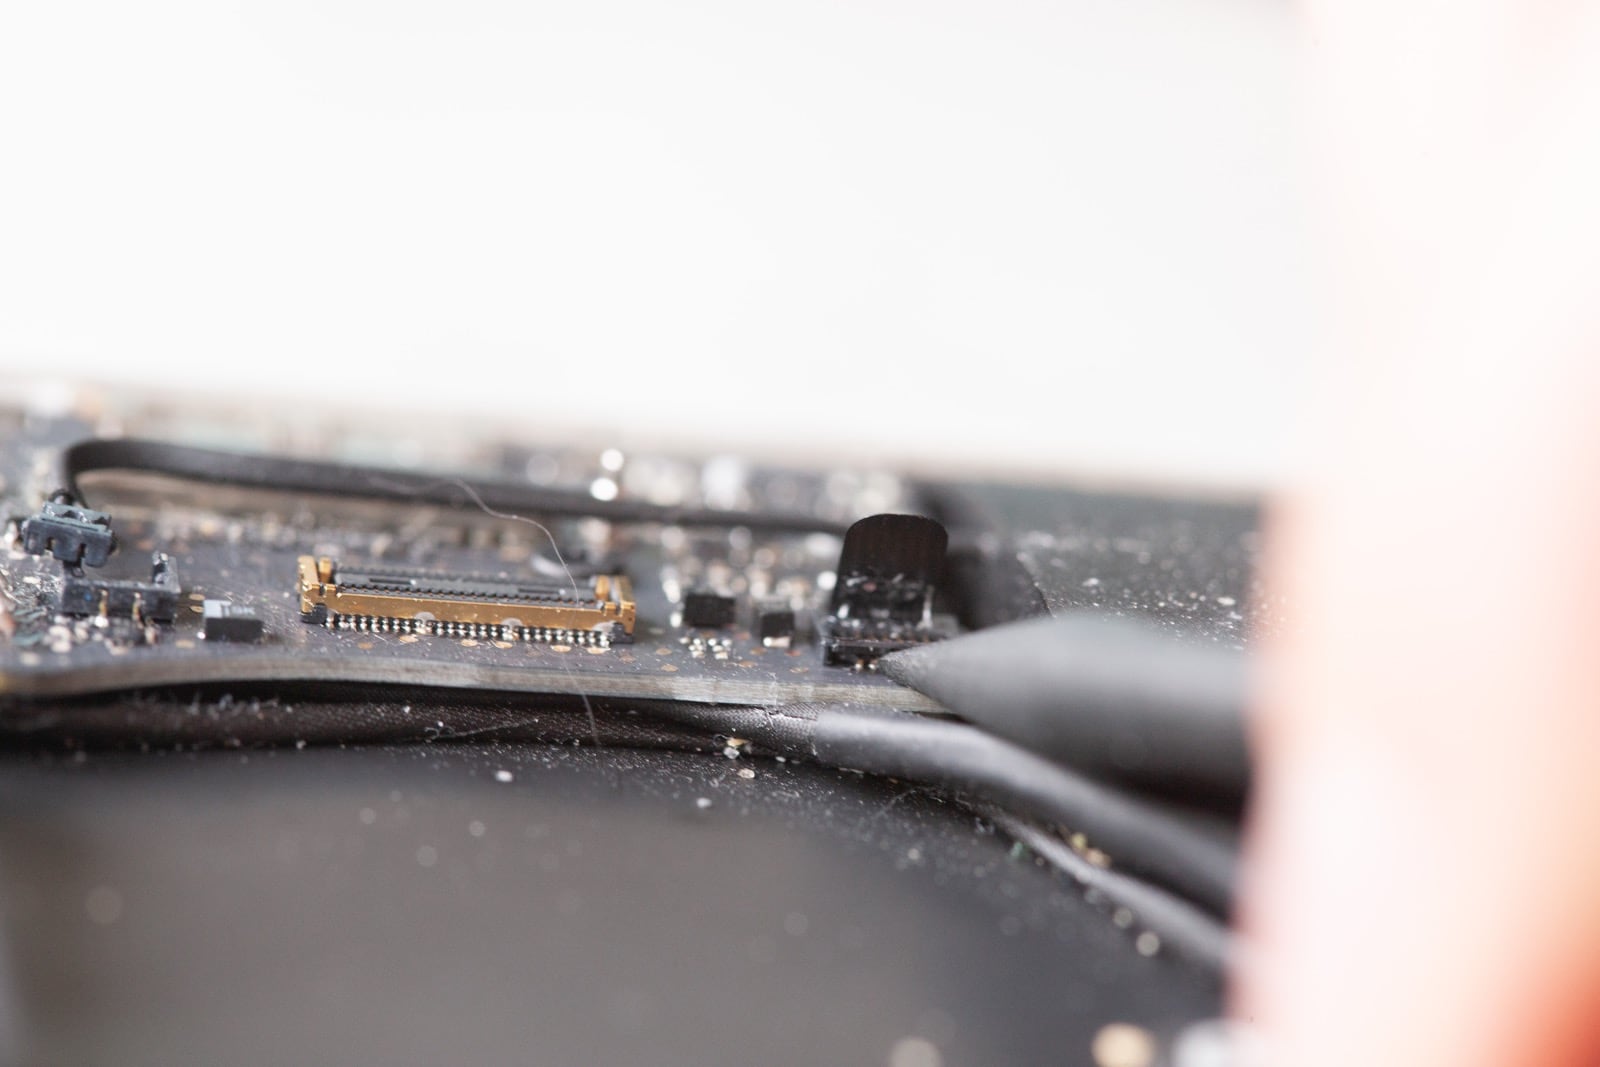
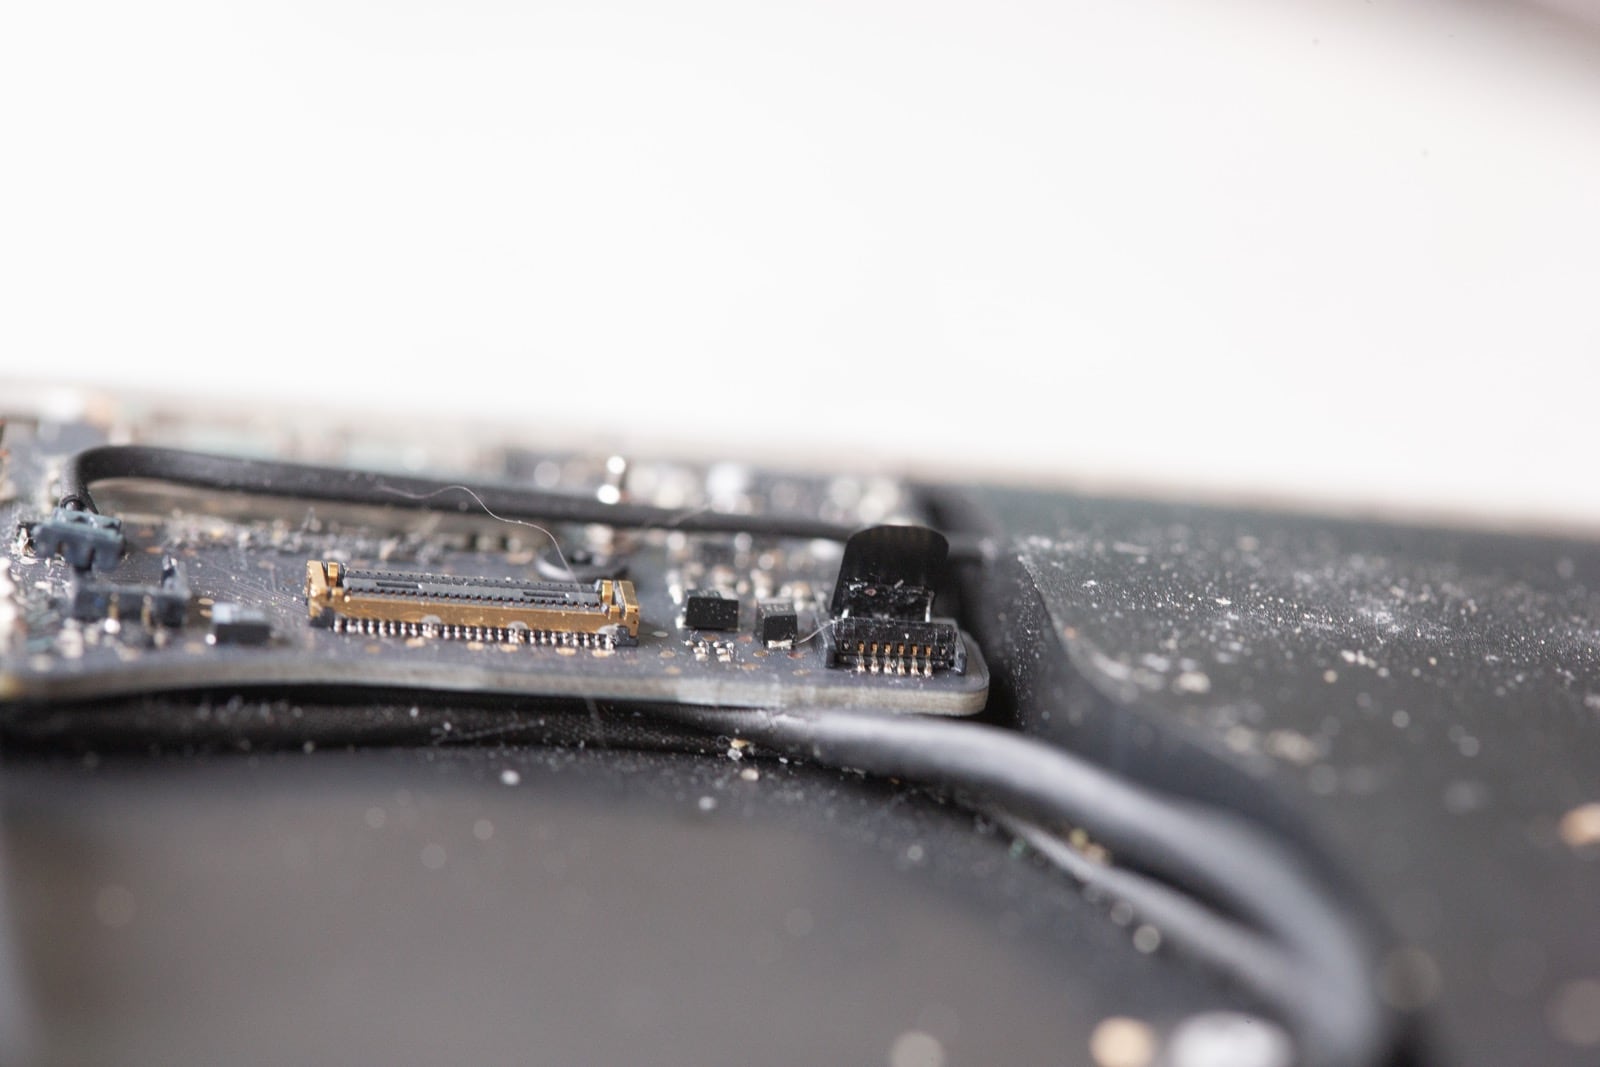
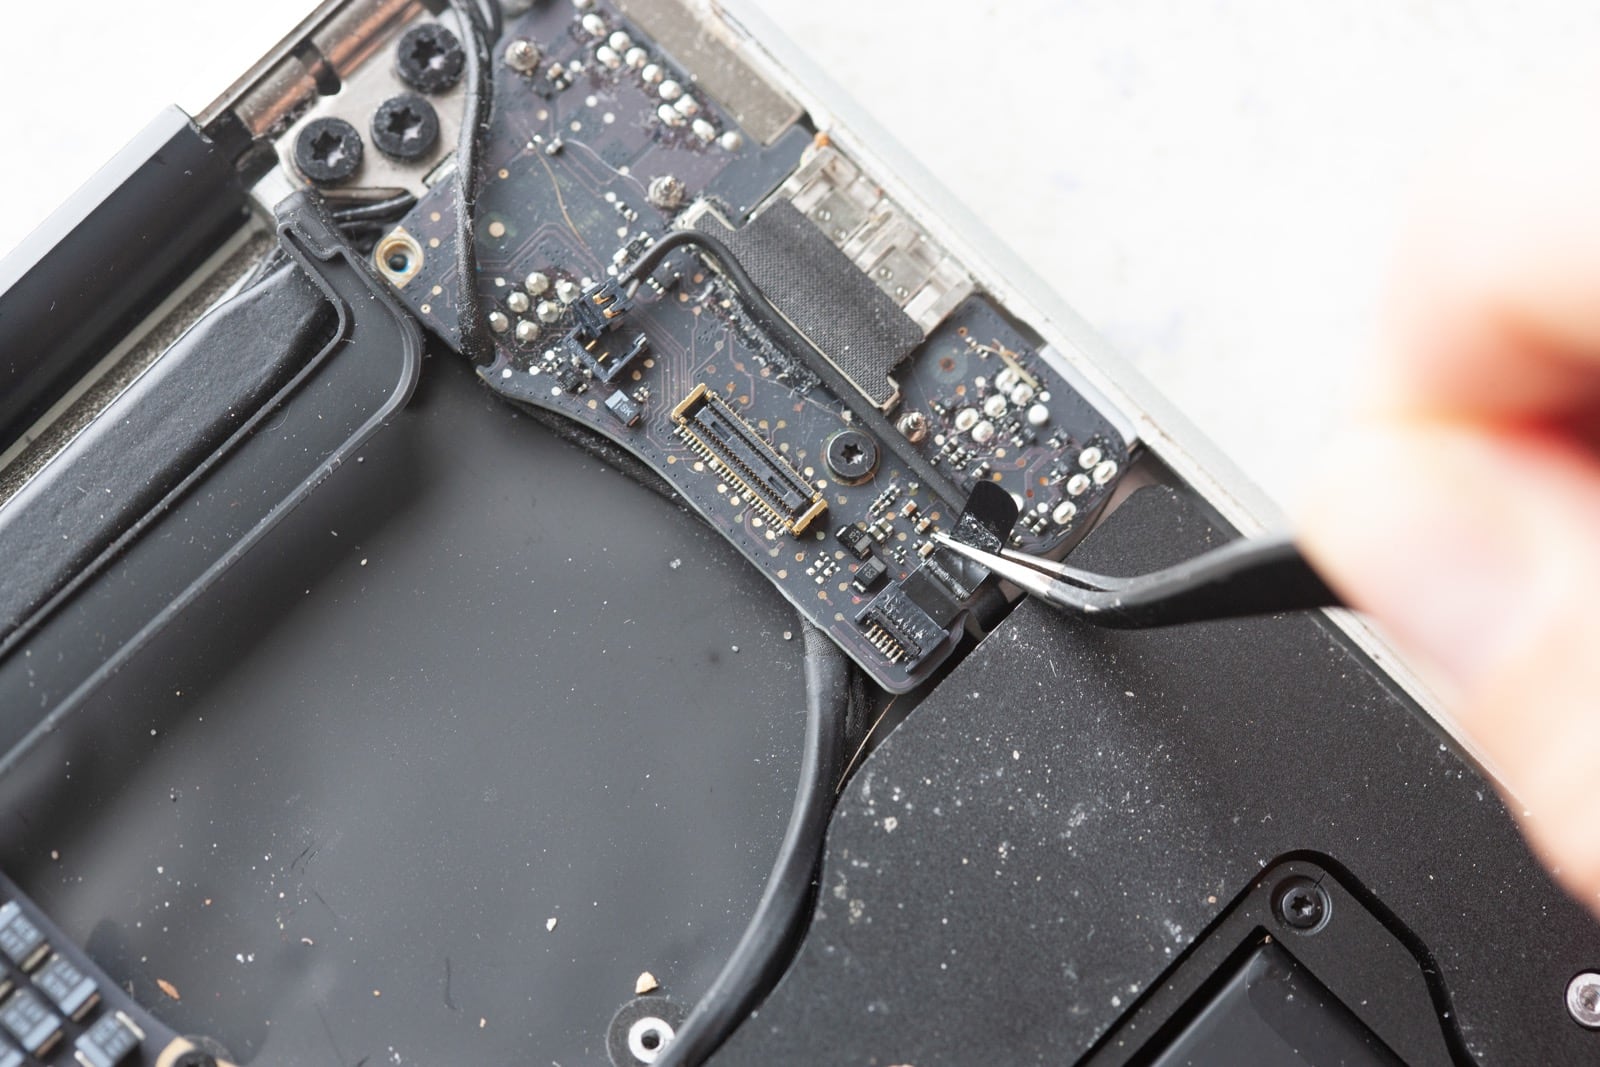
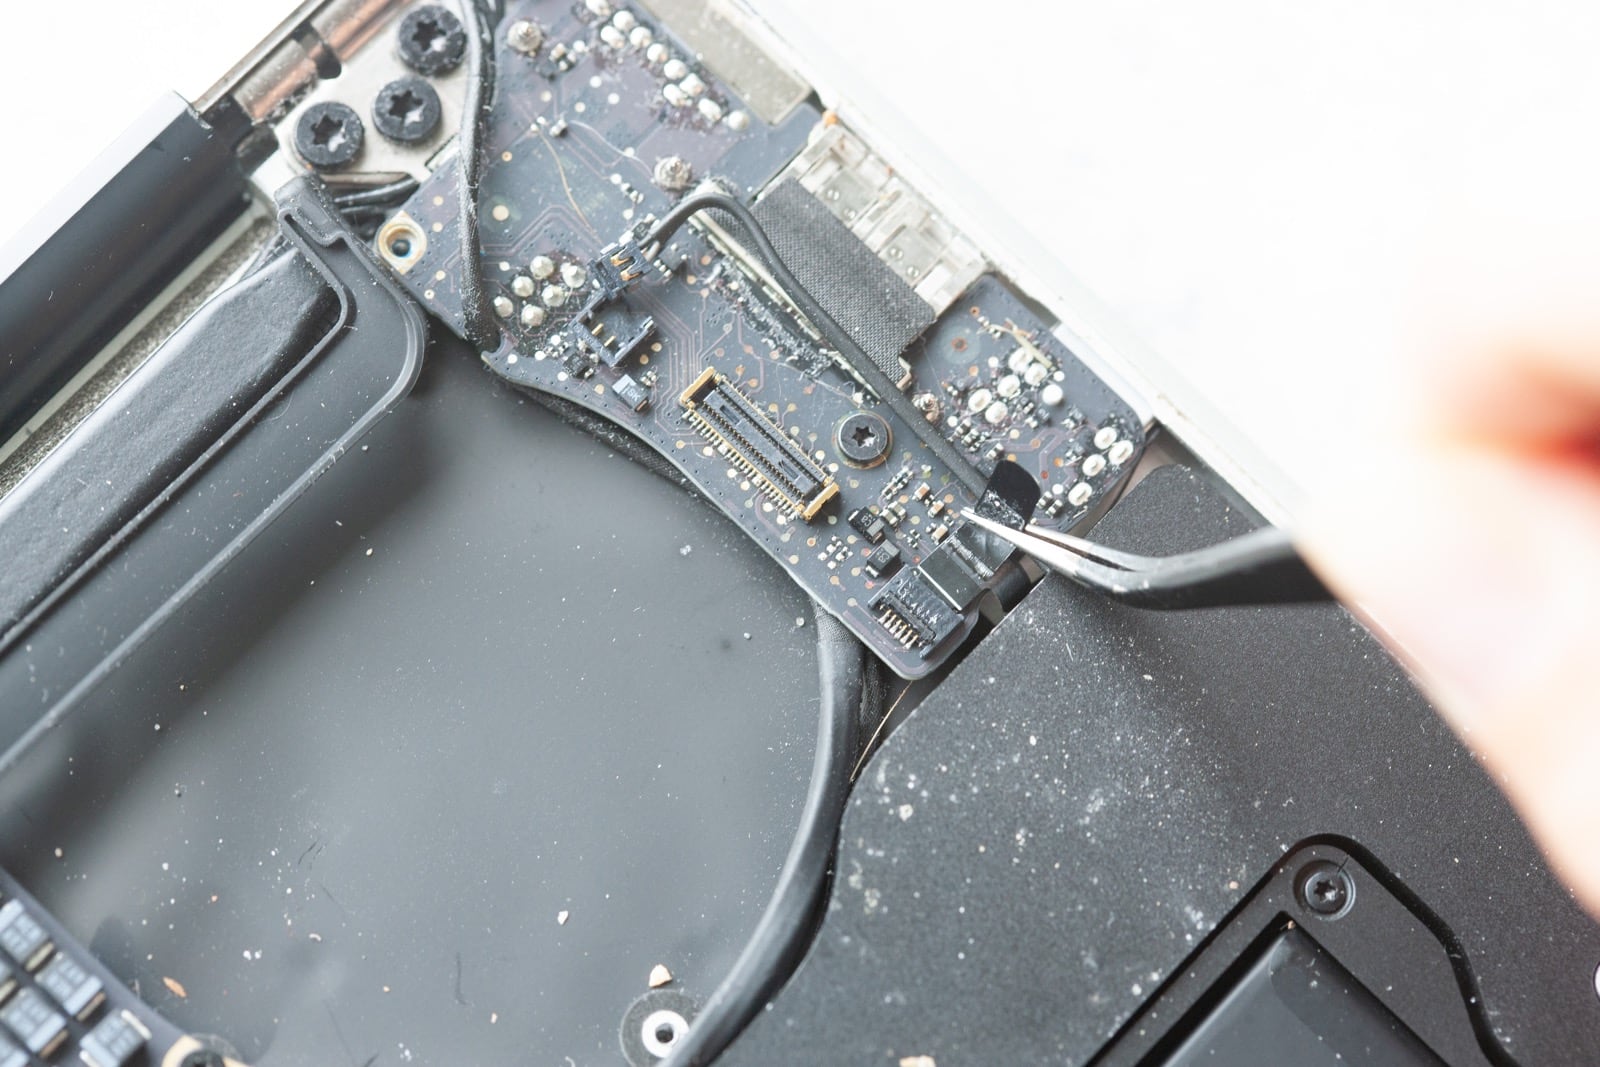
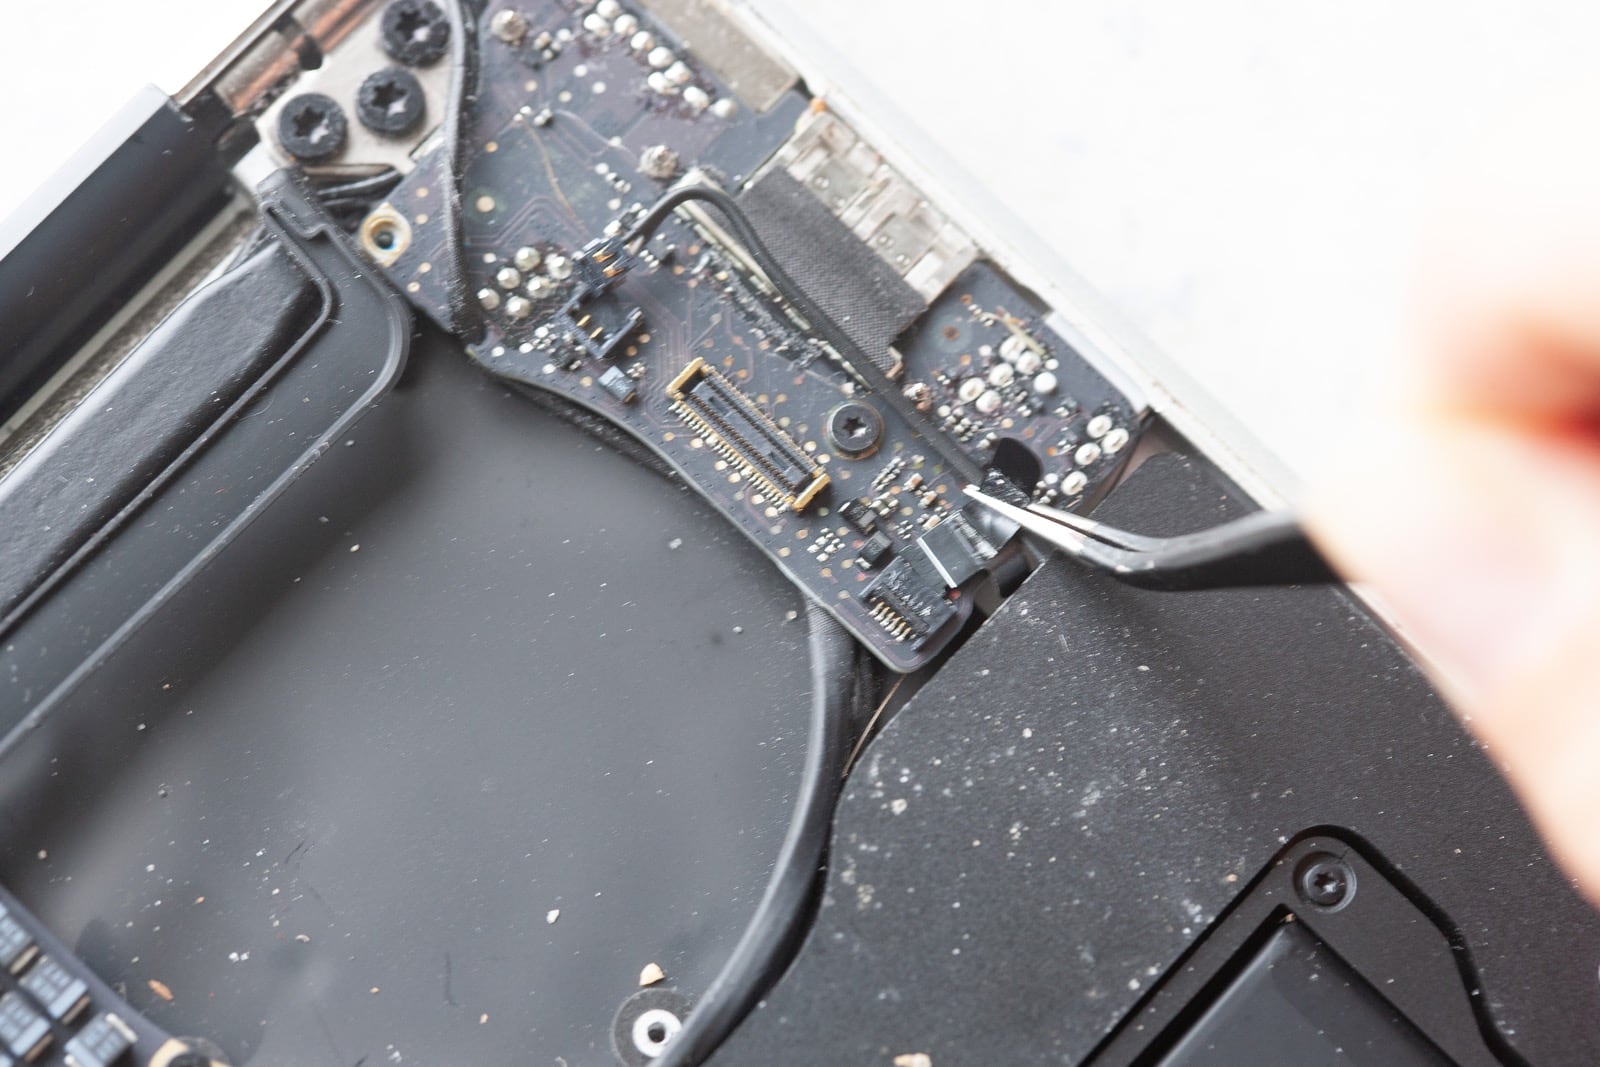
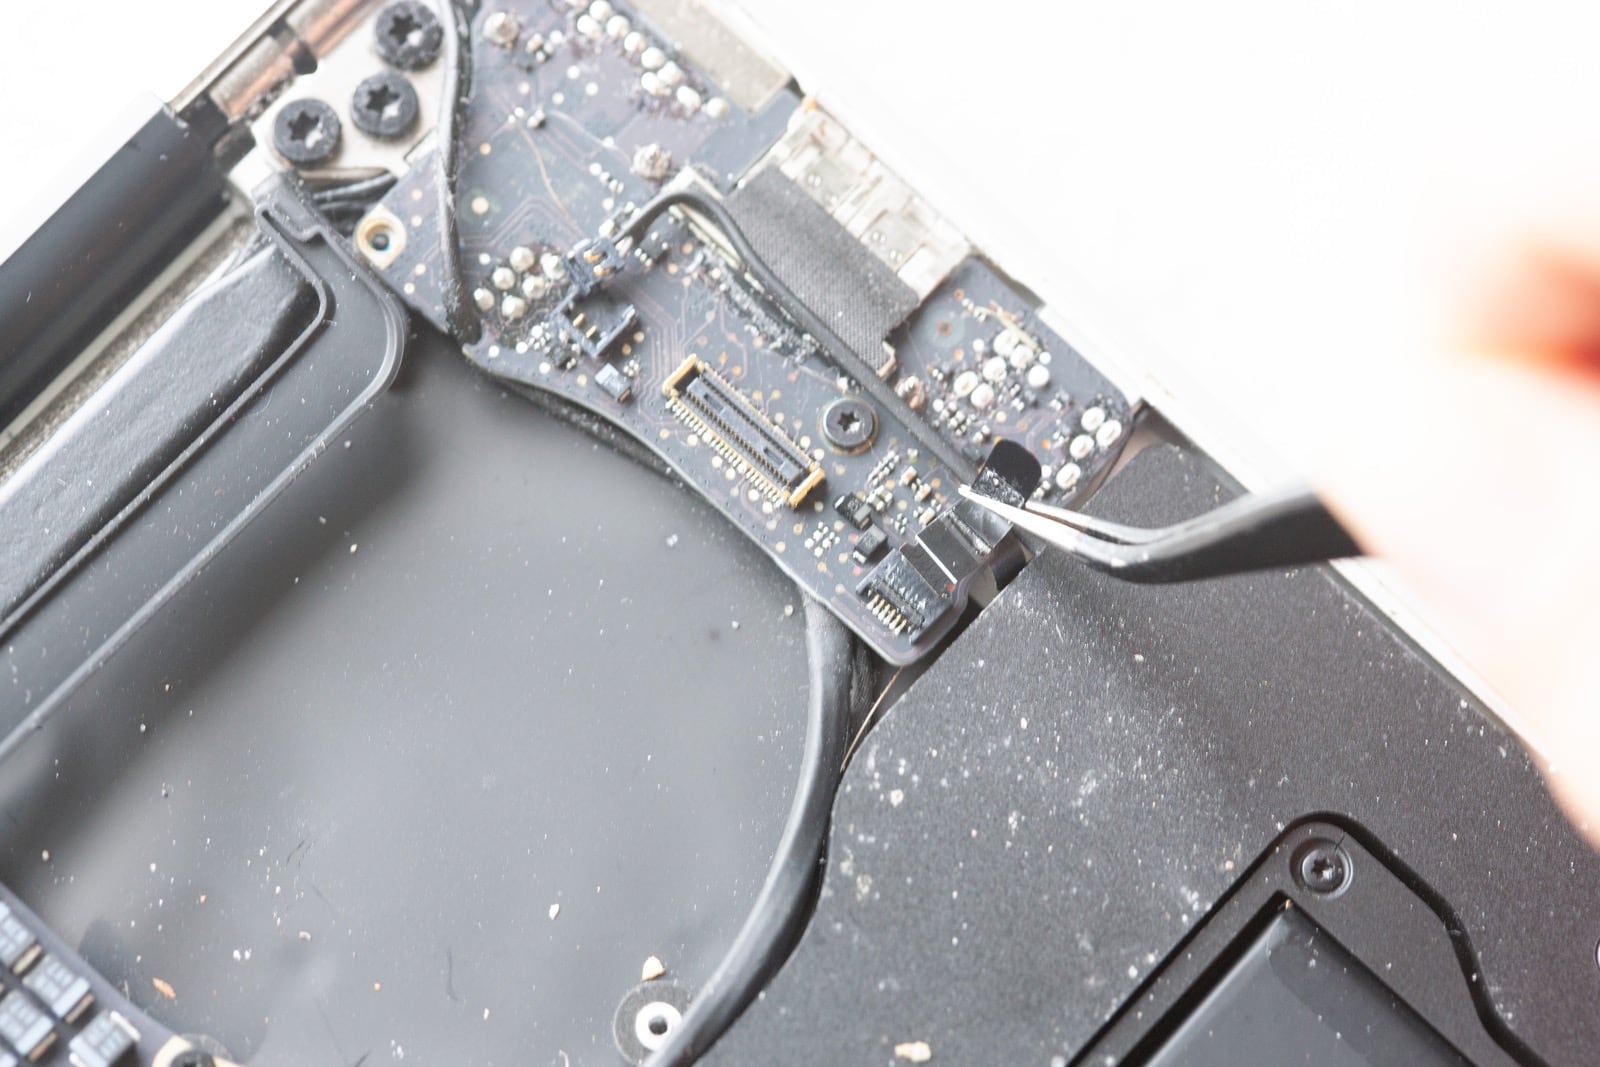
If this is a 2010, 2011, or 2012 model, you will need to remove the iSight camera cable from its connector. The 2013-2017 models have this connector attached to the logic board which we will remove later. Again, the 2010, 2011, and 2012 models only follow the picture below to remove the sight cable from the IO board.
Finally, remove the screw holding down the IO board, disconnect the IO power cable, and lift the IO board out.
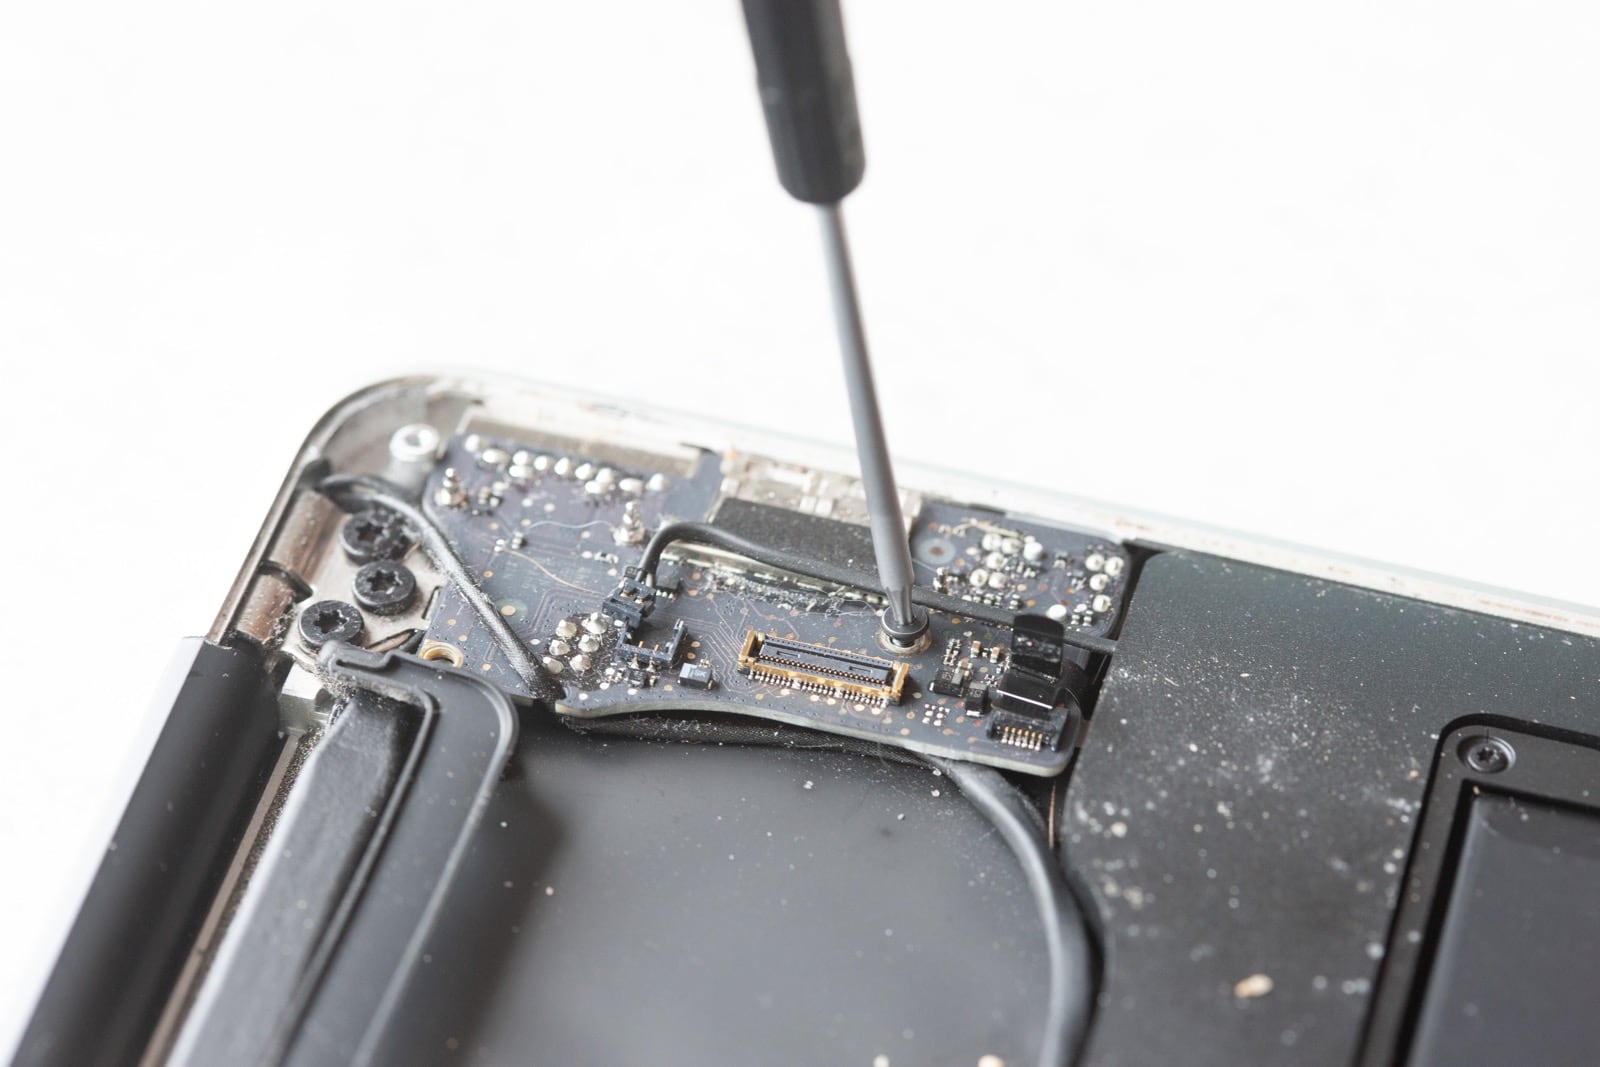
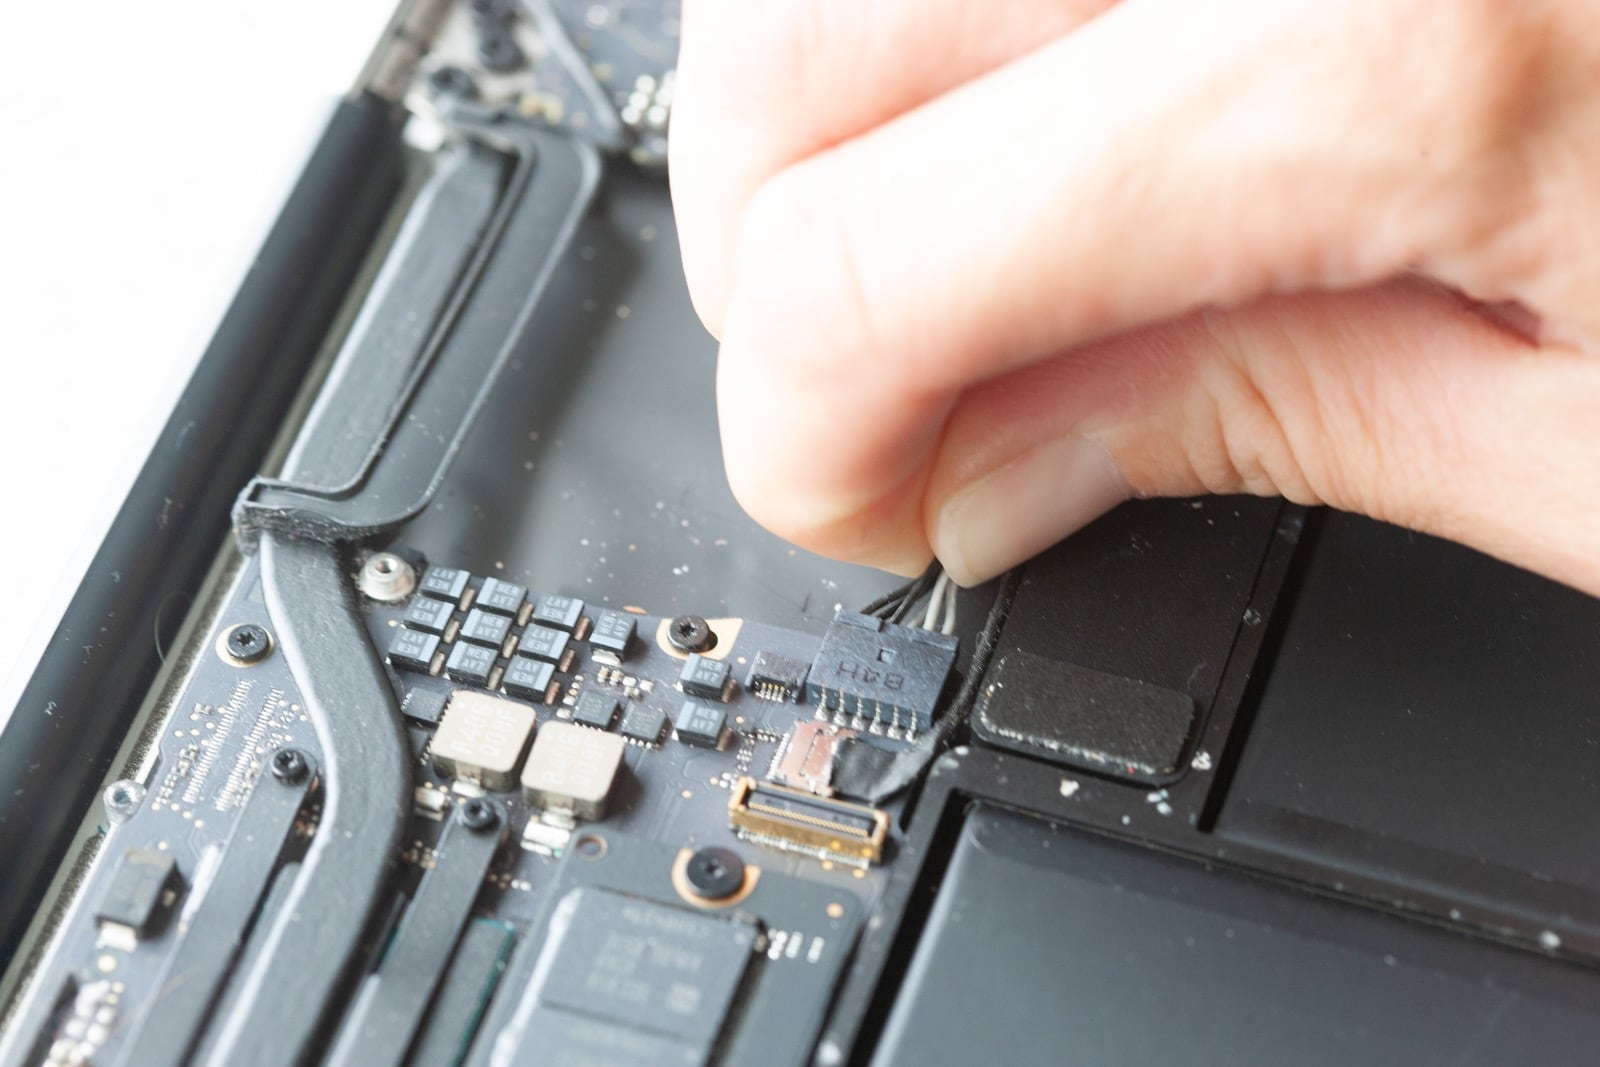
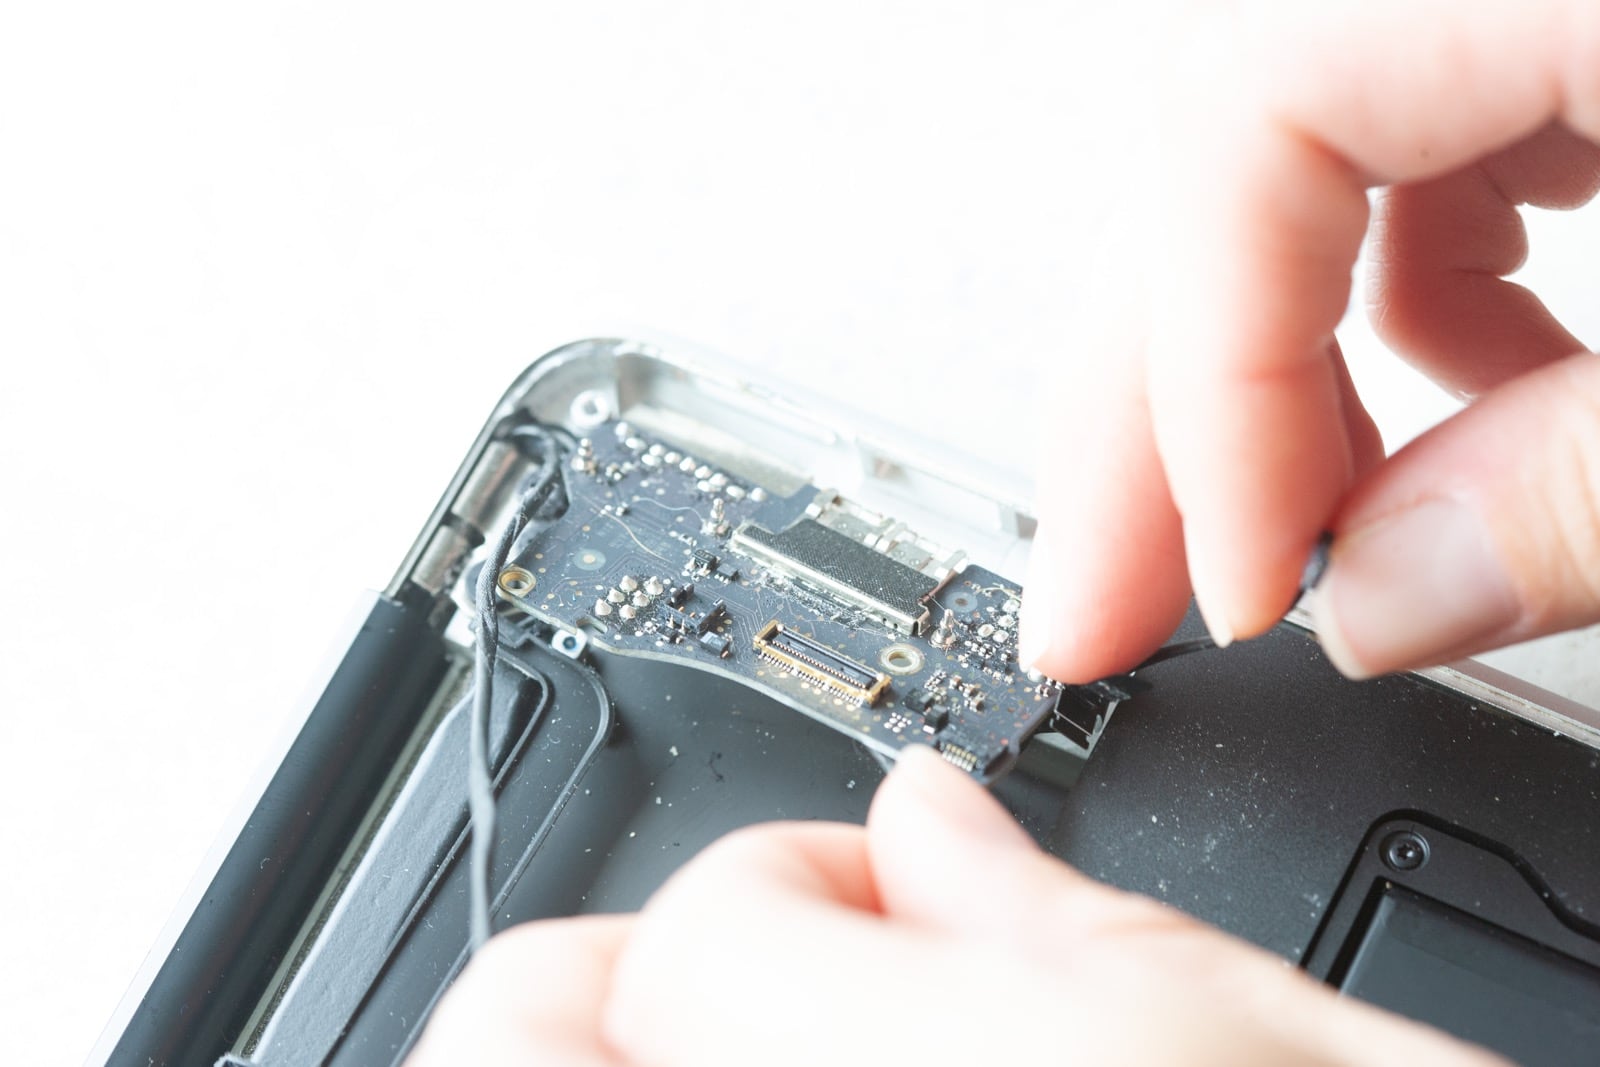
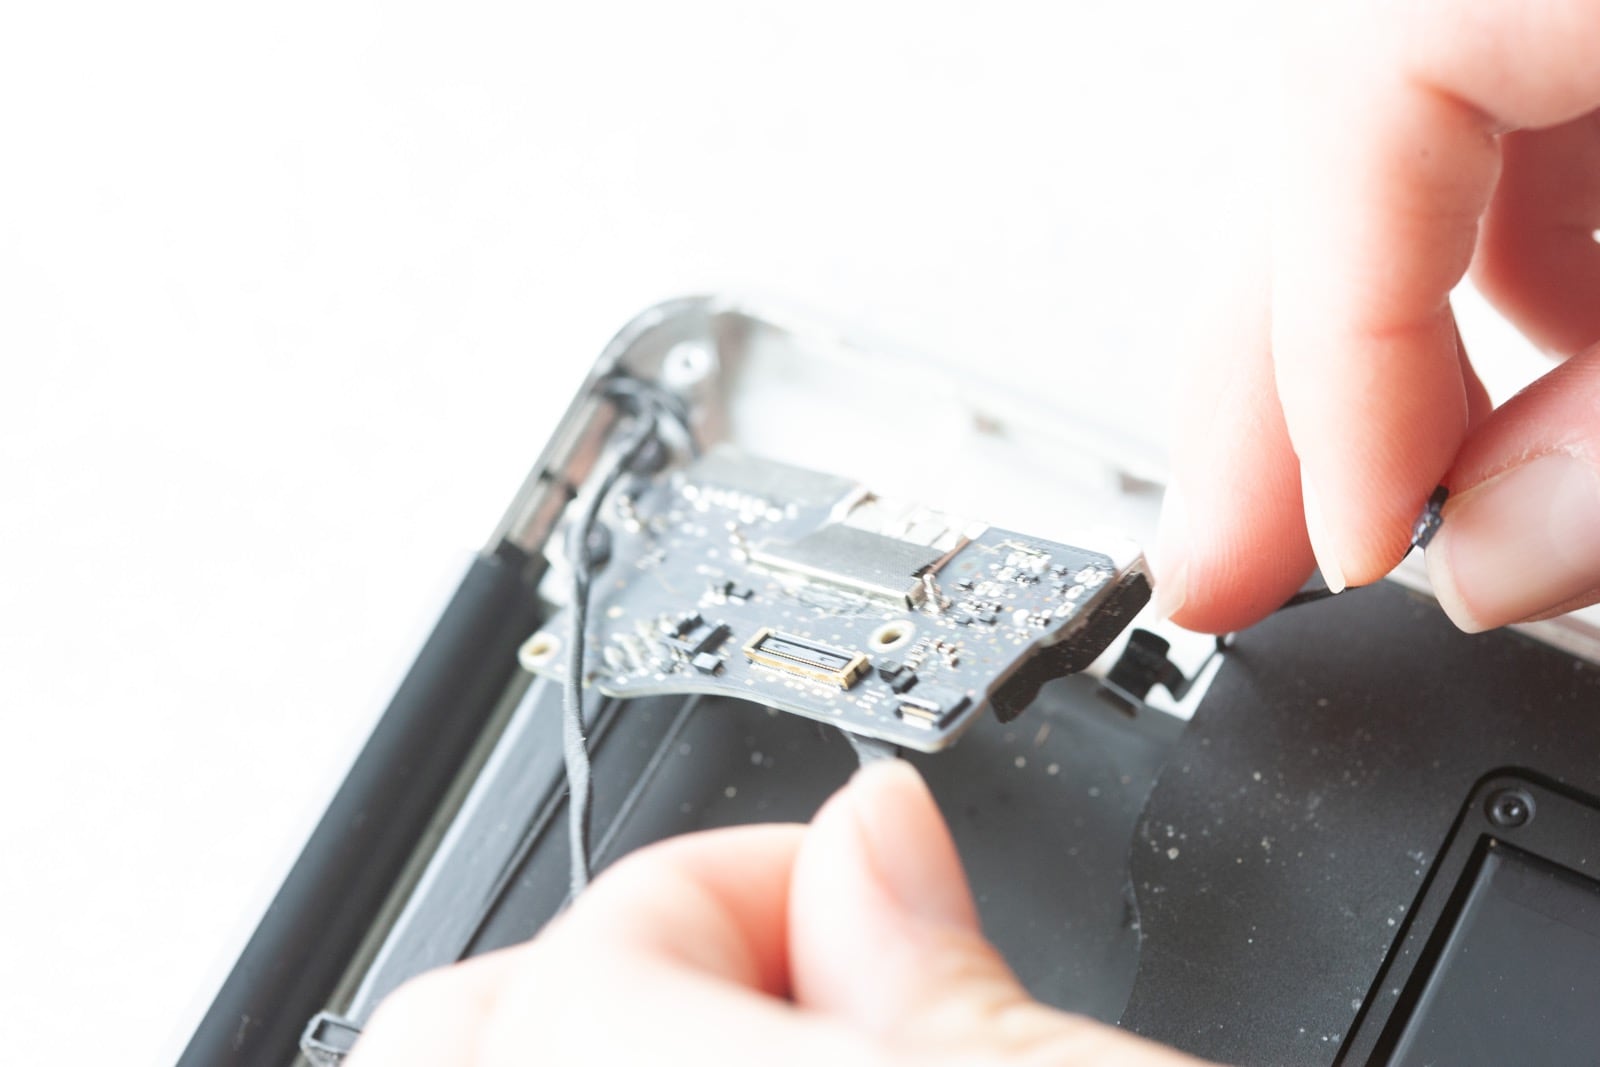
Step 10 – Disconnect iSight Cable.
As you probably noticed above, 2010, 2011, and 2012 models of the MacBook Air have the iSight cable connected to the IO board that you just removed. If you have one of the 2013, 2014, 2015, or 2017 models, you will remove the iSight cable from the logic board.
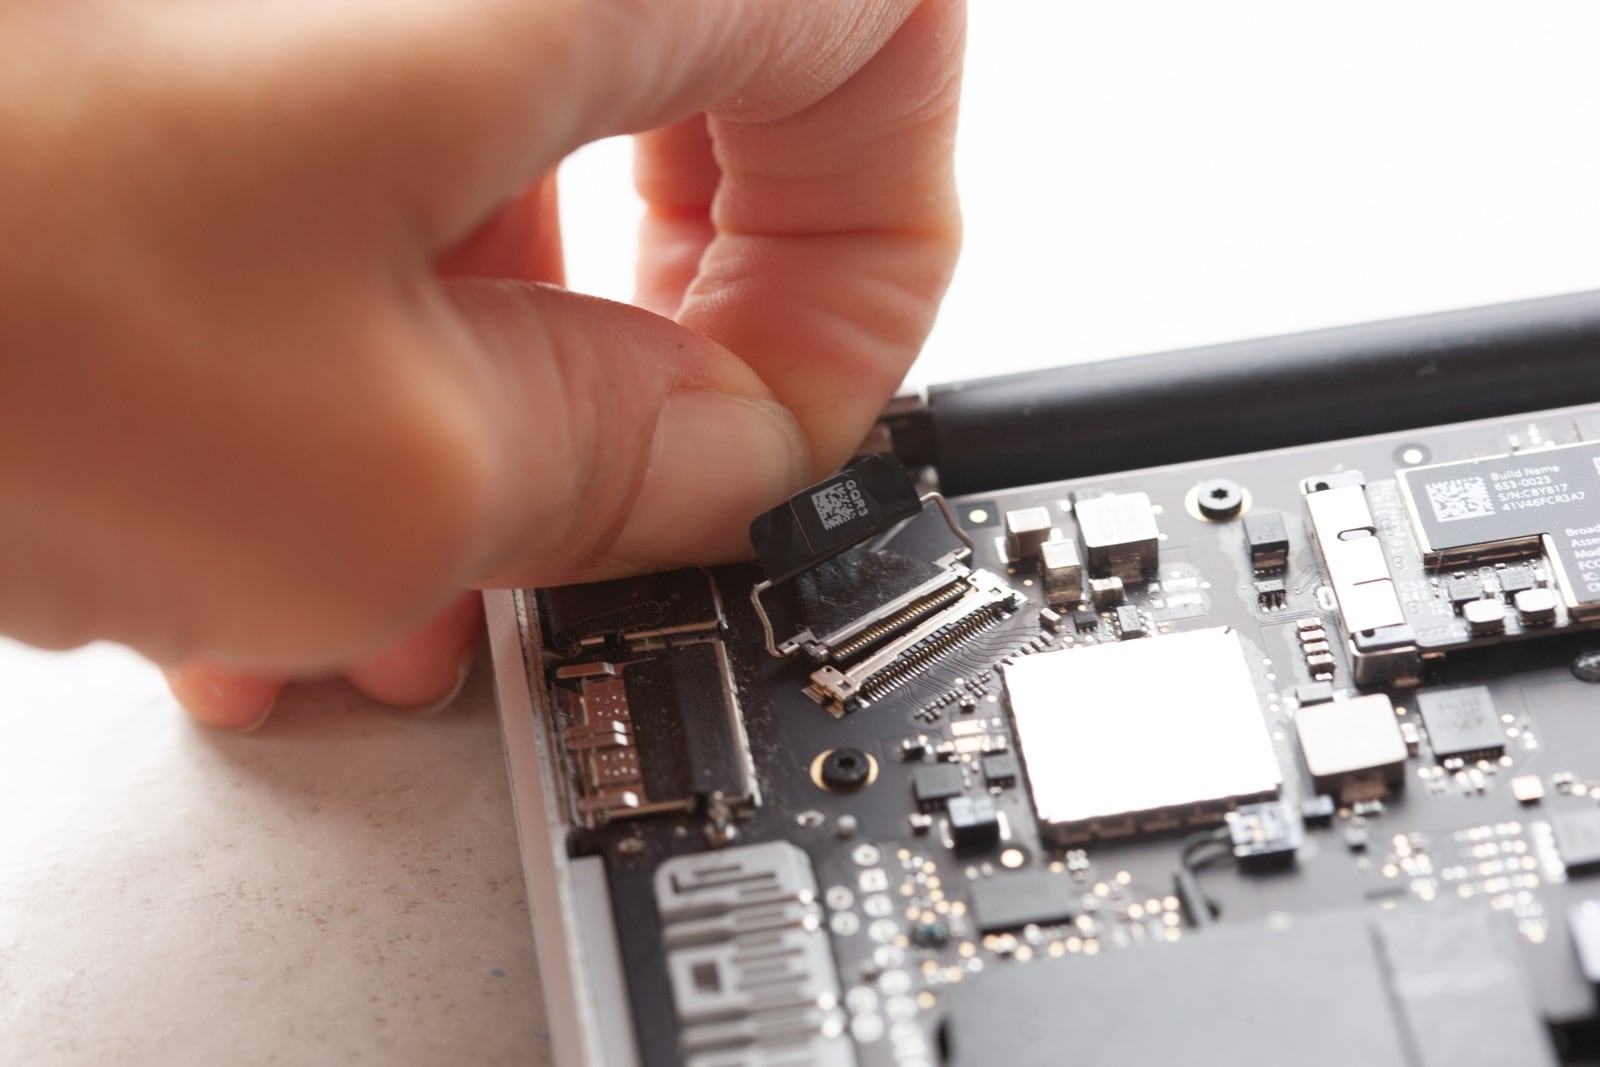
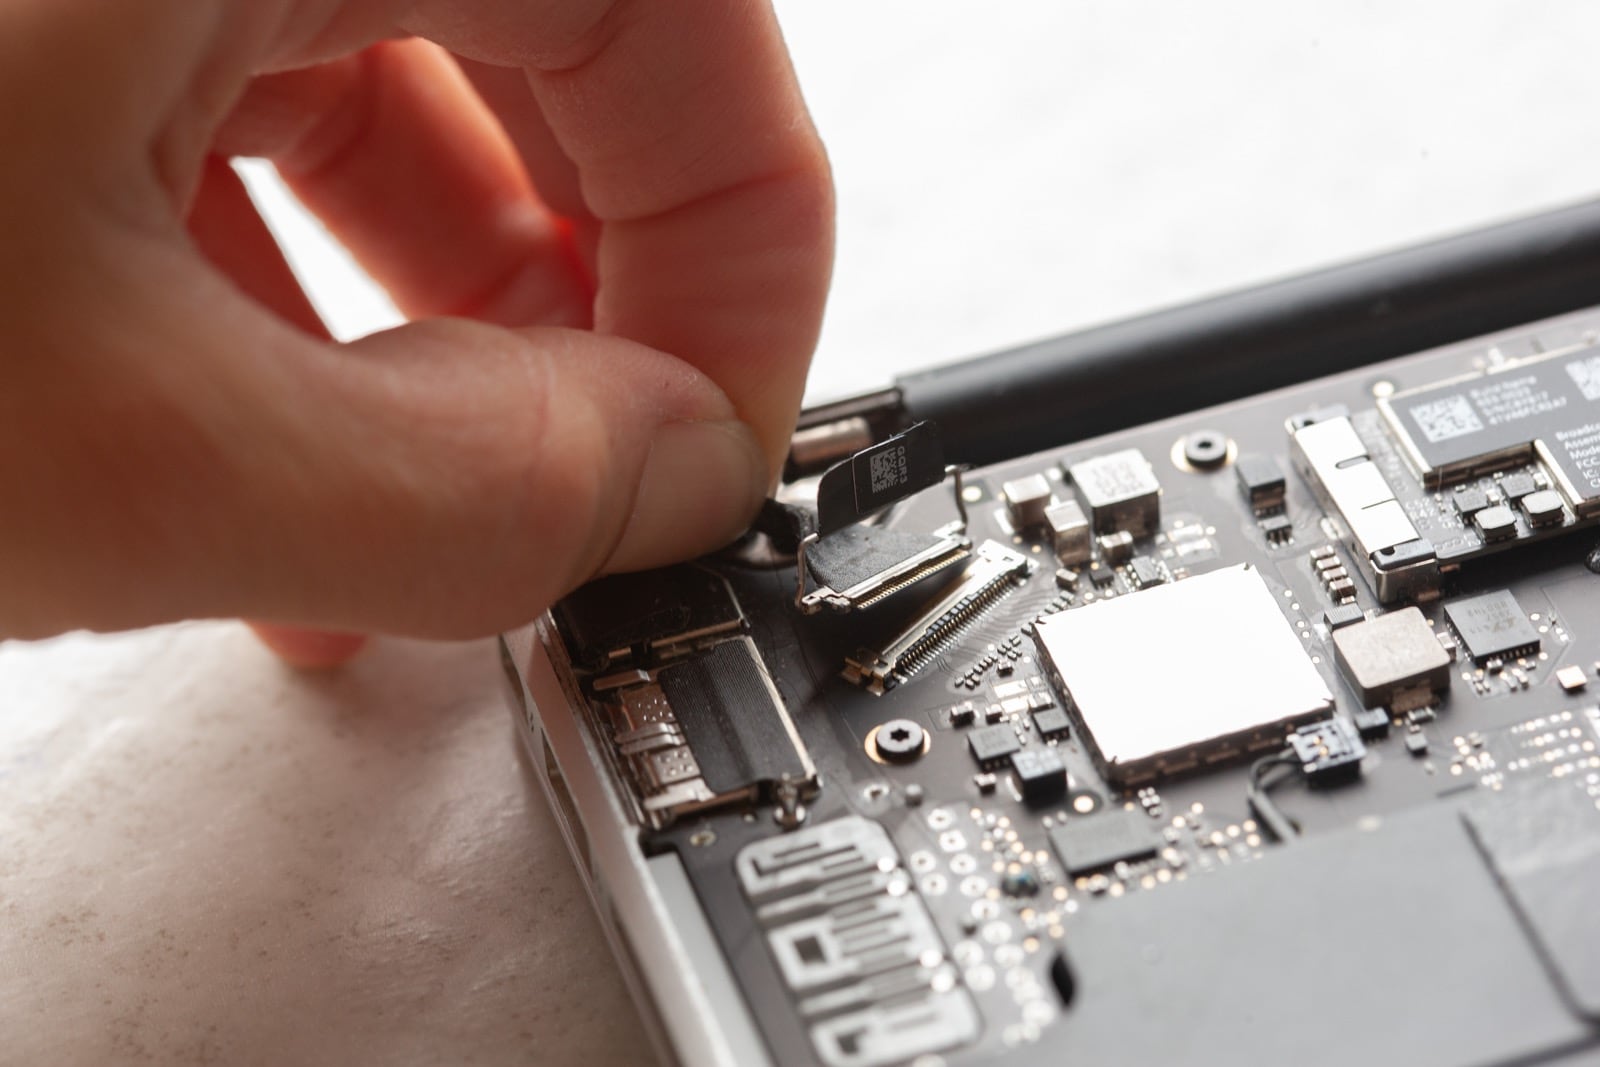
This iSight cable gets removed by pulling the cable towards the battery, NOT UP. It is a very common error that people make to lift the cable and rip the connector off the logic board. The pictures below show you how to remove the cable safely.
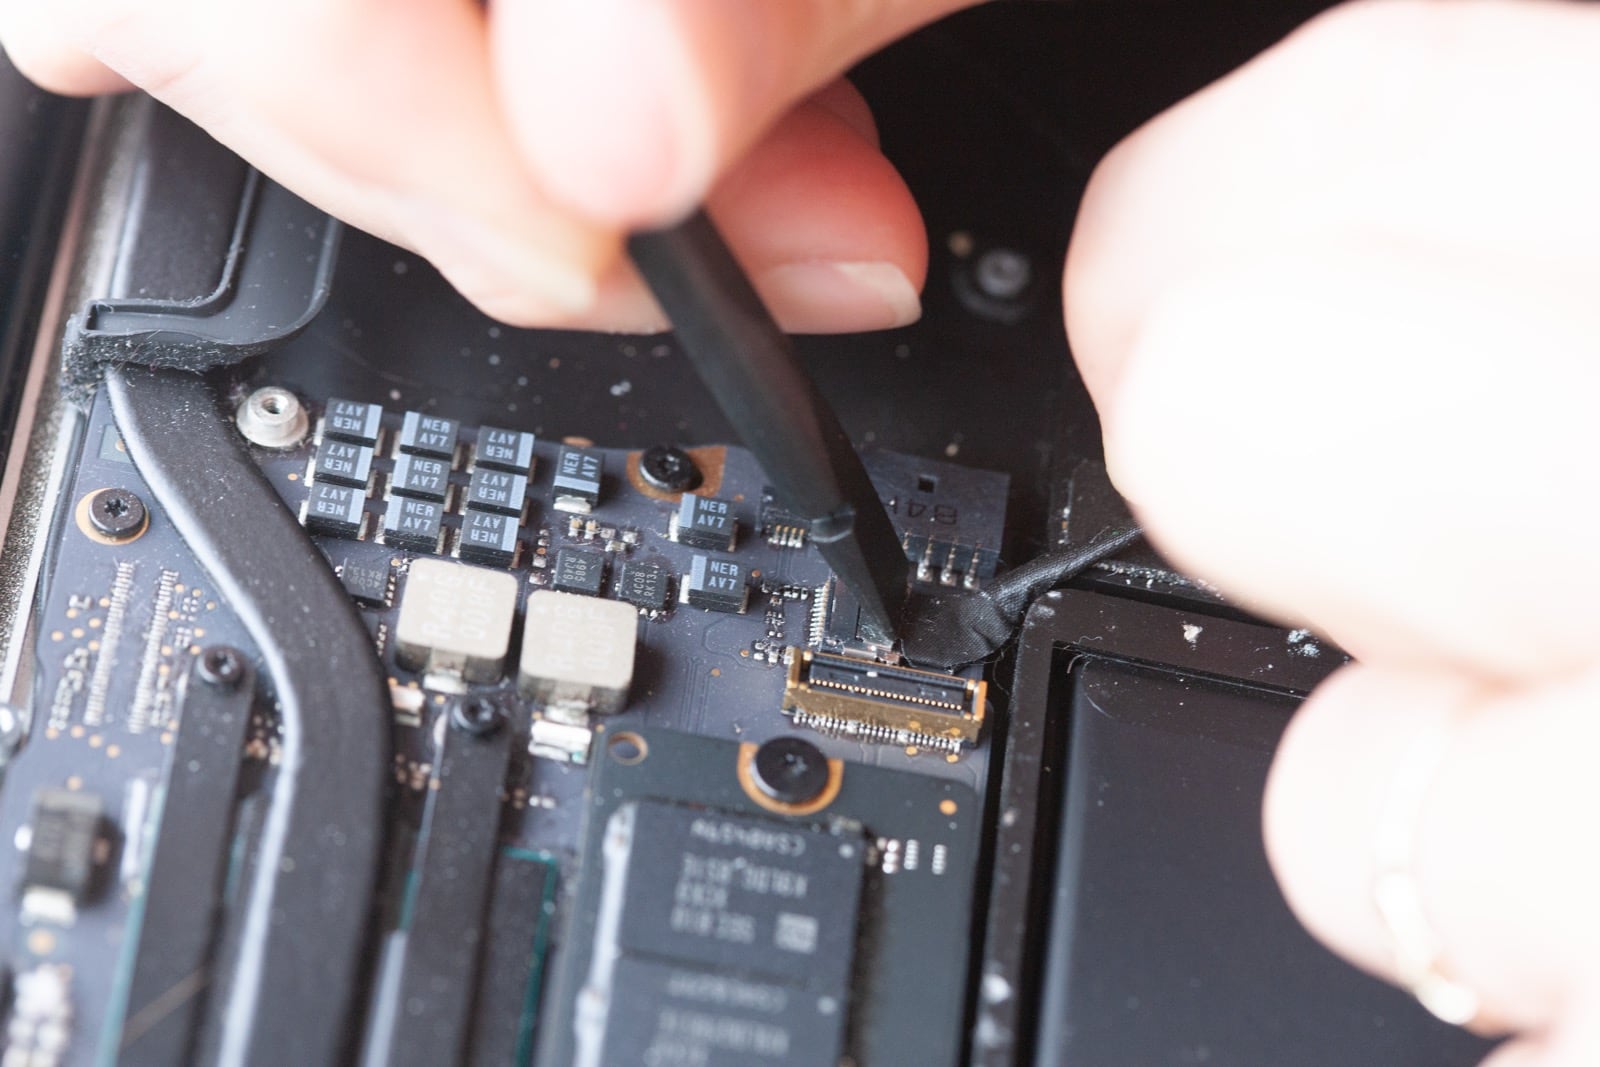
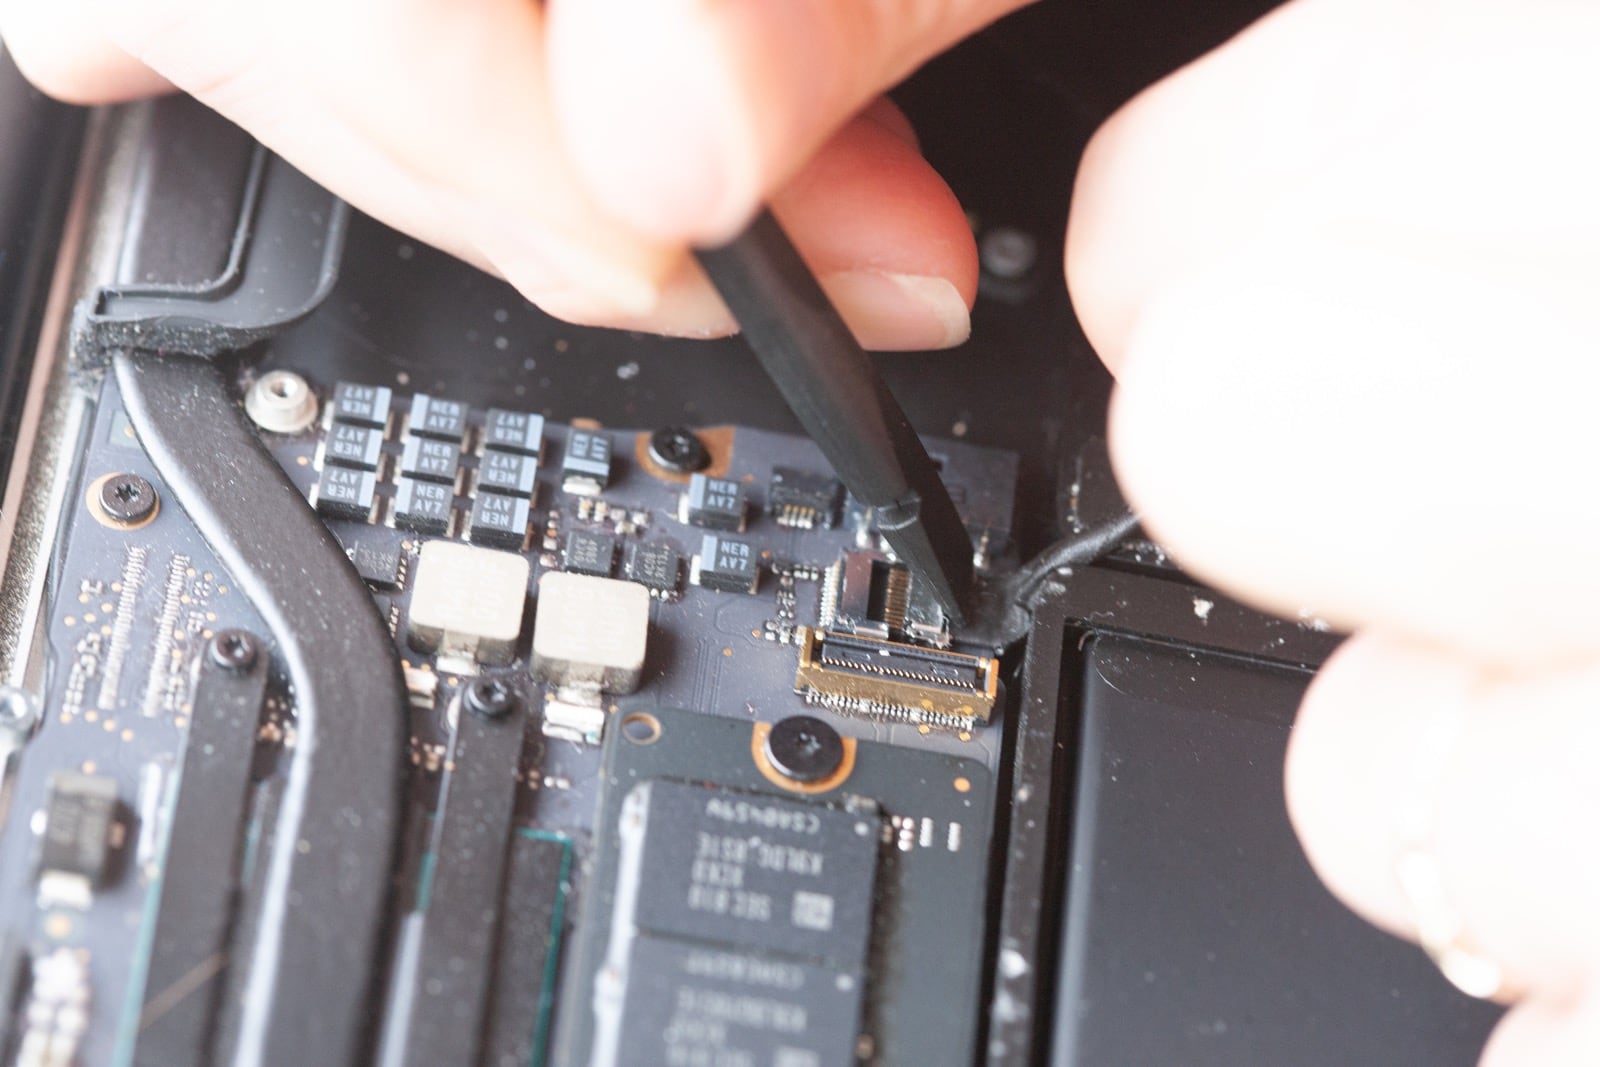
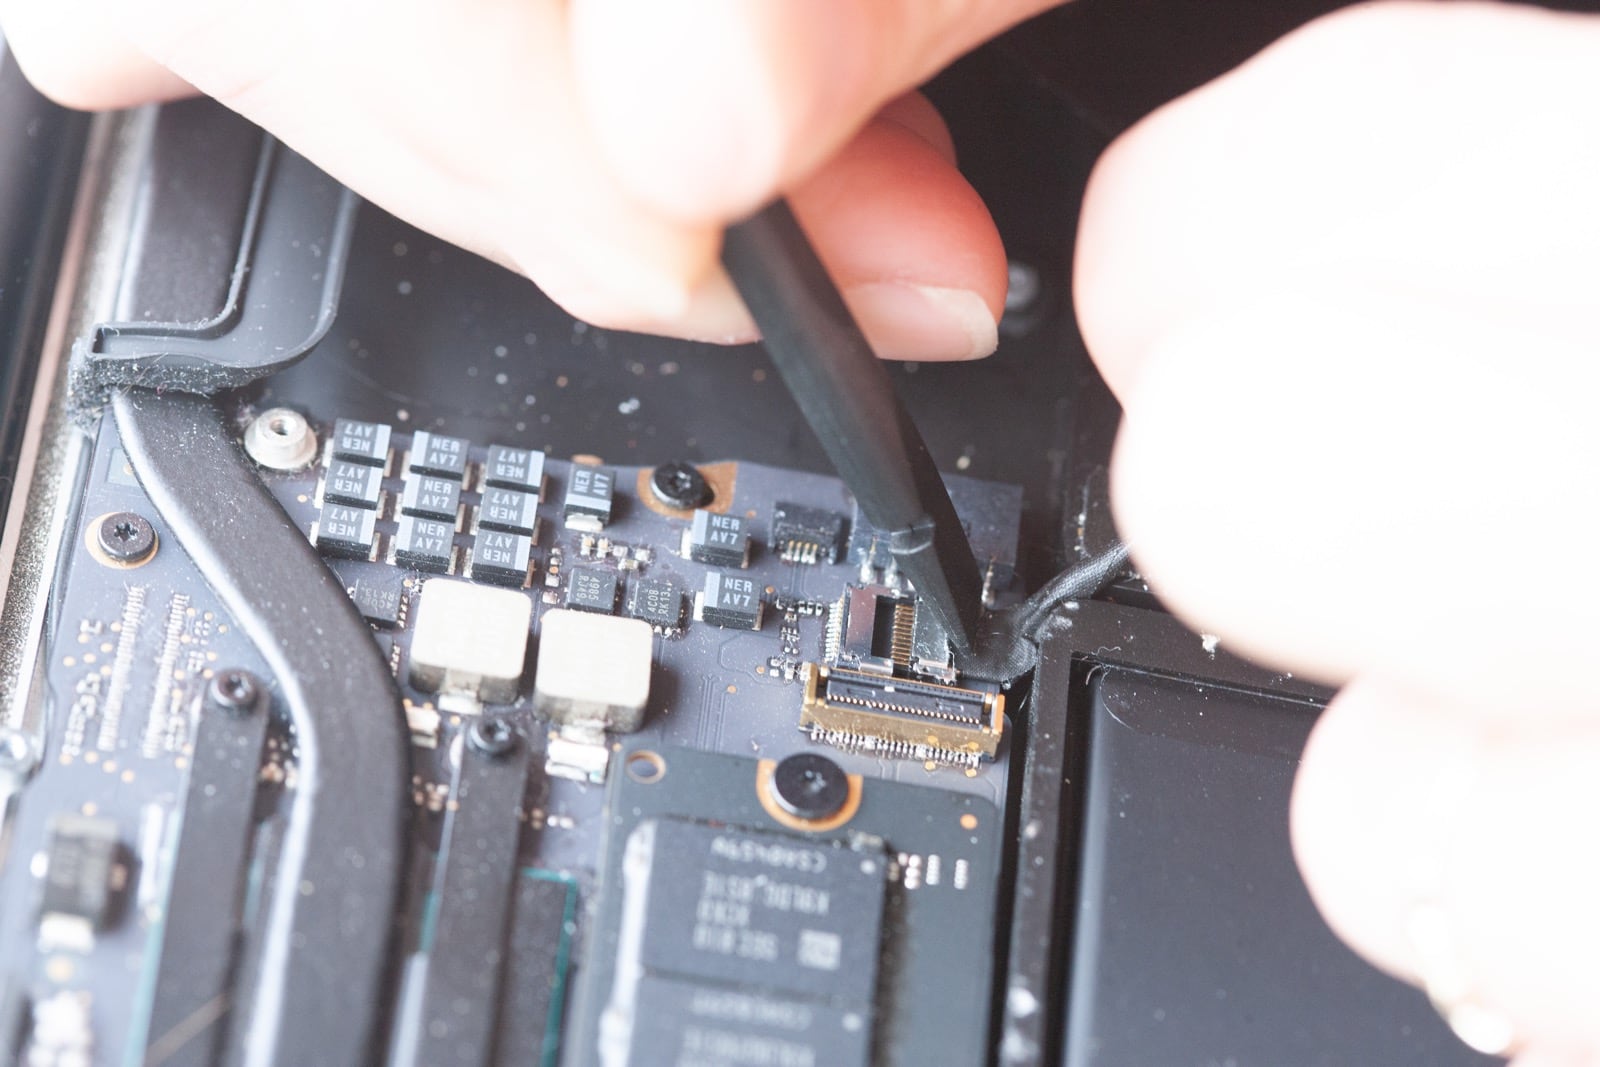
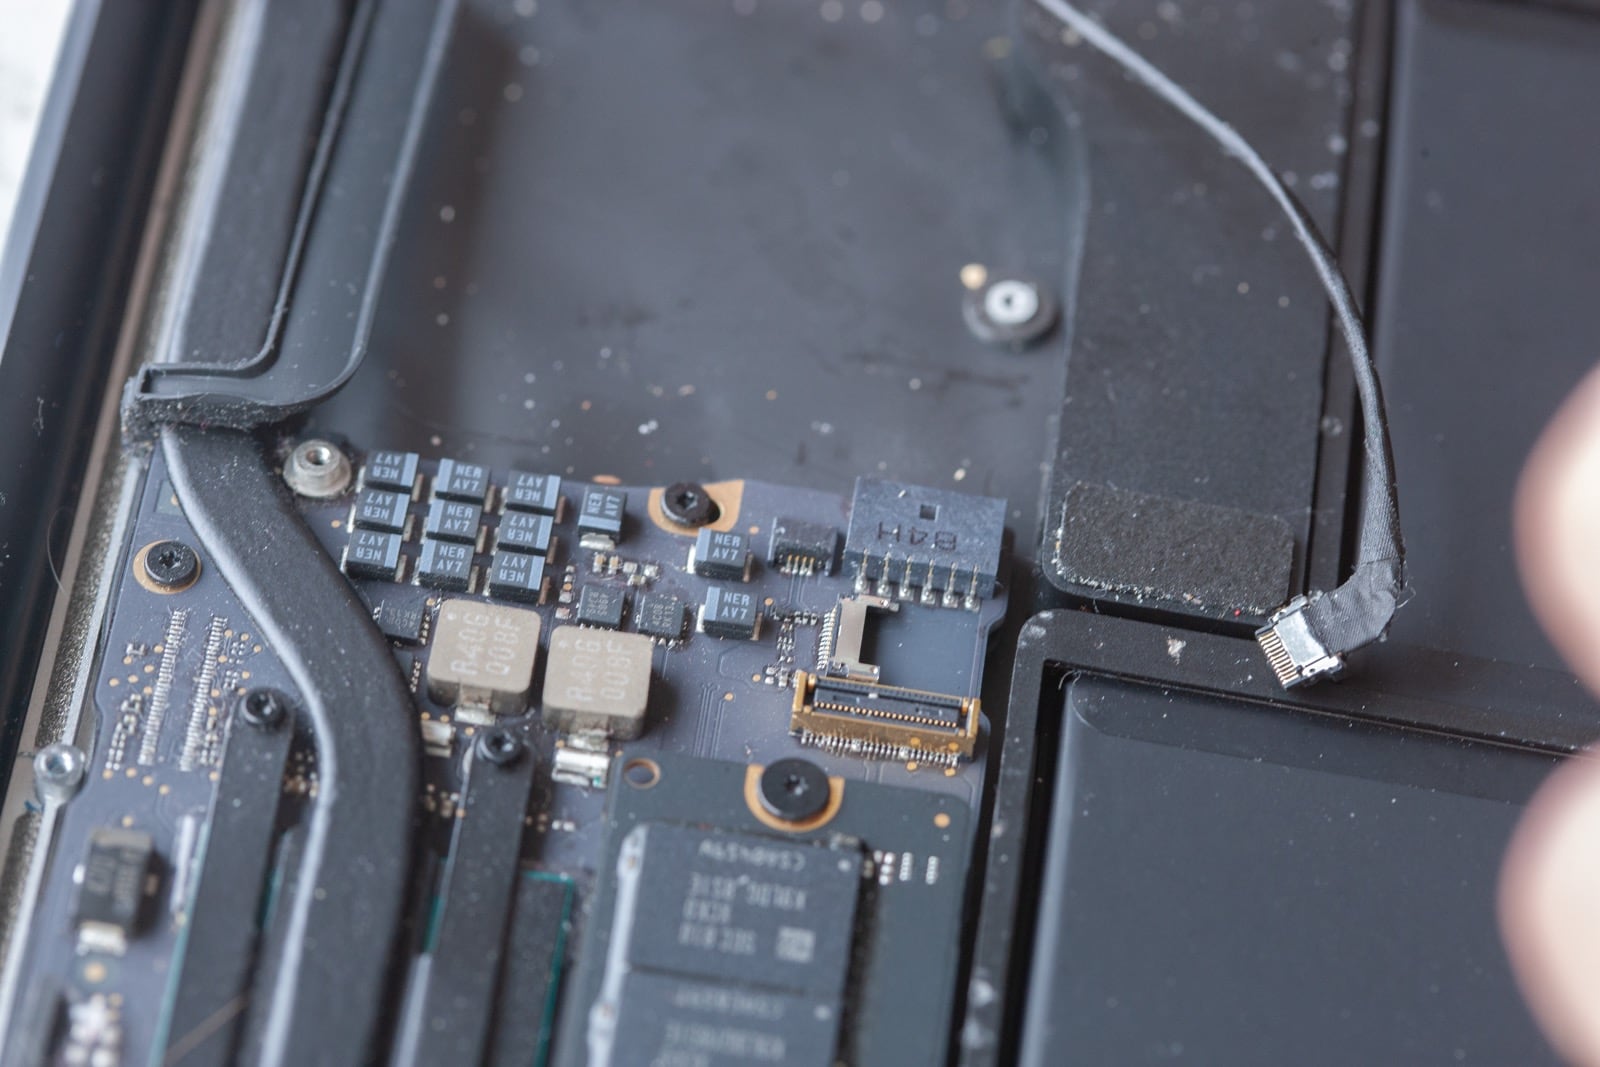
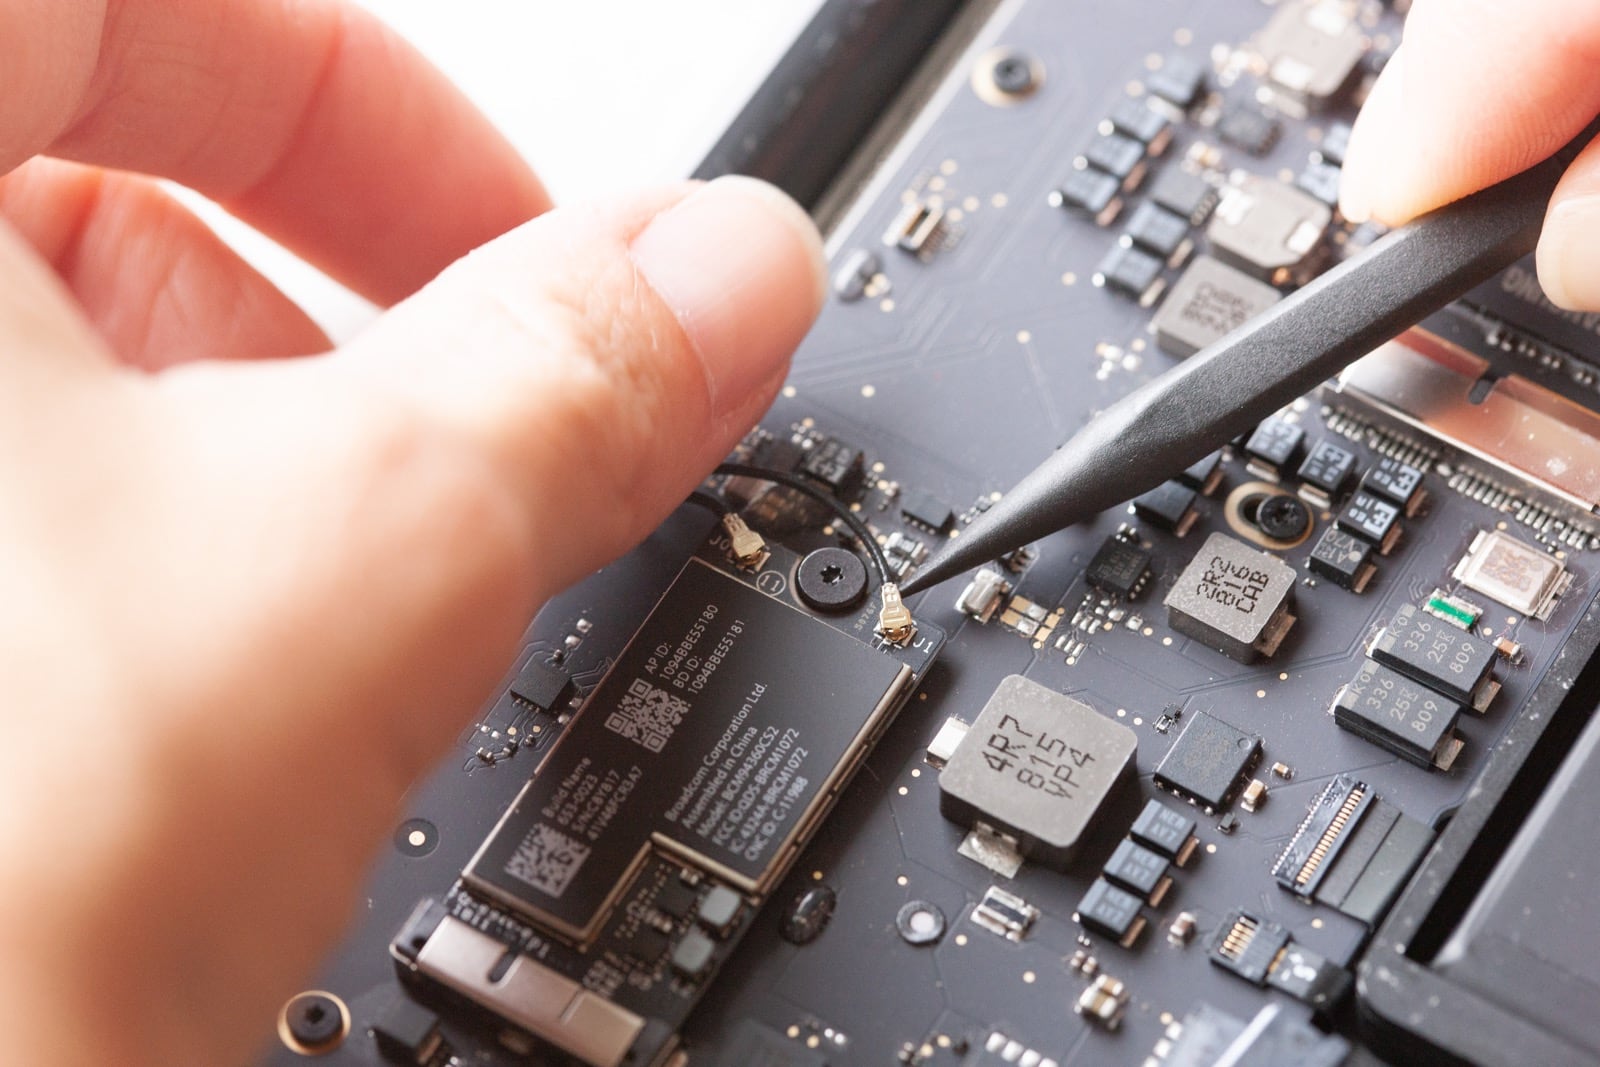
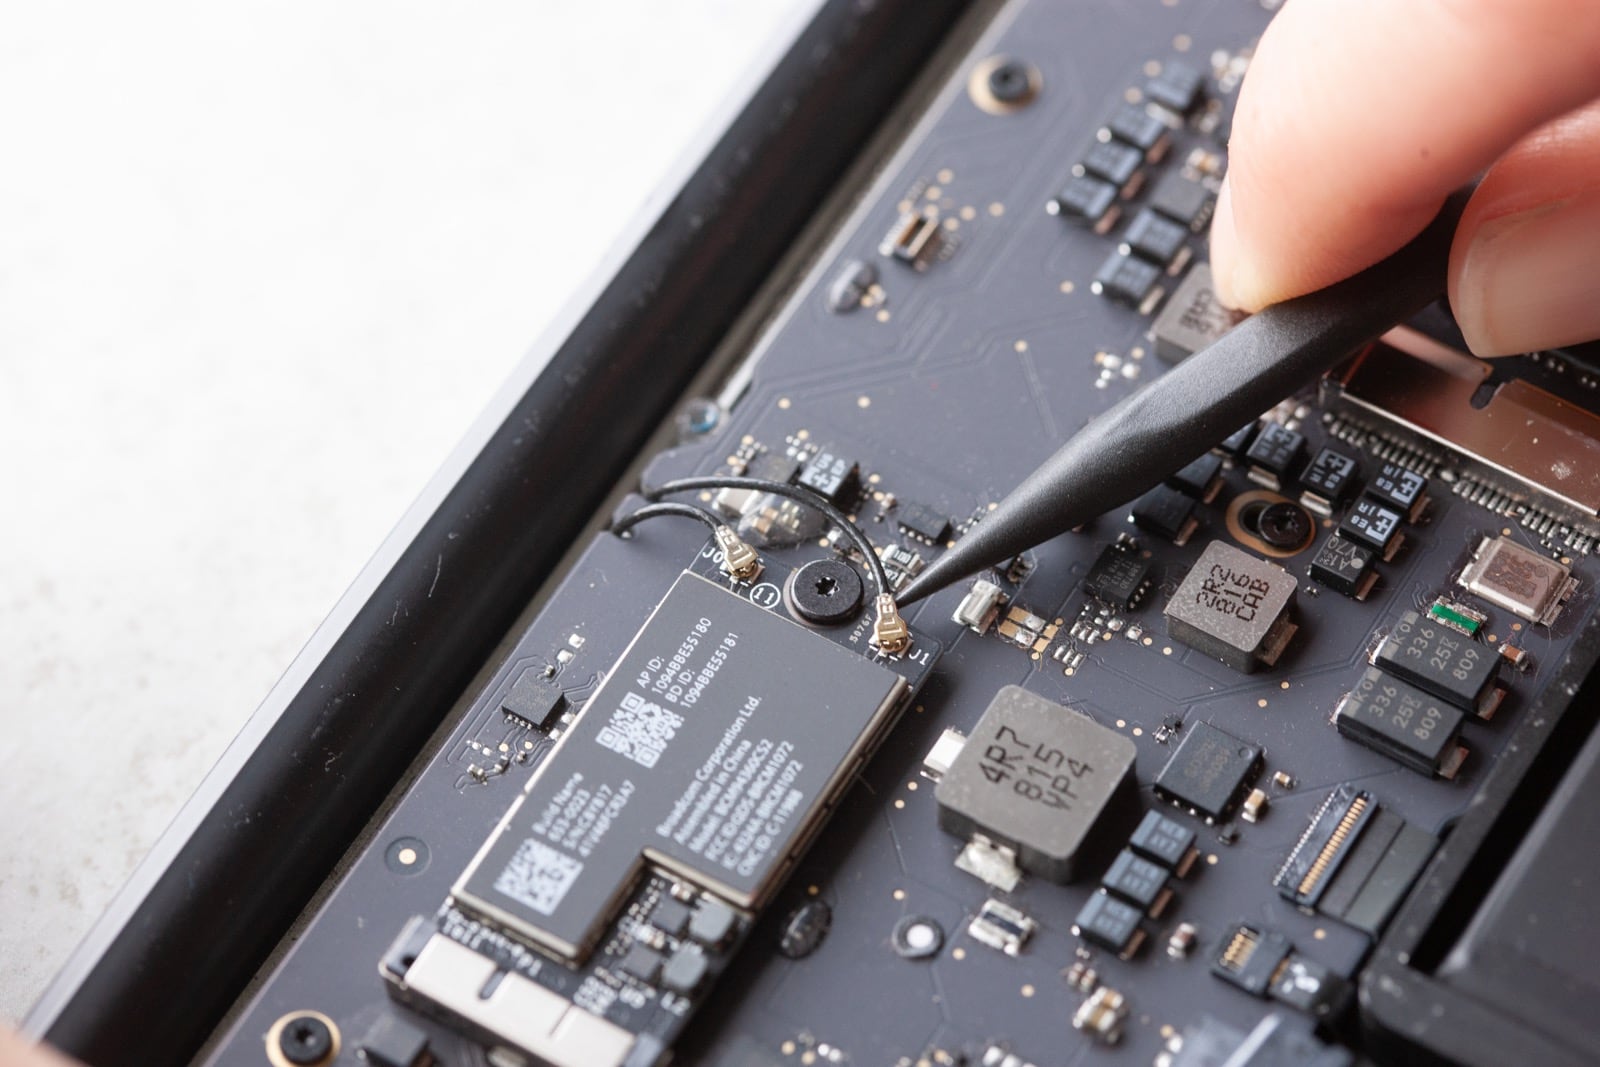
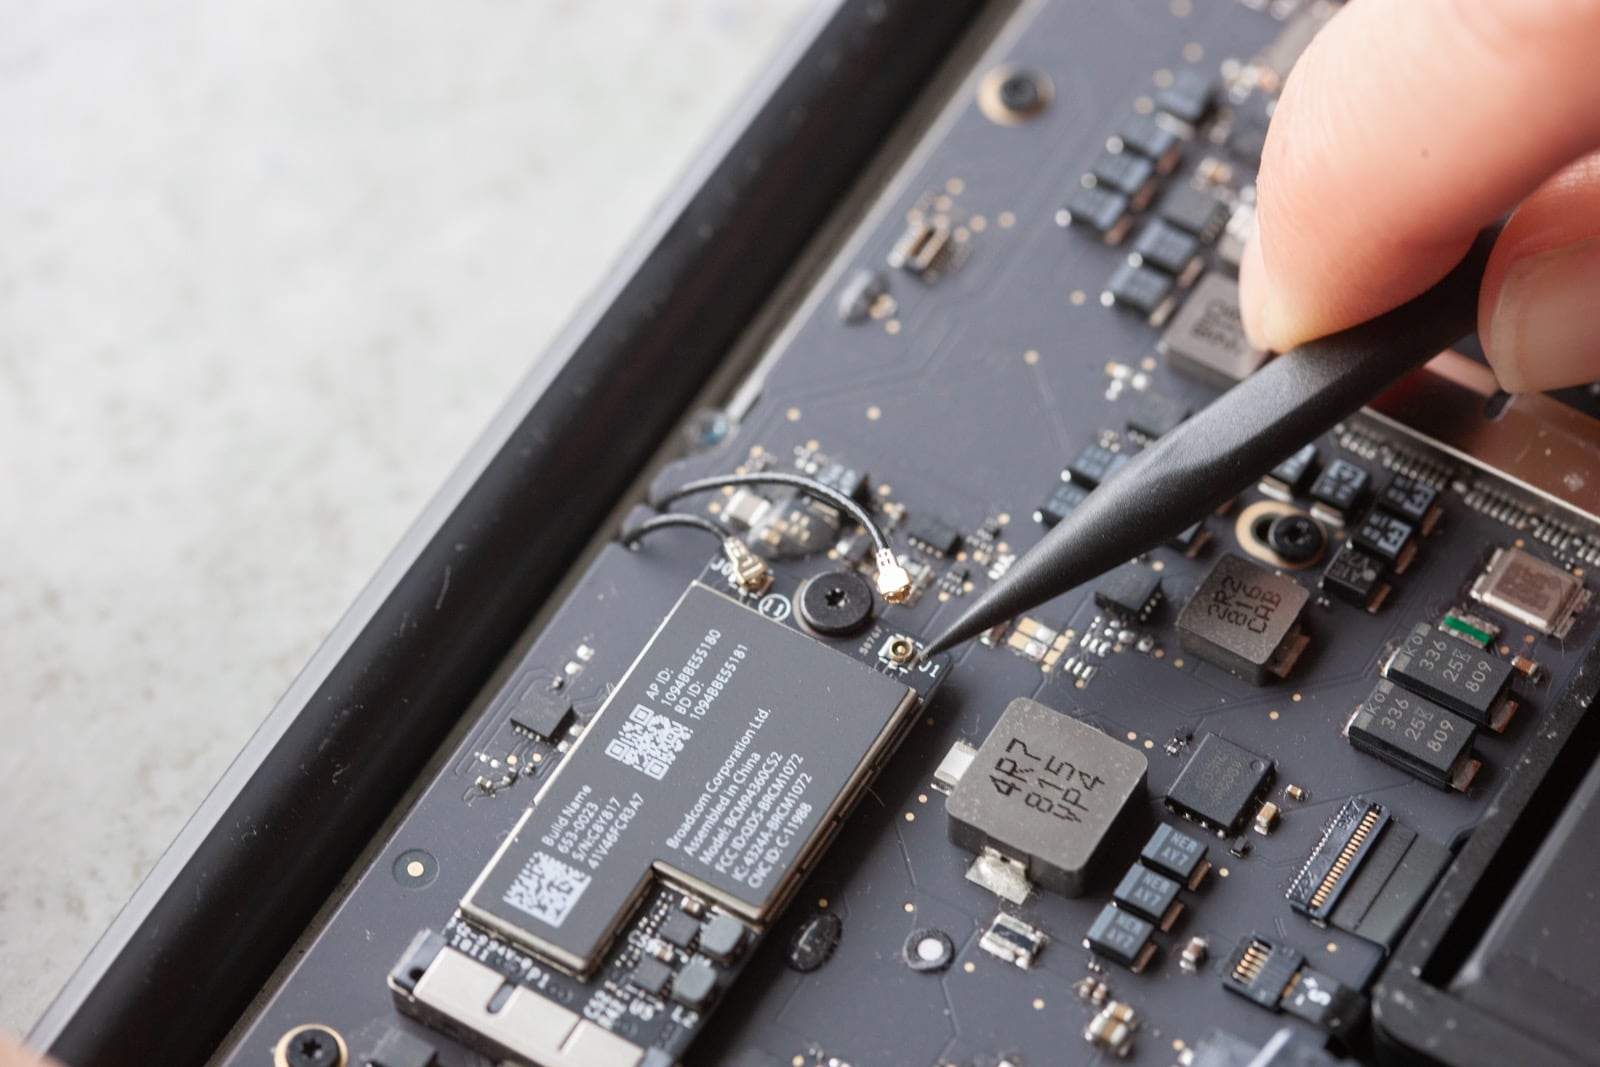
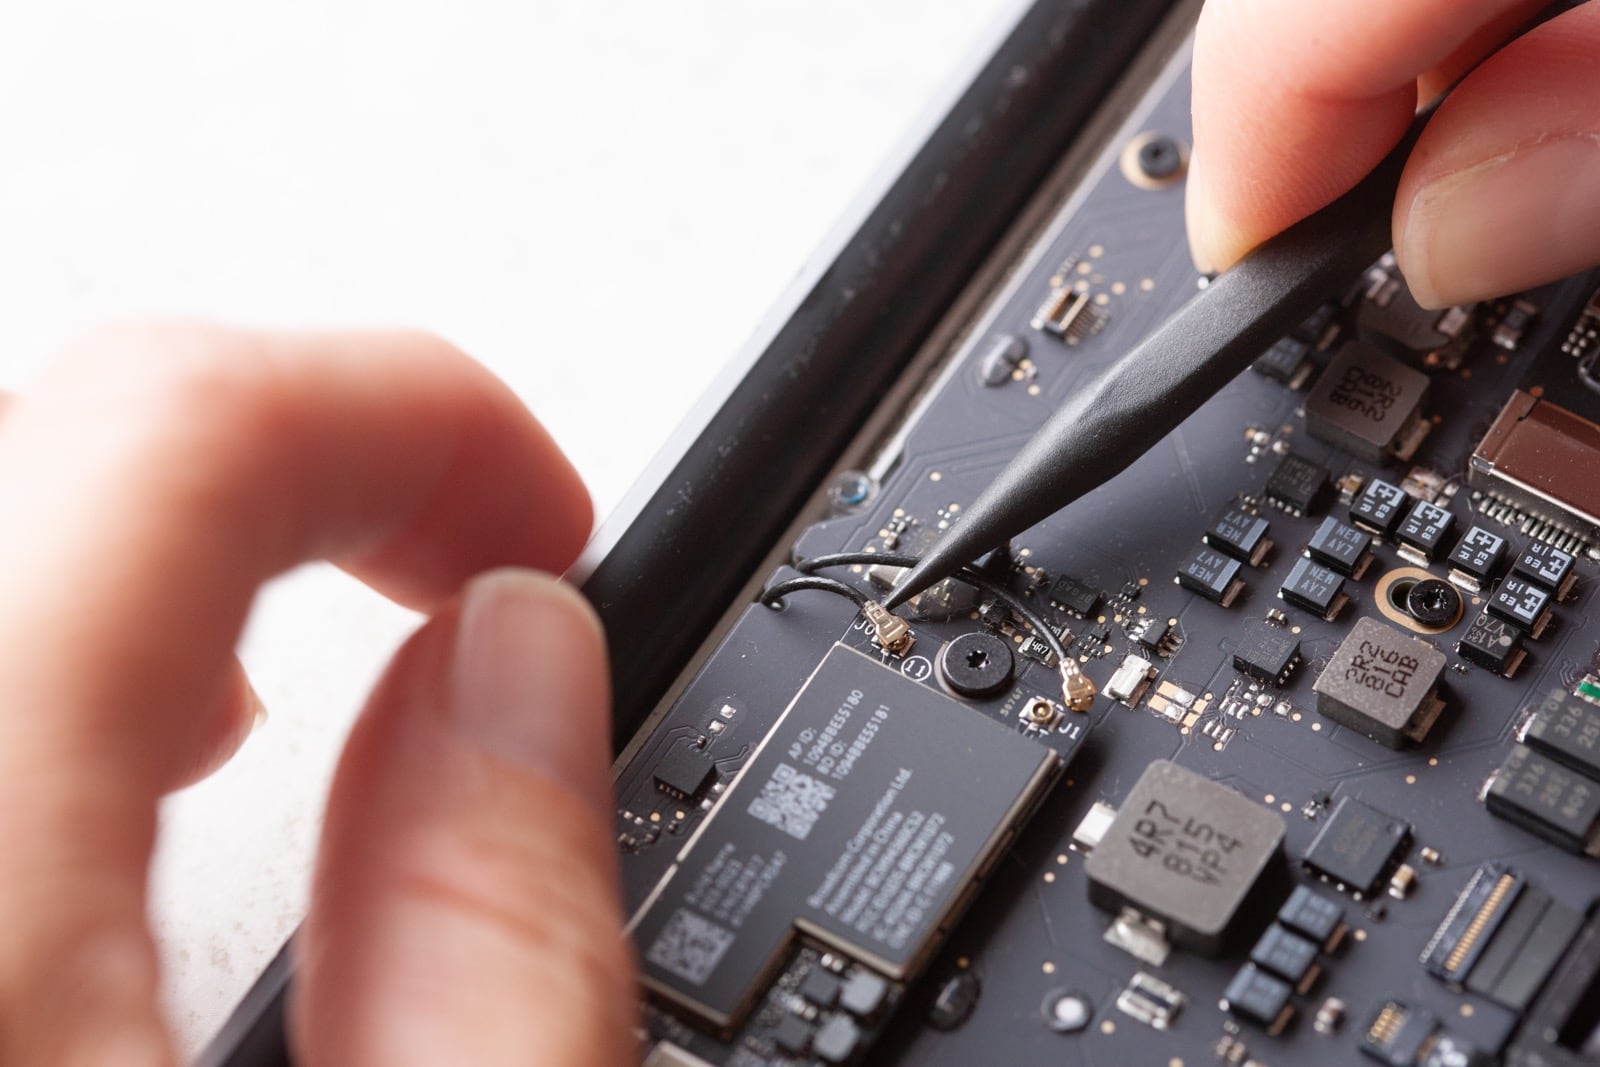
Step 11 – Disconnect the antenna cables from the Airport card.
Take a deep breath and take your time here. These cables are pretty delicate and I have seen a lot of connectors pulled off the cables during a first-time repair.
The trick is to wiggle the connector off by lifting it straight up… rocking side to side is fine to get it to loosen, but most of the pressure should be going straight up.
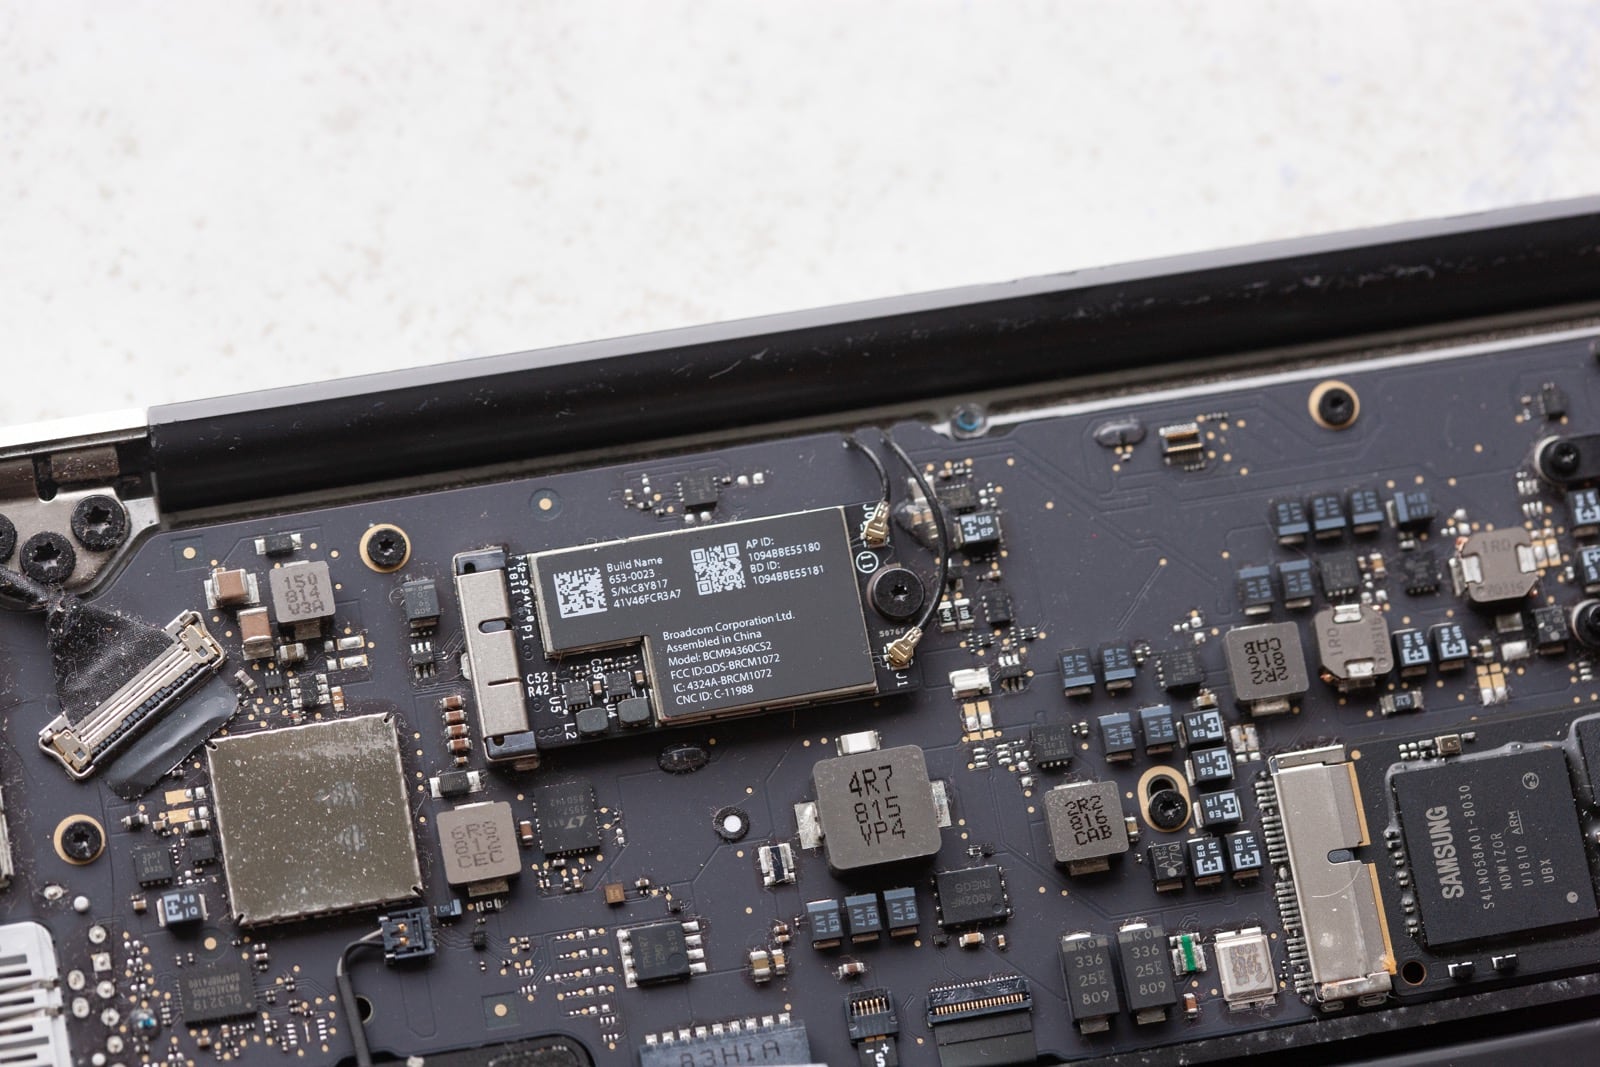
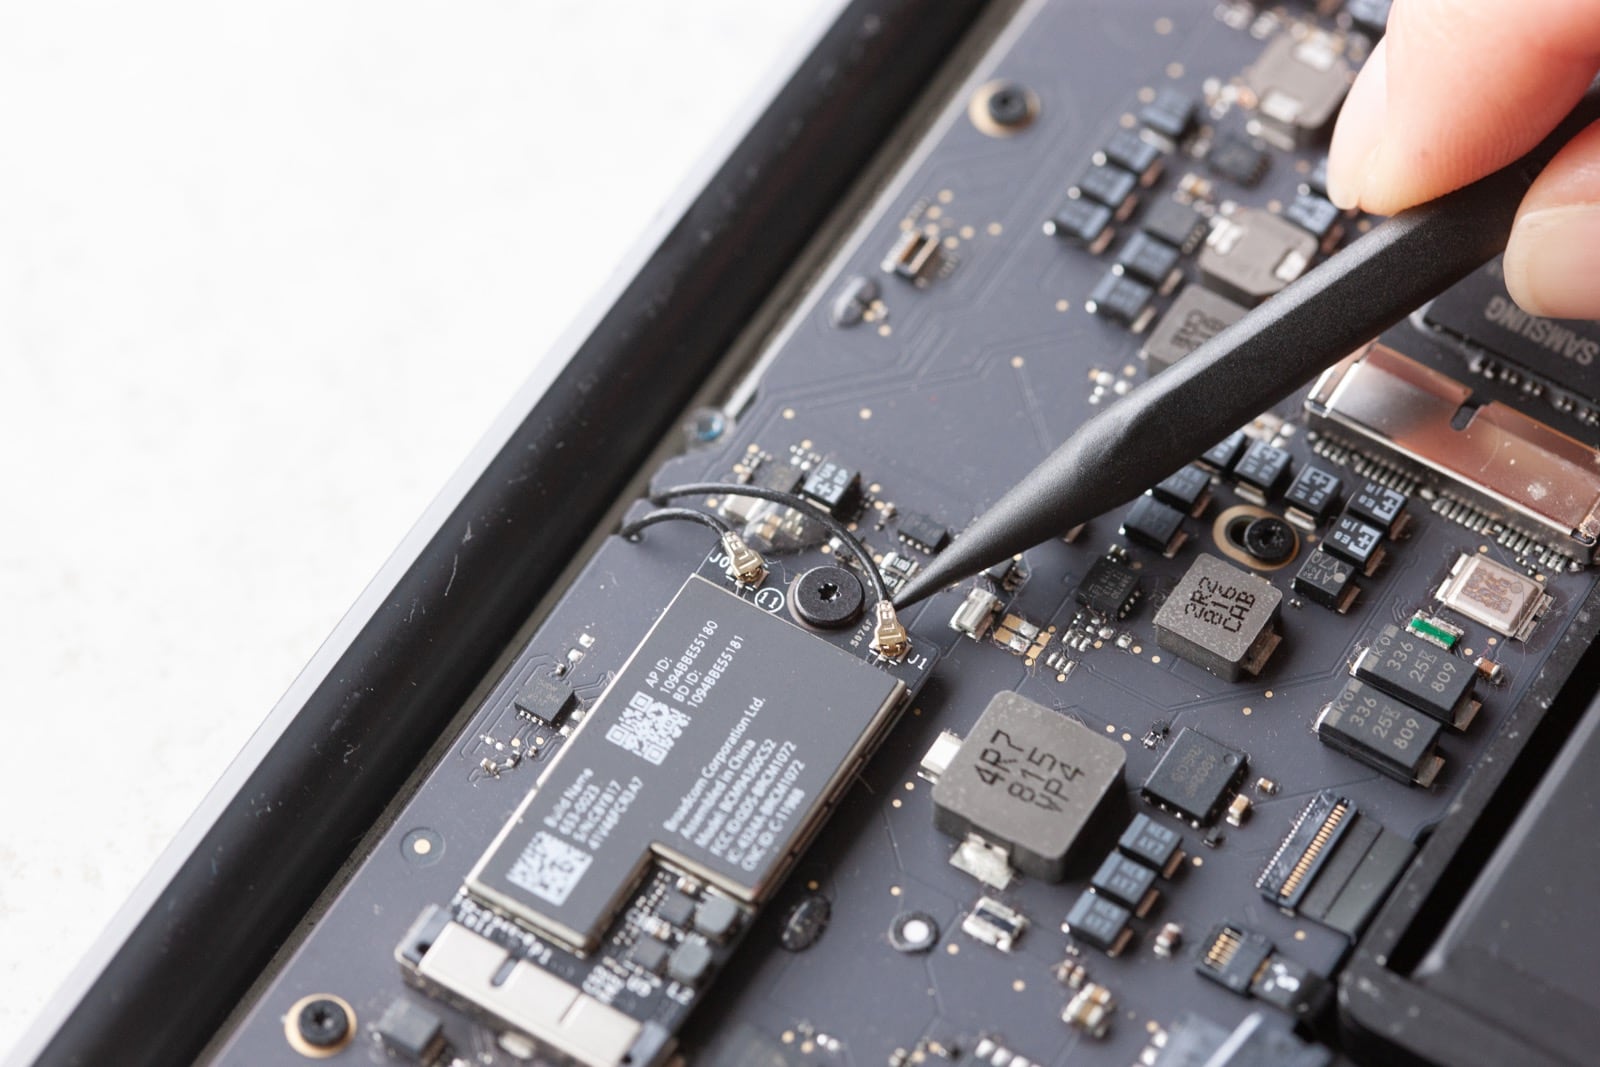
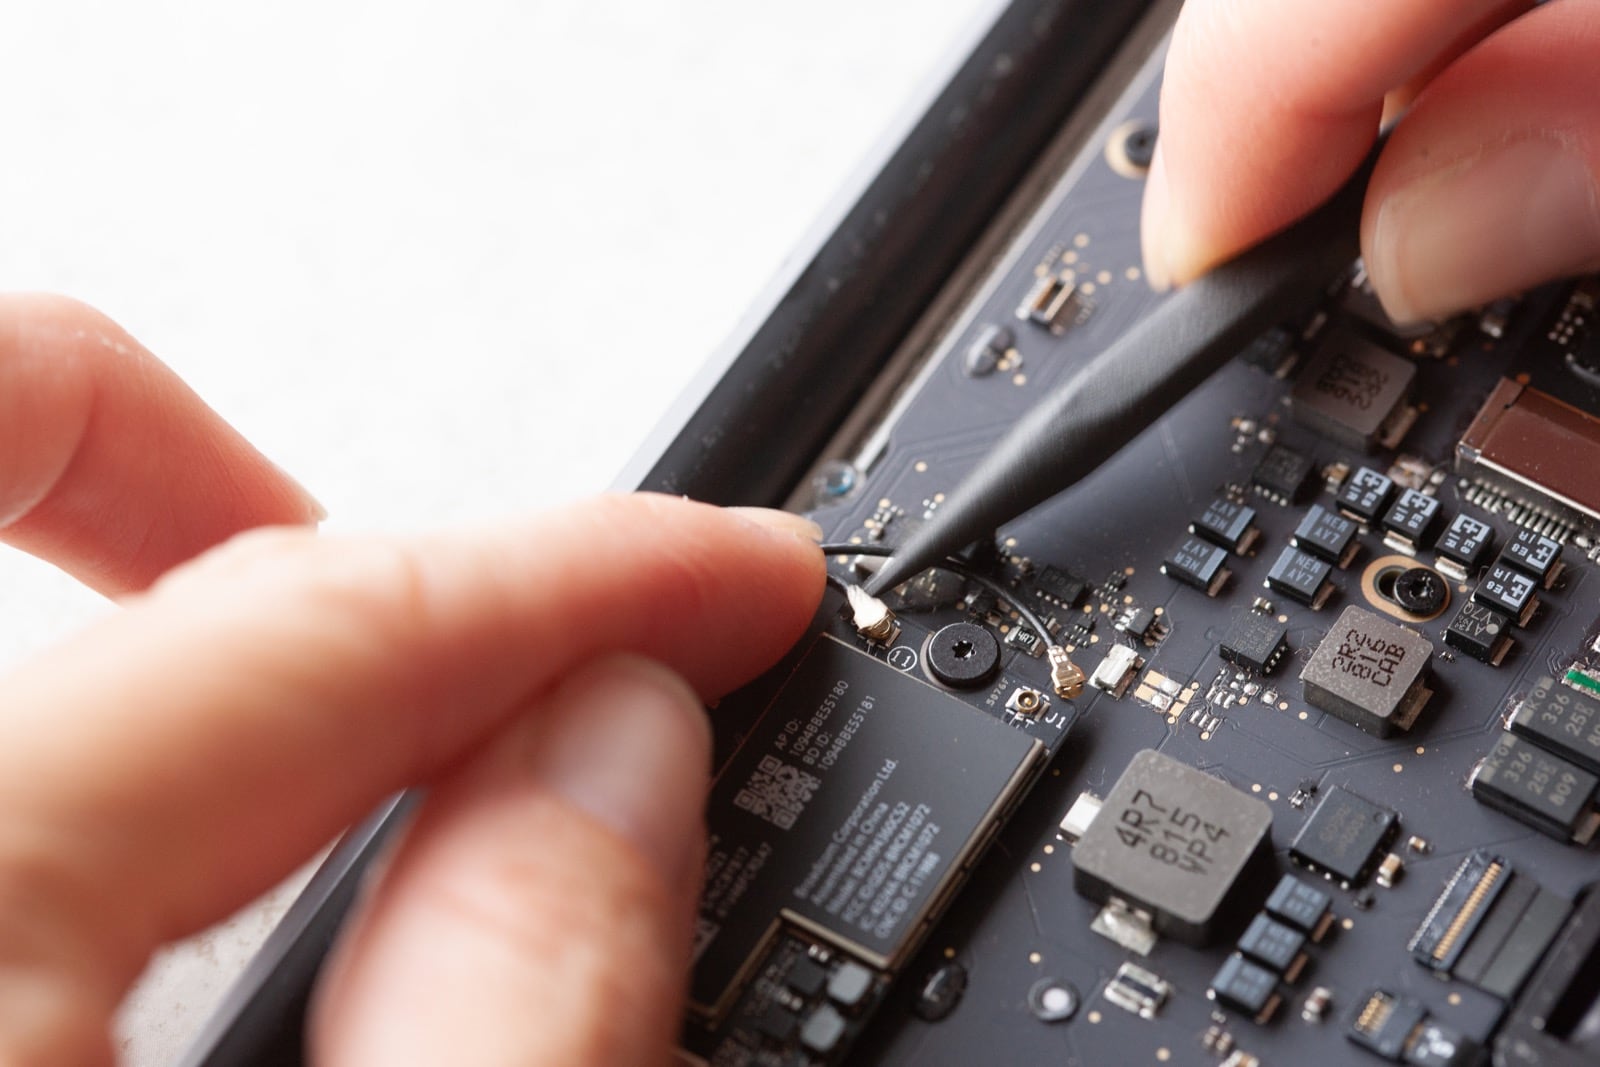
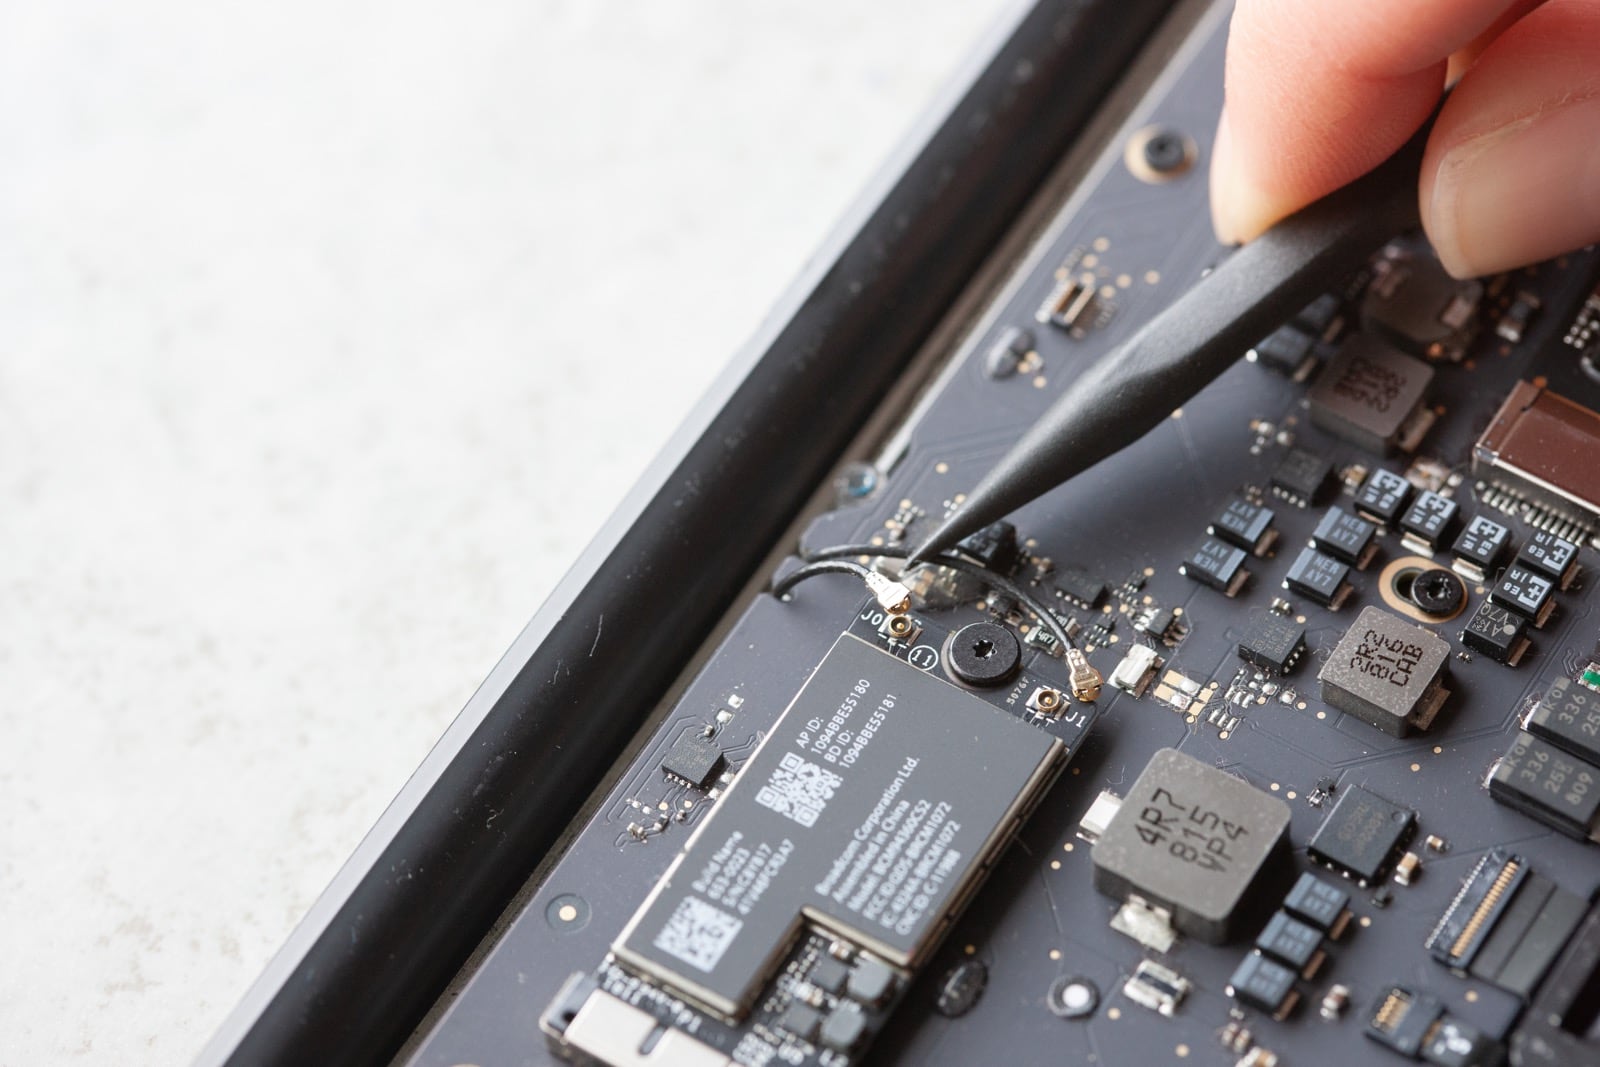
Step 12 – Disconnect the LVDS cable from the logic board.
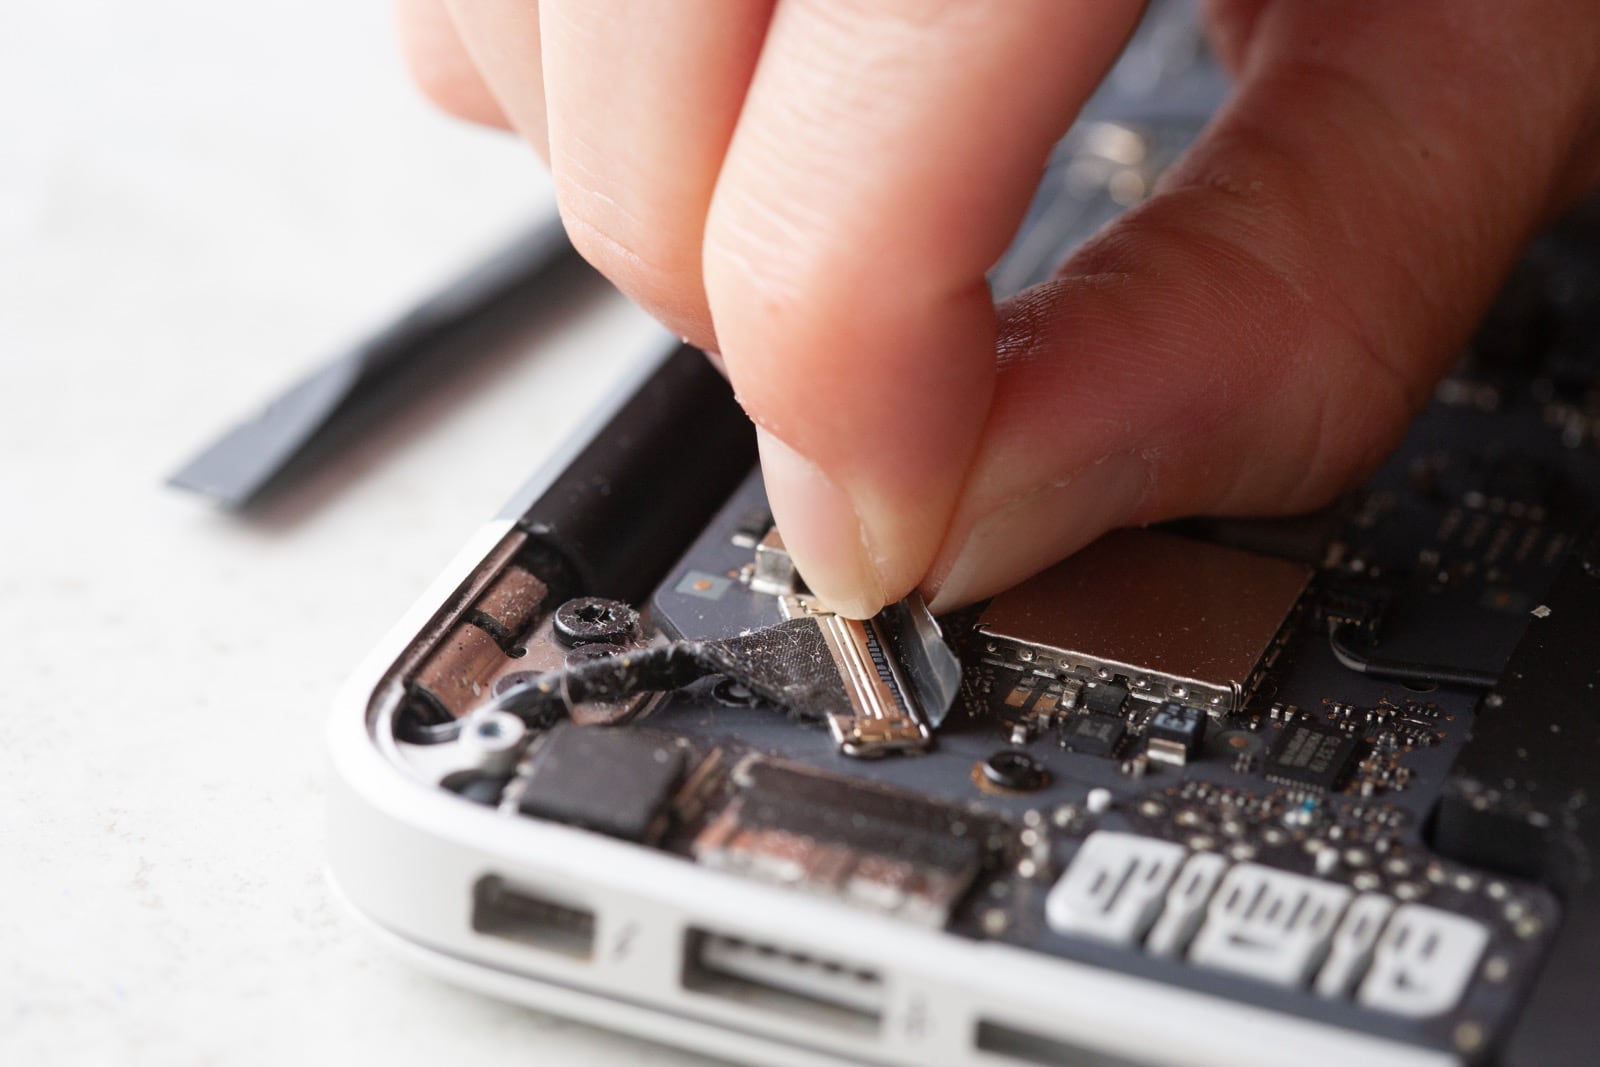
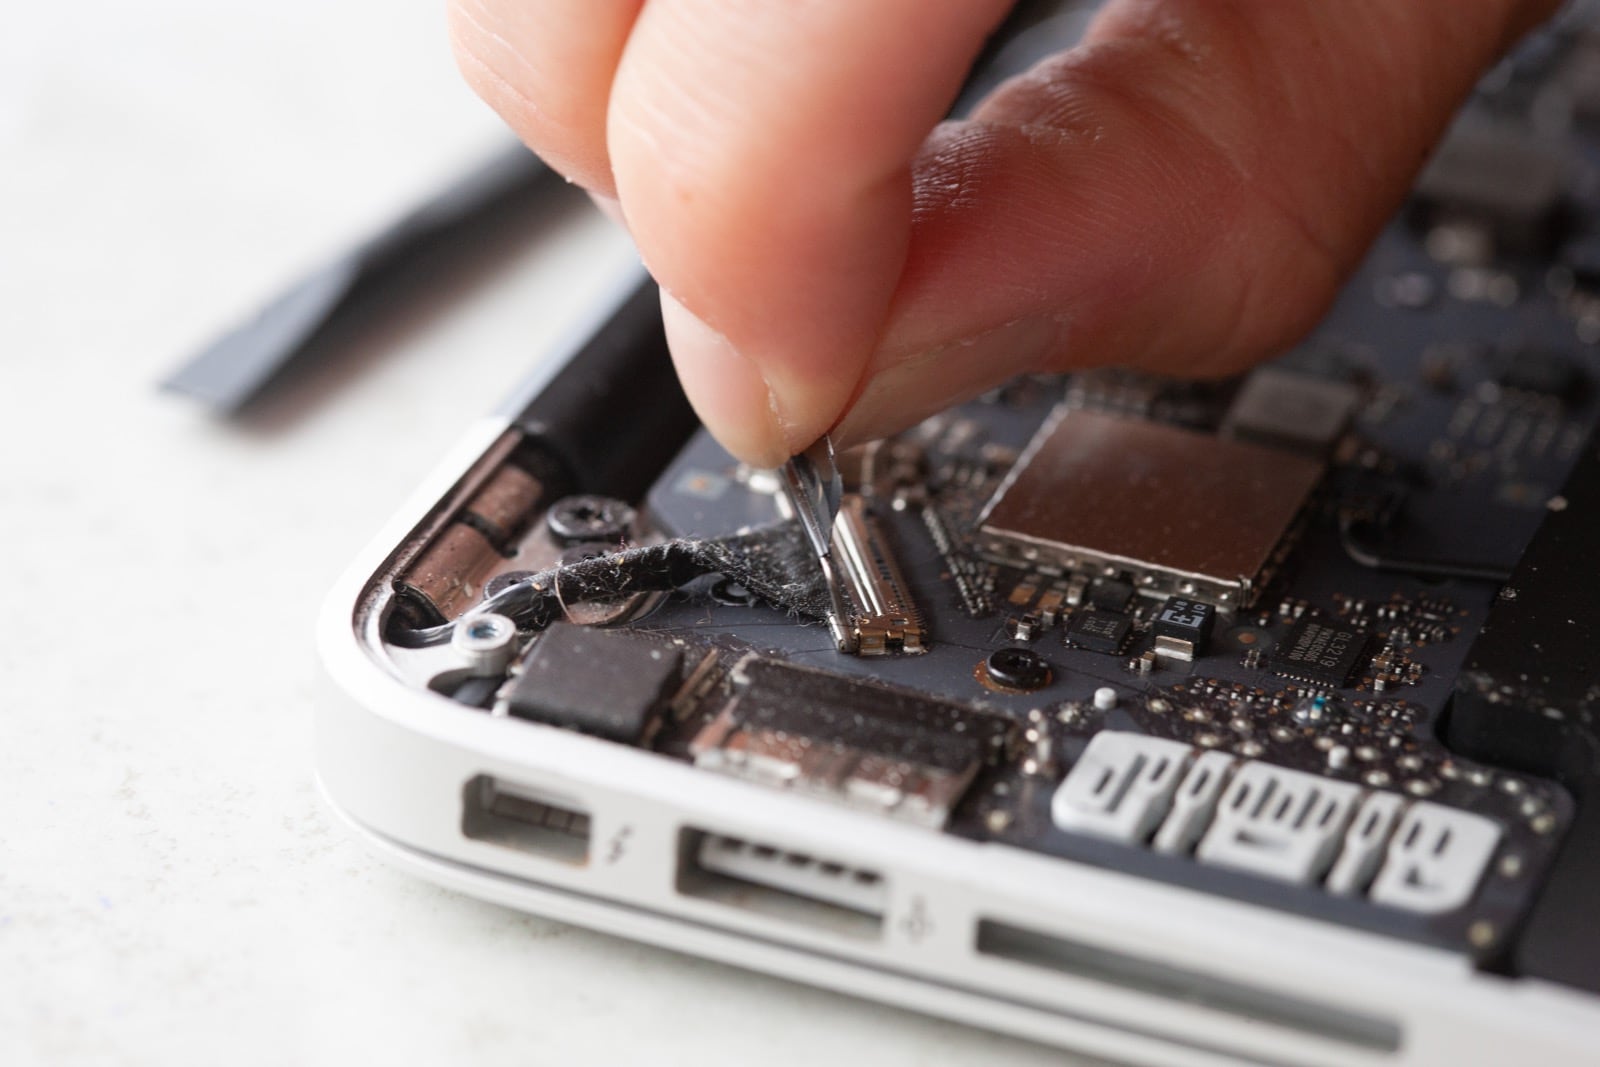
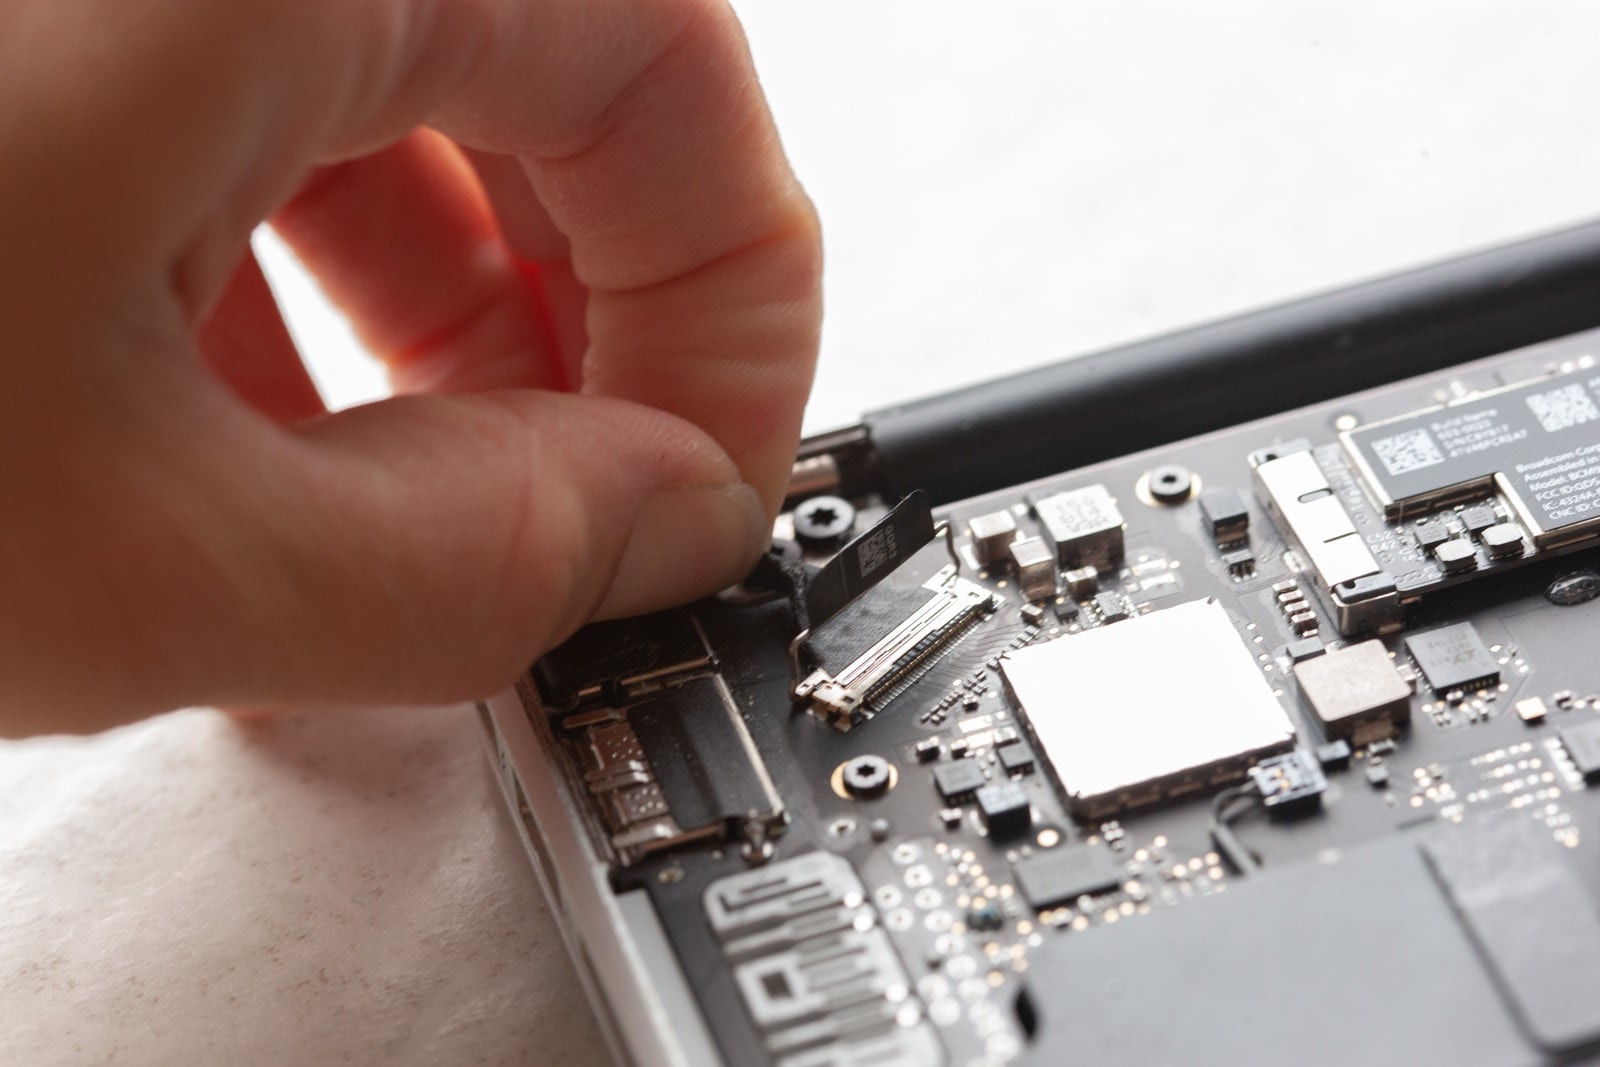
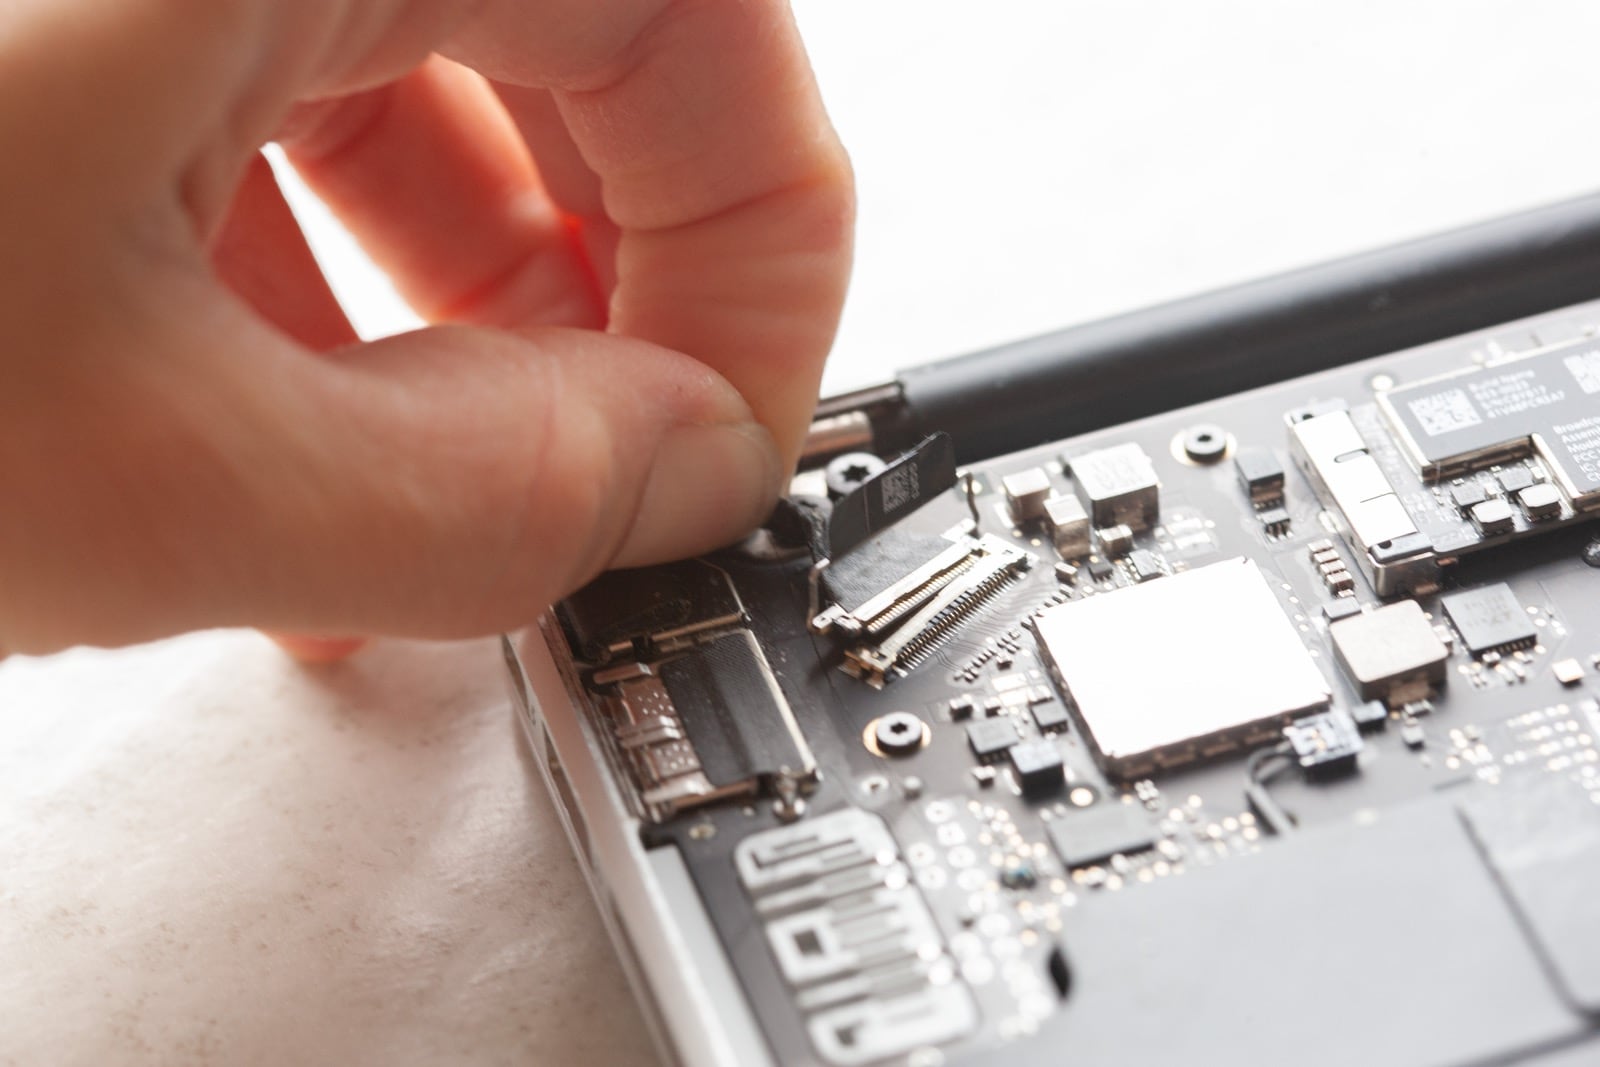
The LVDS connector is held in place by a locking bracket. There is normally a black plastic tab that you use to lift directly up to unlock the connector. Once the LVDS cable is unlocked, you can pull the cable straight back (NOT UP) as shown in the pictures below.
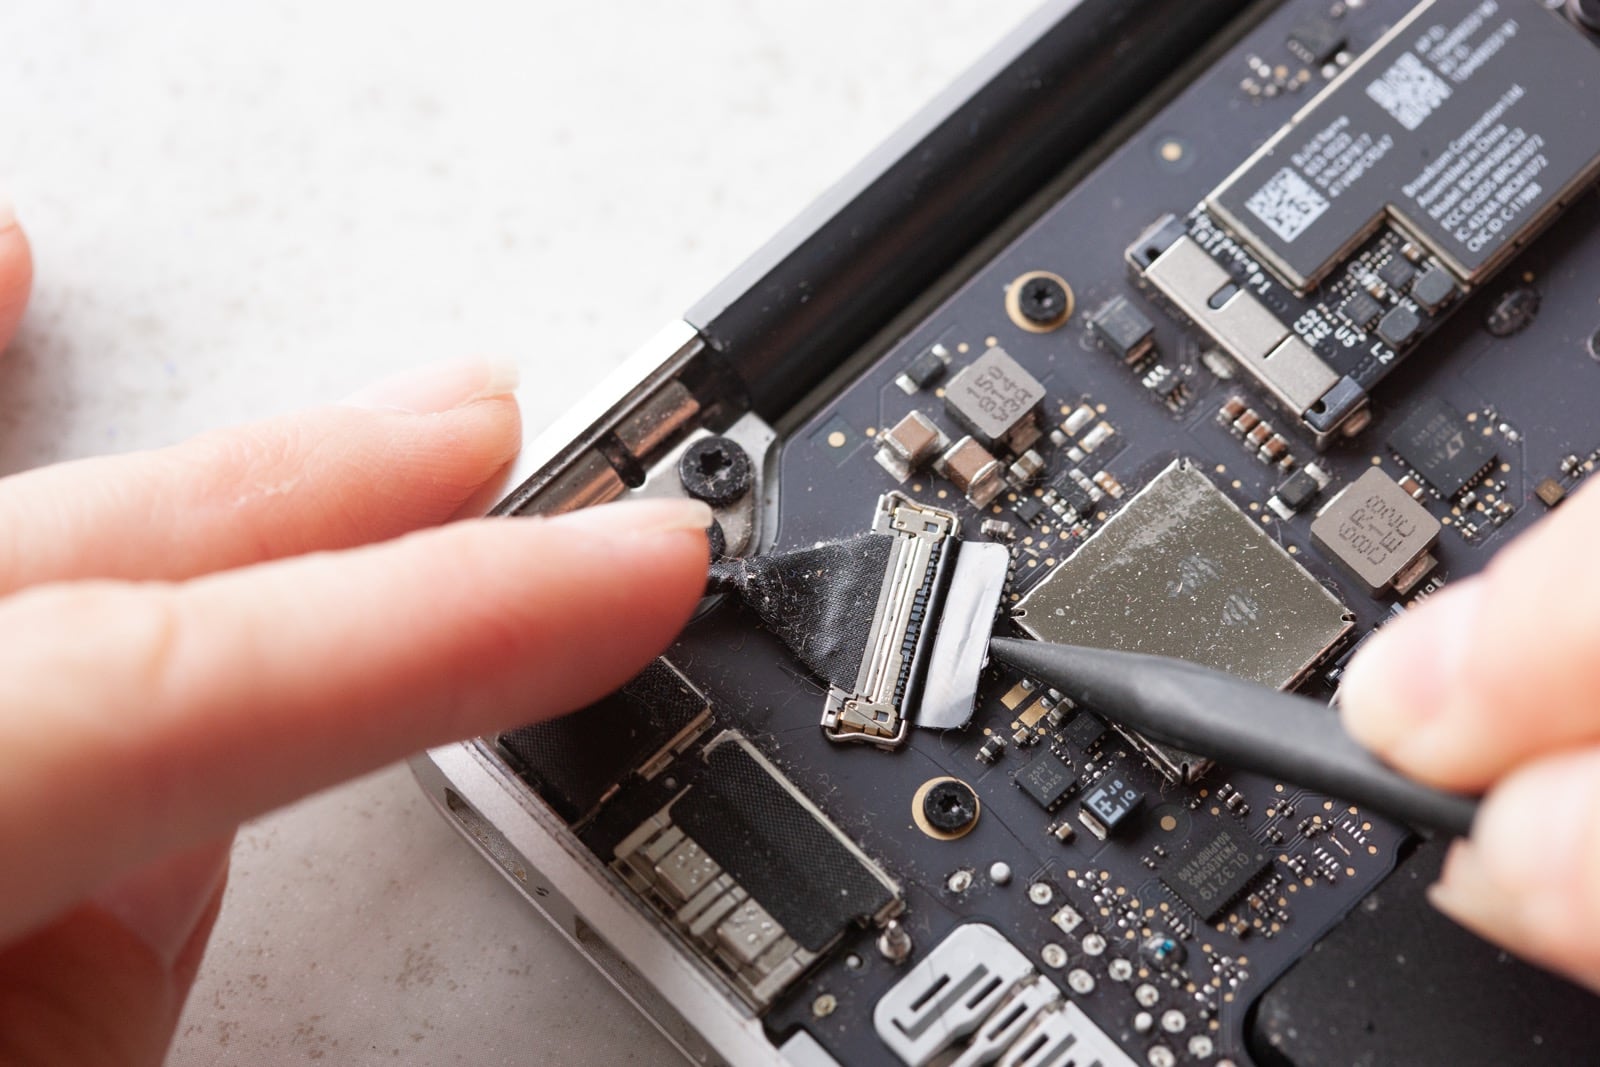
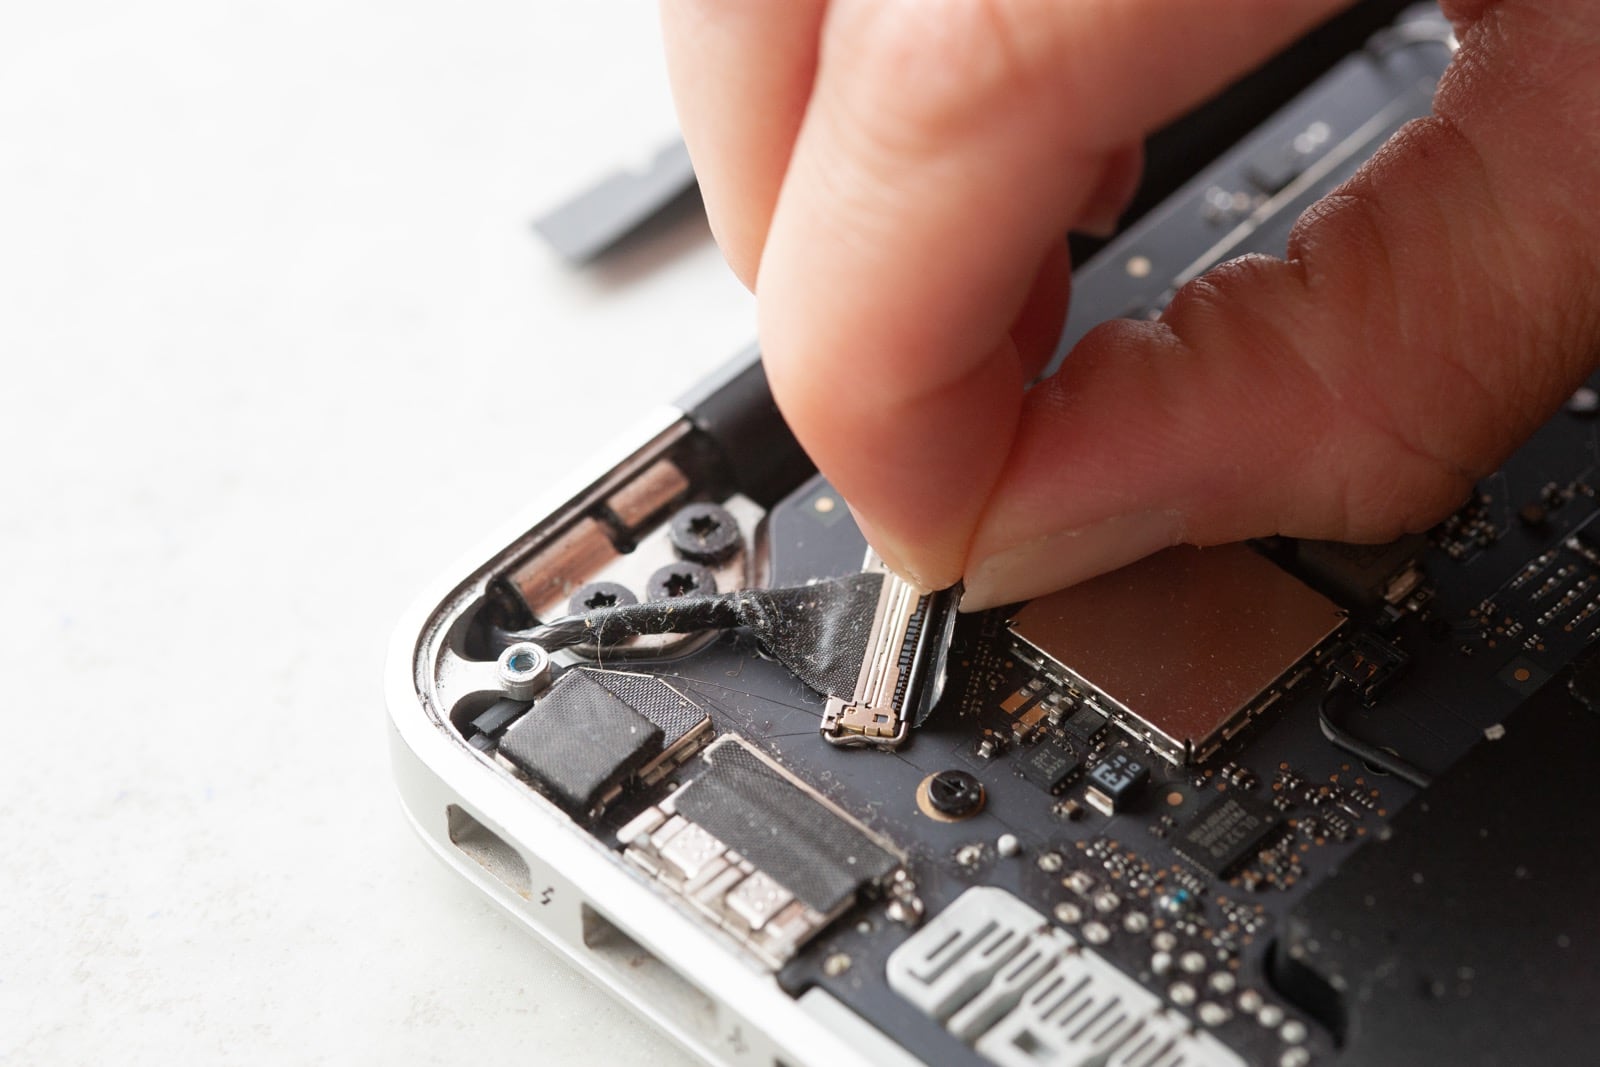
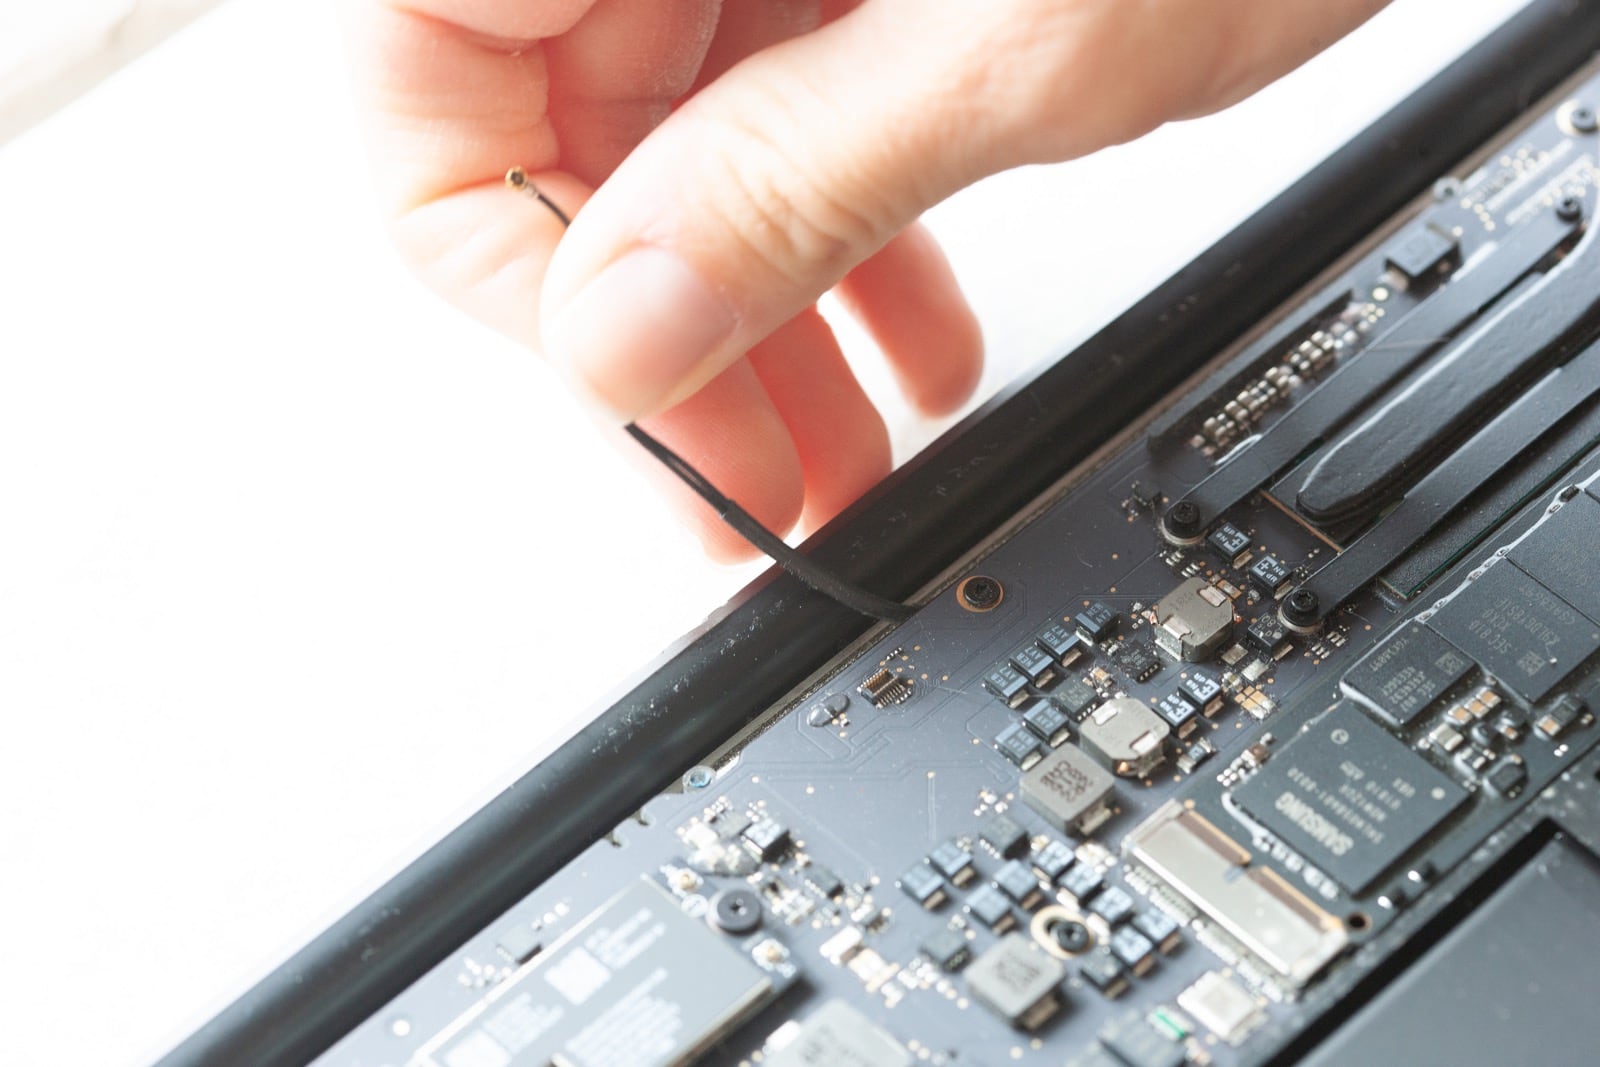
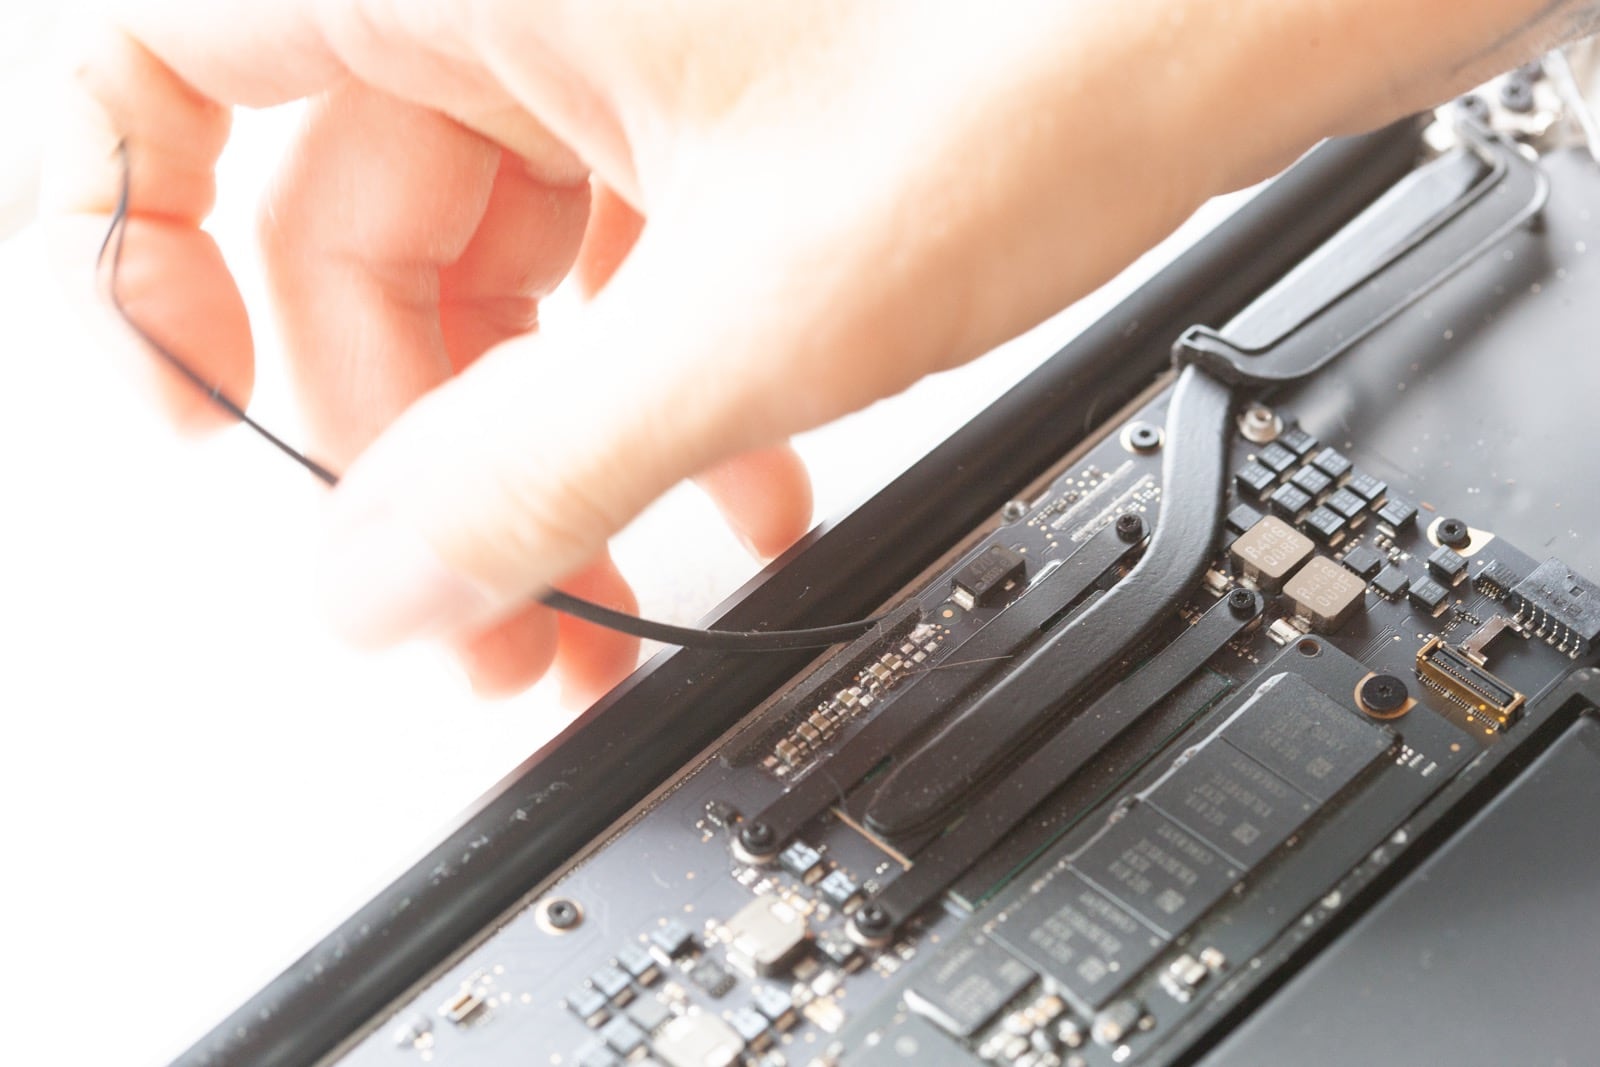
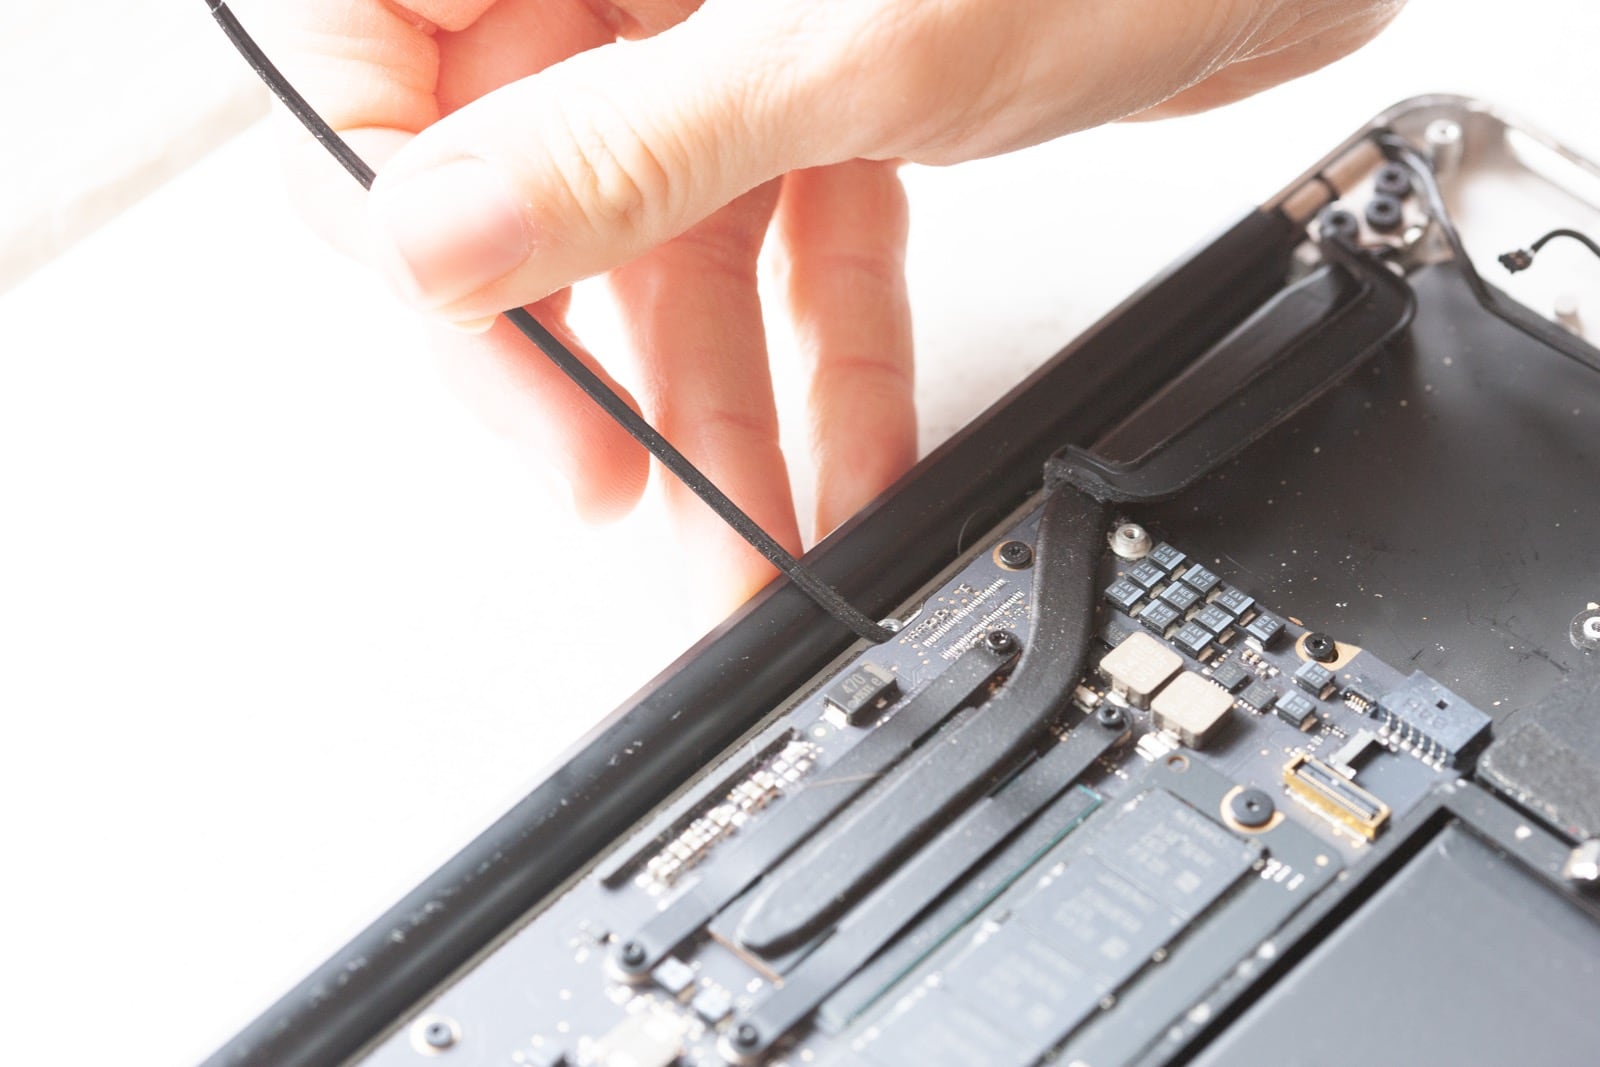
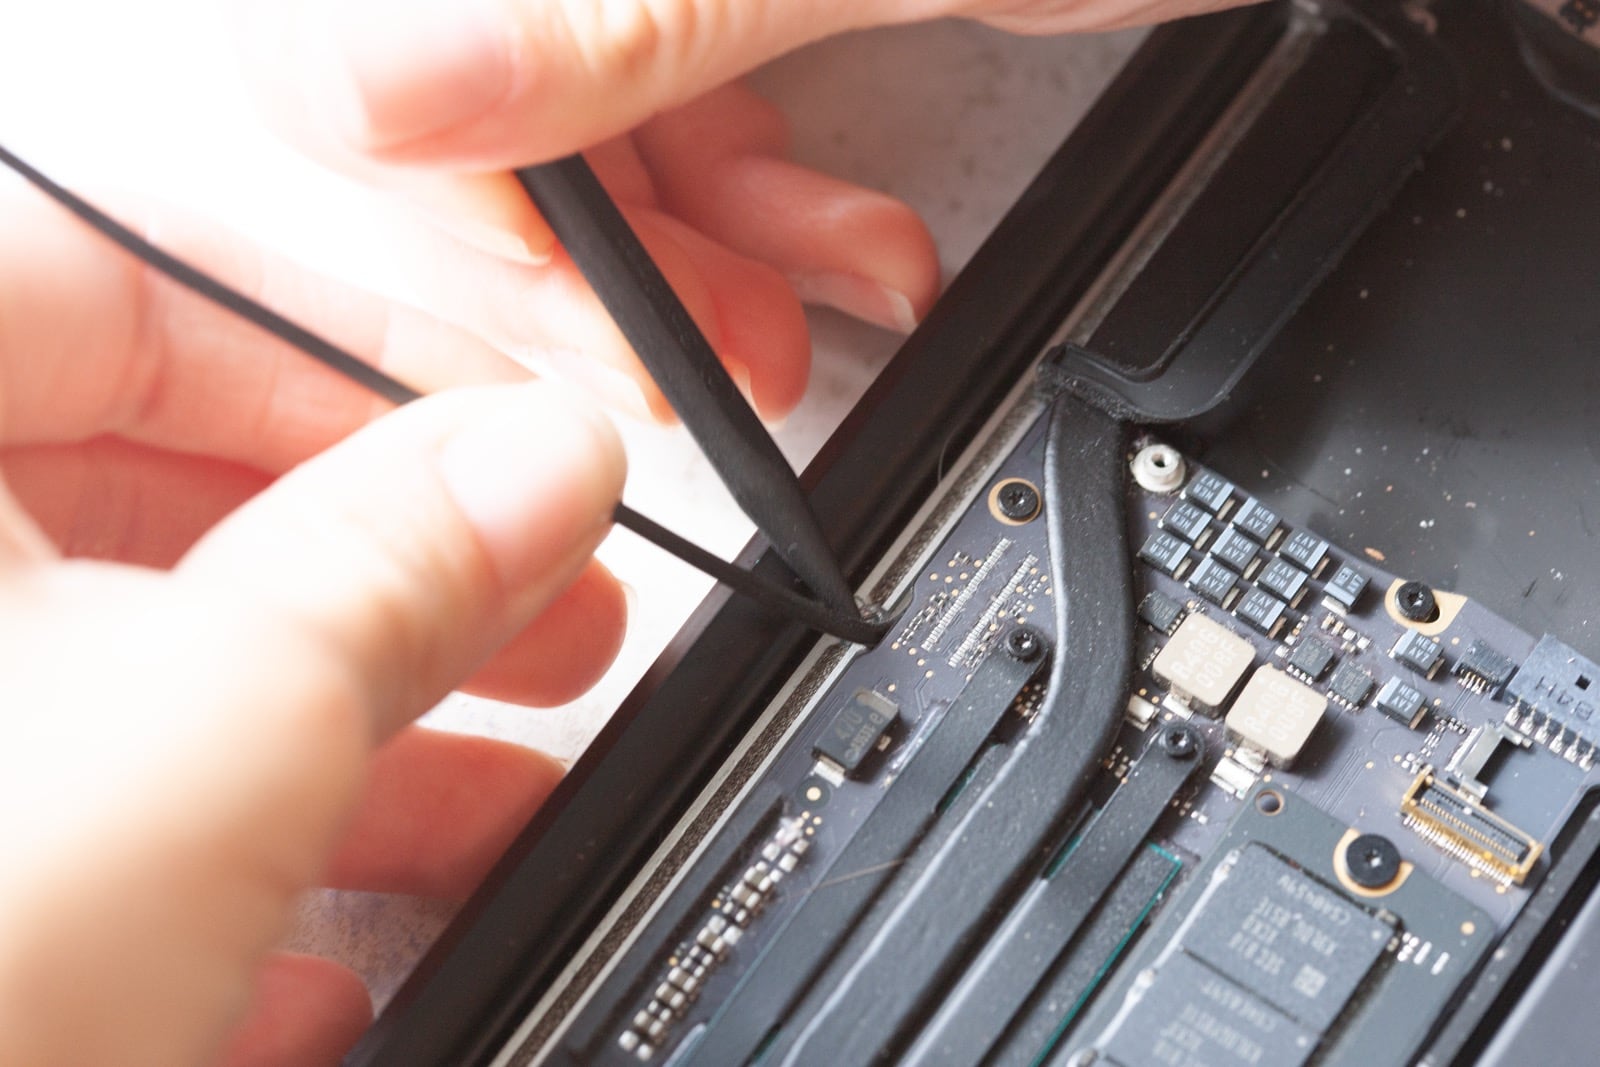
Step 13 – Deroute antenna cable
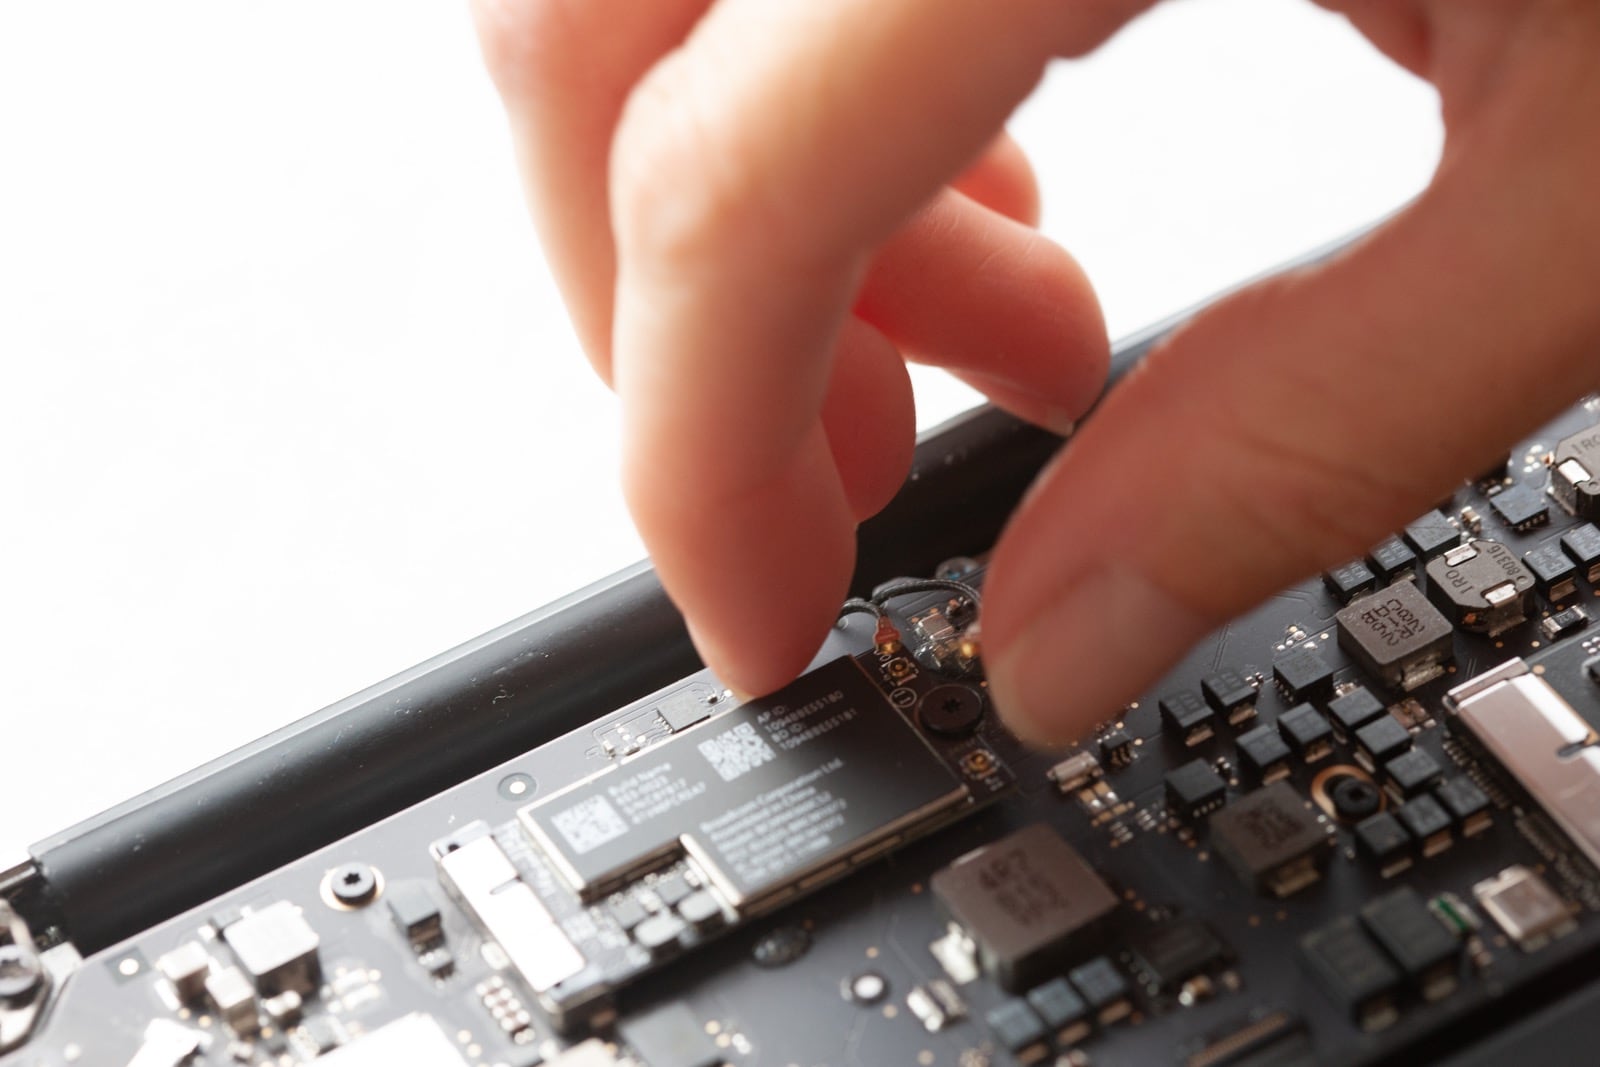
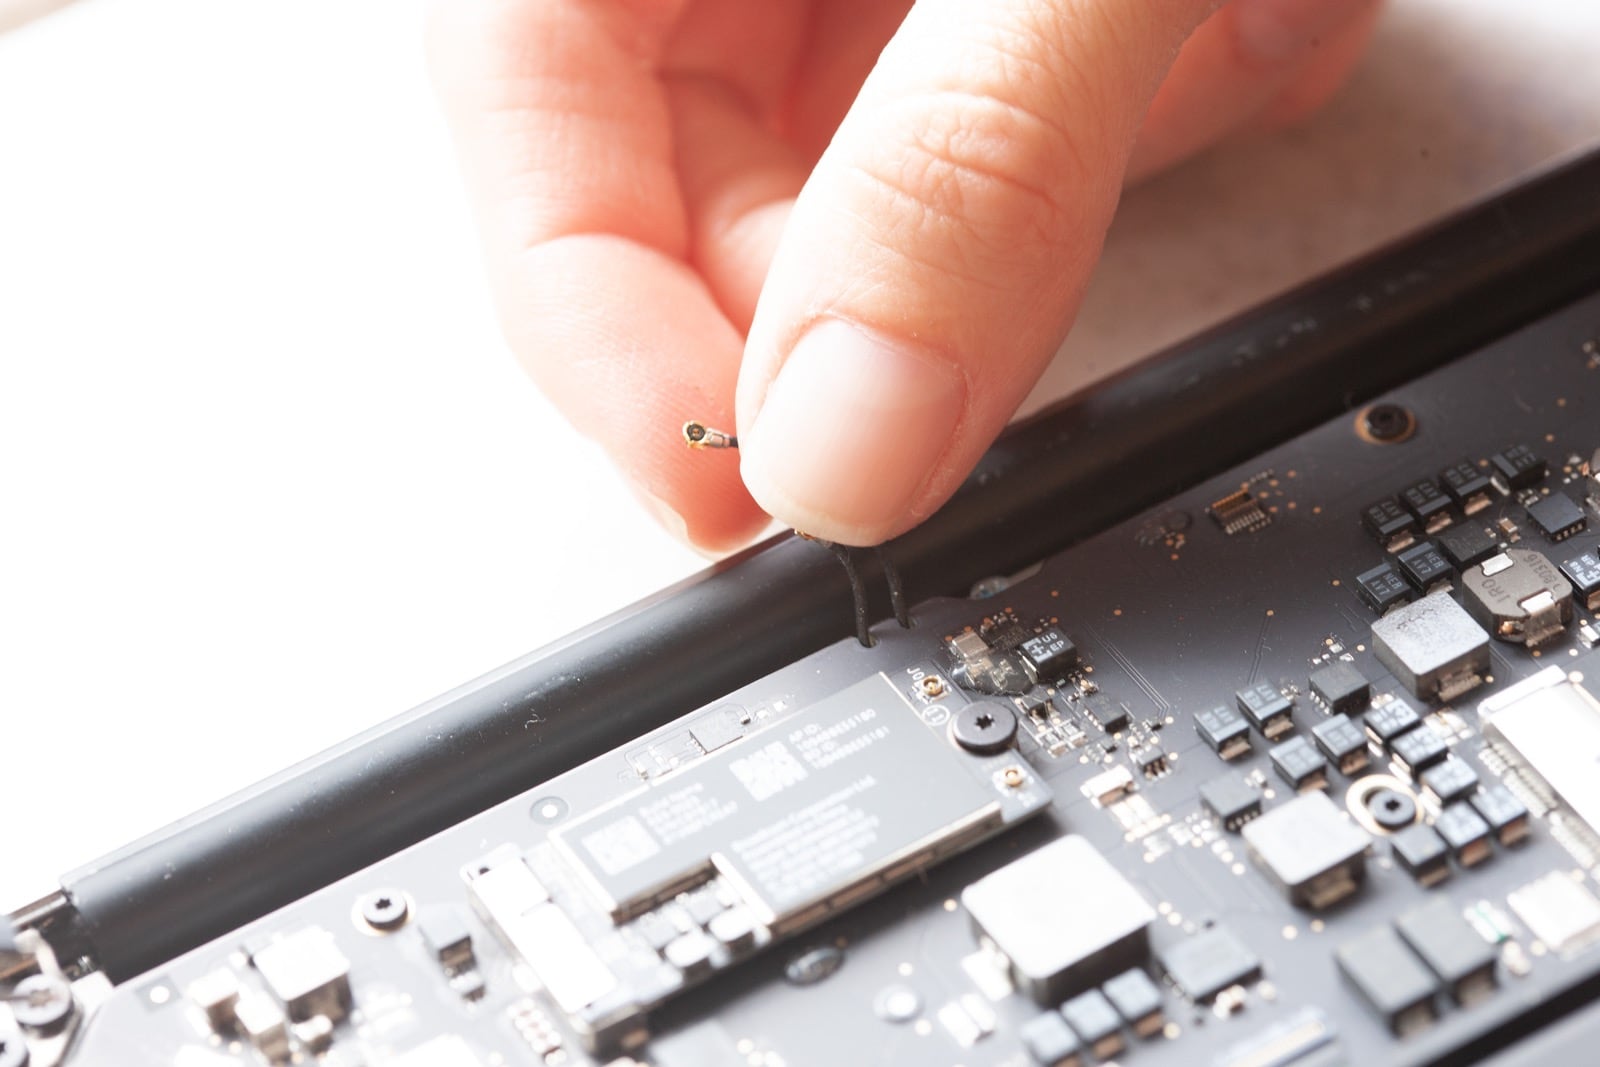
Remember that antenna cable you disconnected a bit ago? It is time to lift that cable out until it reaches the hinge assembly where it is held down by screws.
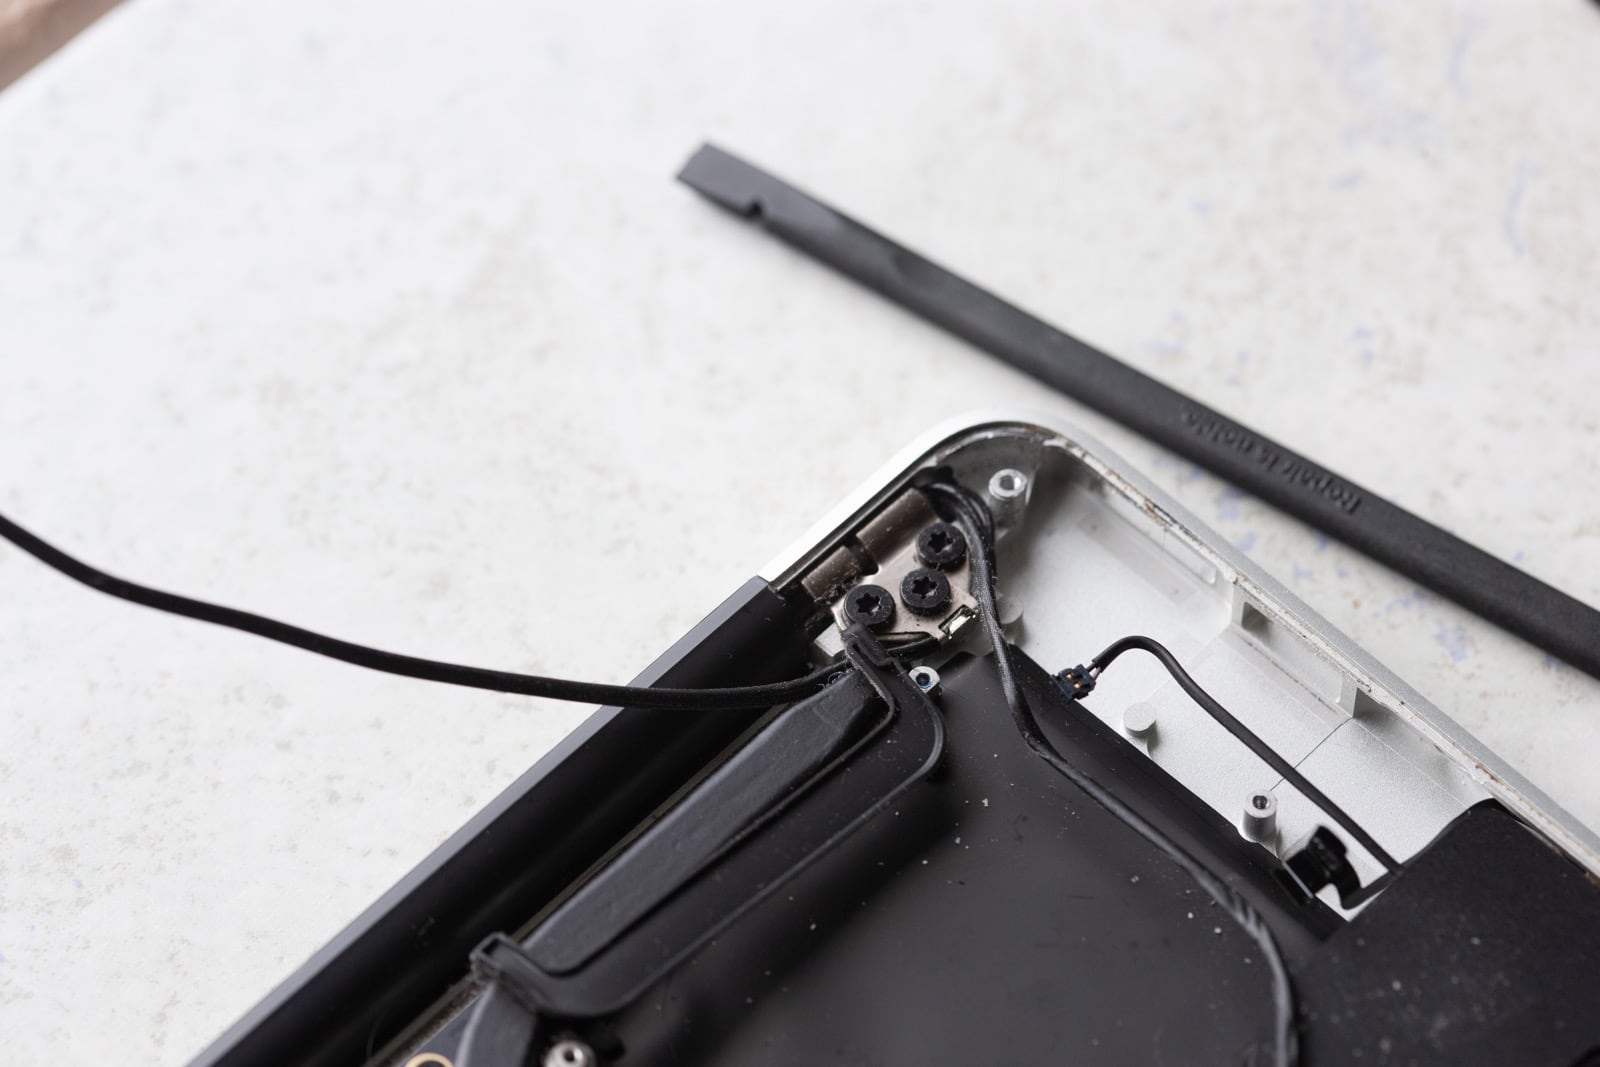
Step 14 – Removing the hinge screws.
You are almost halfway done with this repair! Another deep breath and remember to take your time.
Start by opening the computer and placing it on its side as the pictures show. Removing the 6 screws holding down the hinges is pretty easy, but take care not to strip them. Take your time and focus on one at a time.
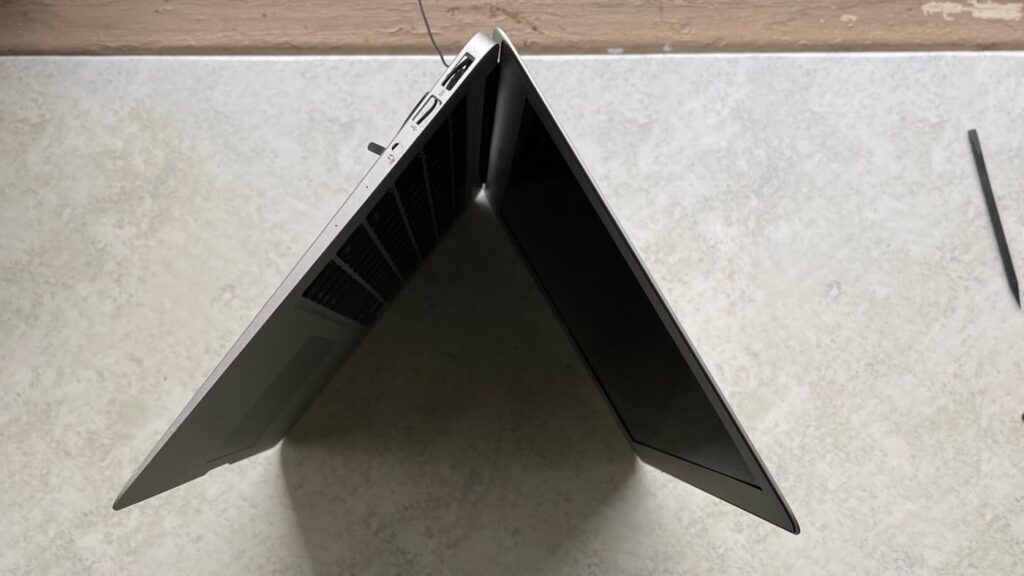
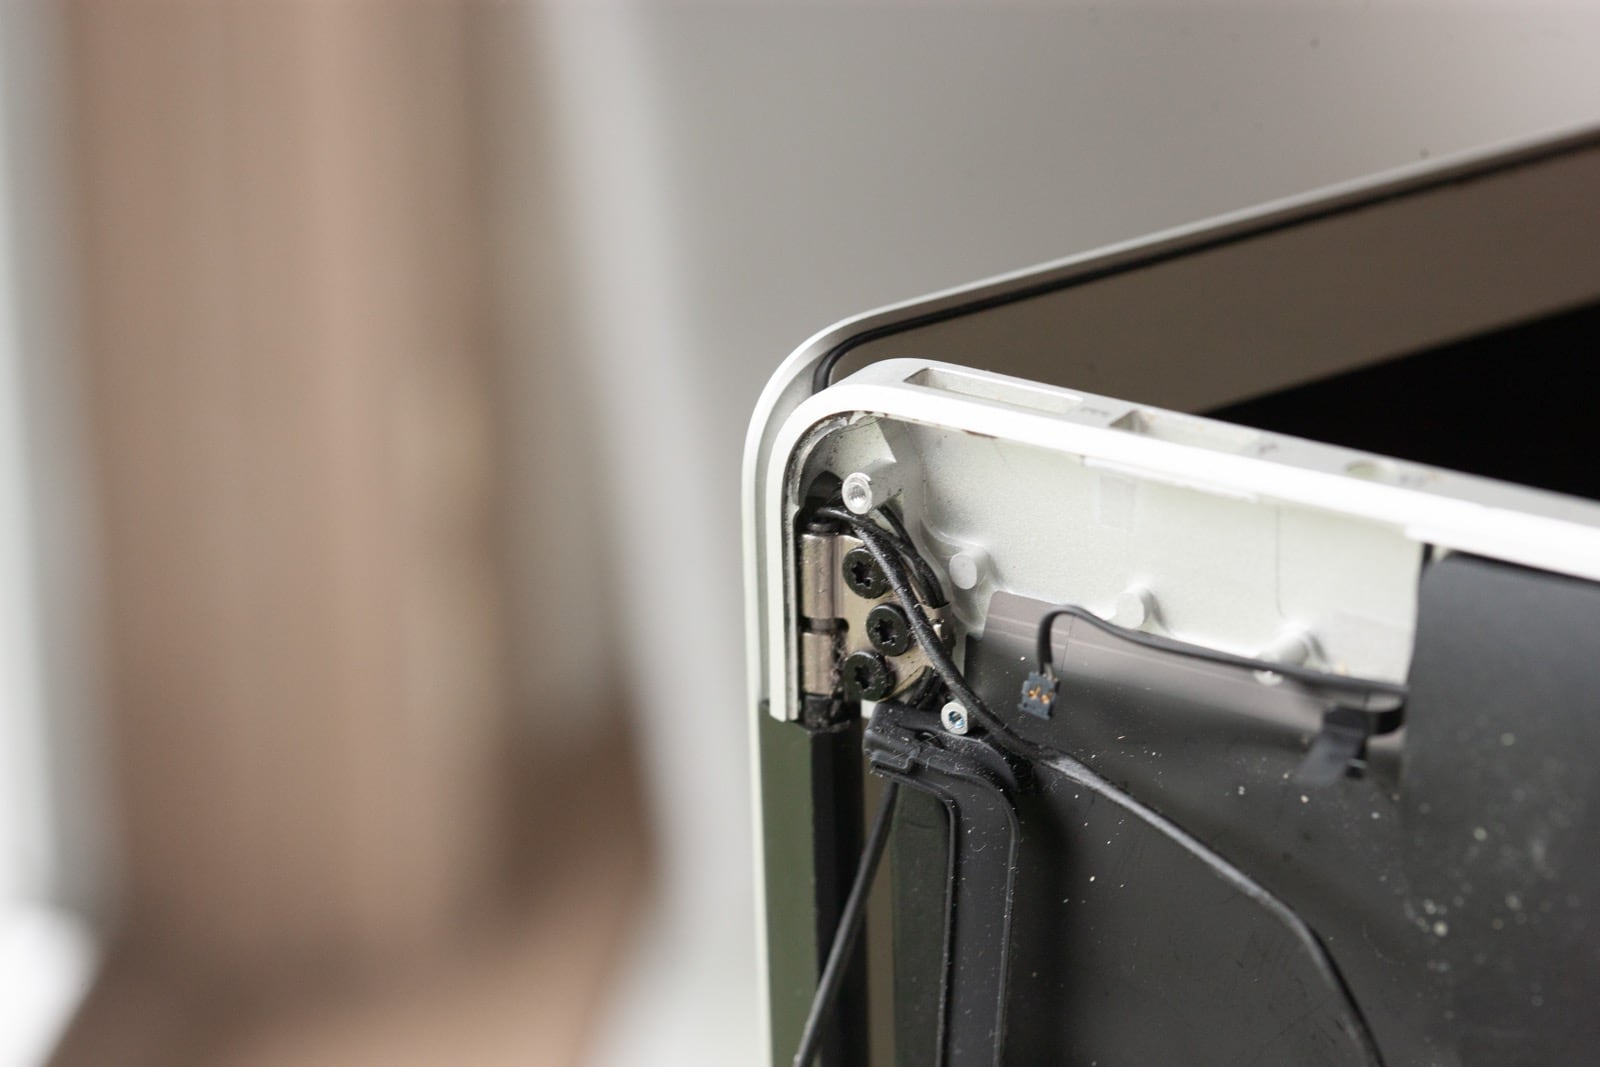
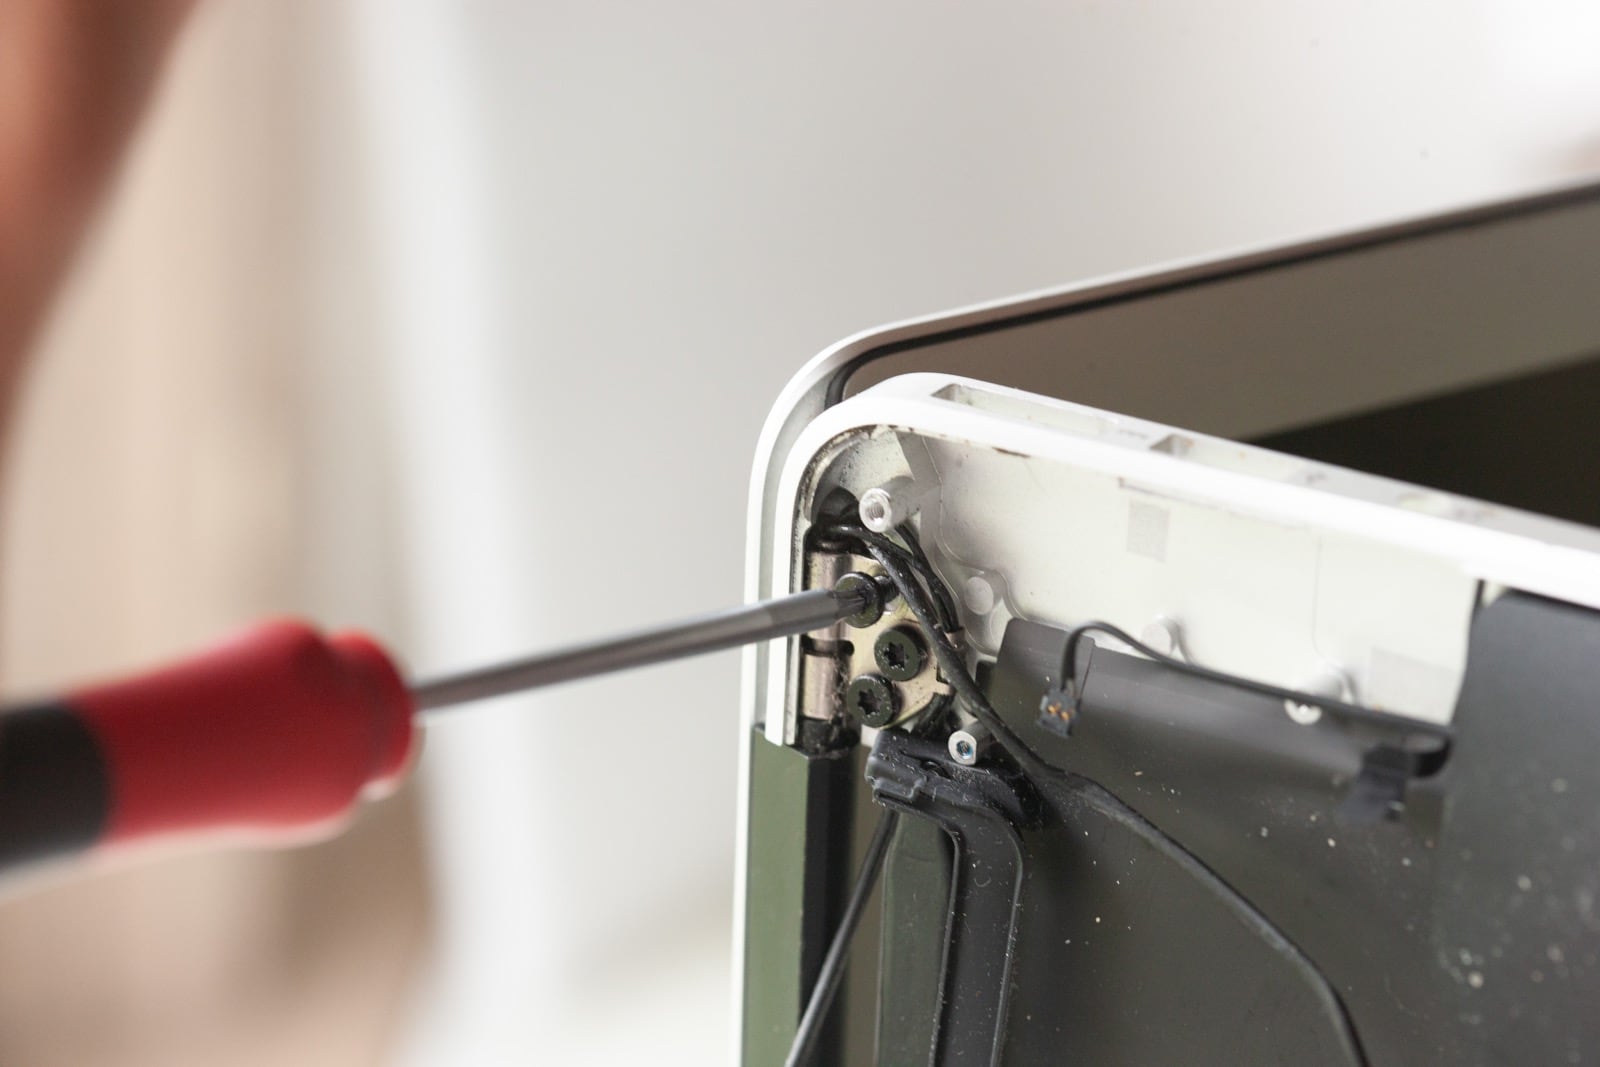
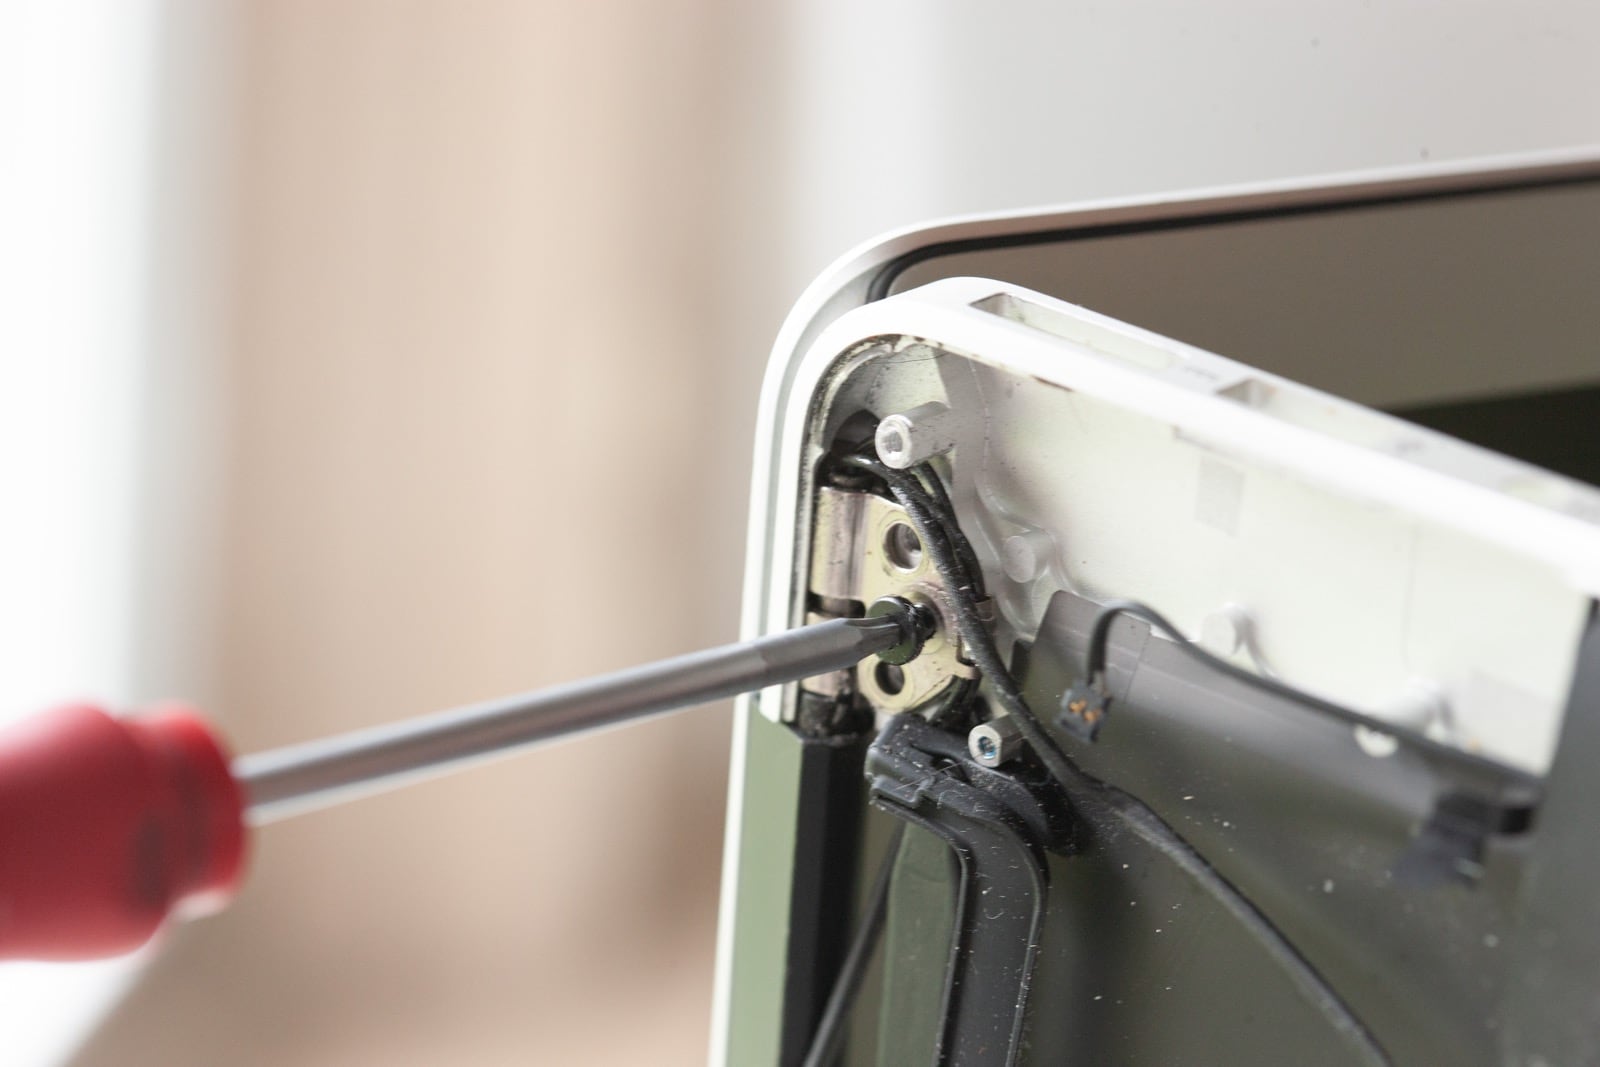
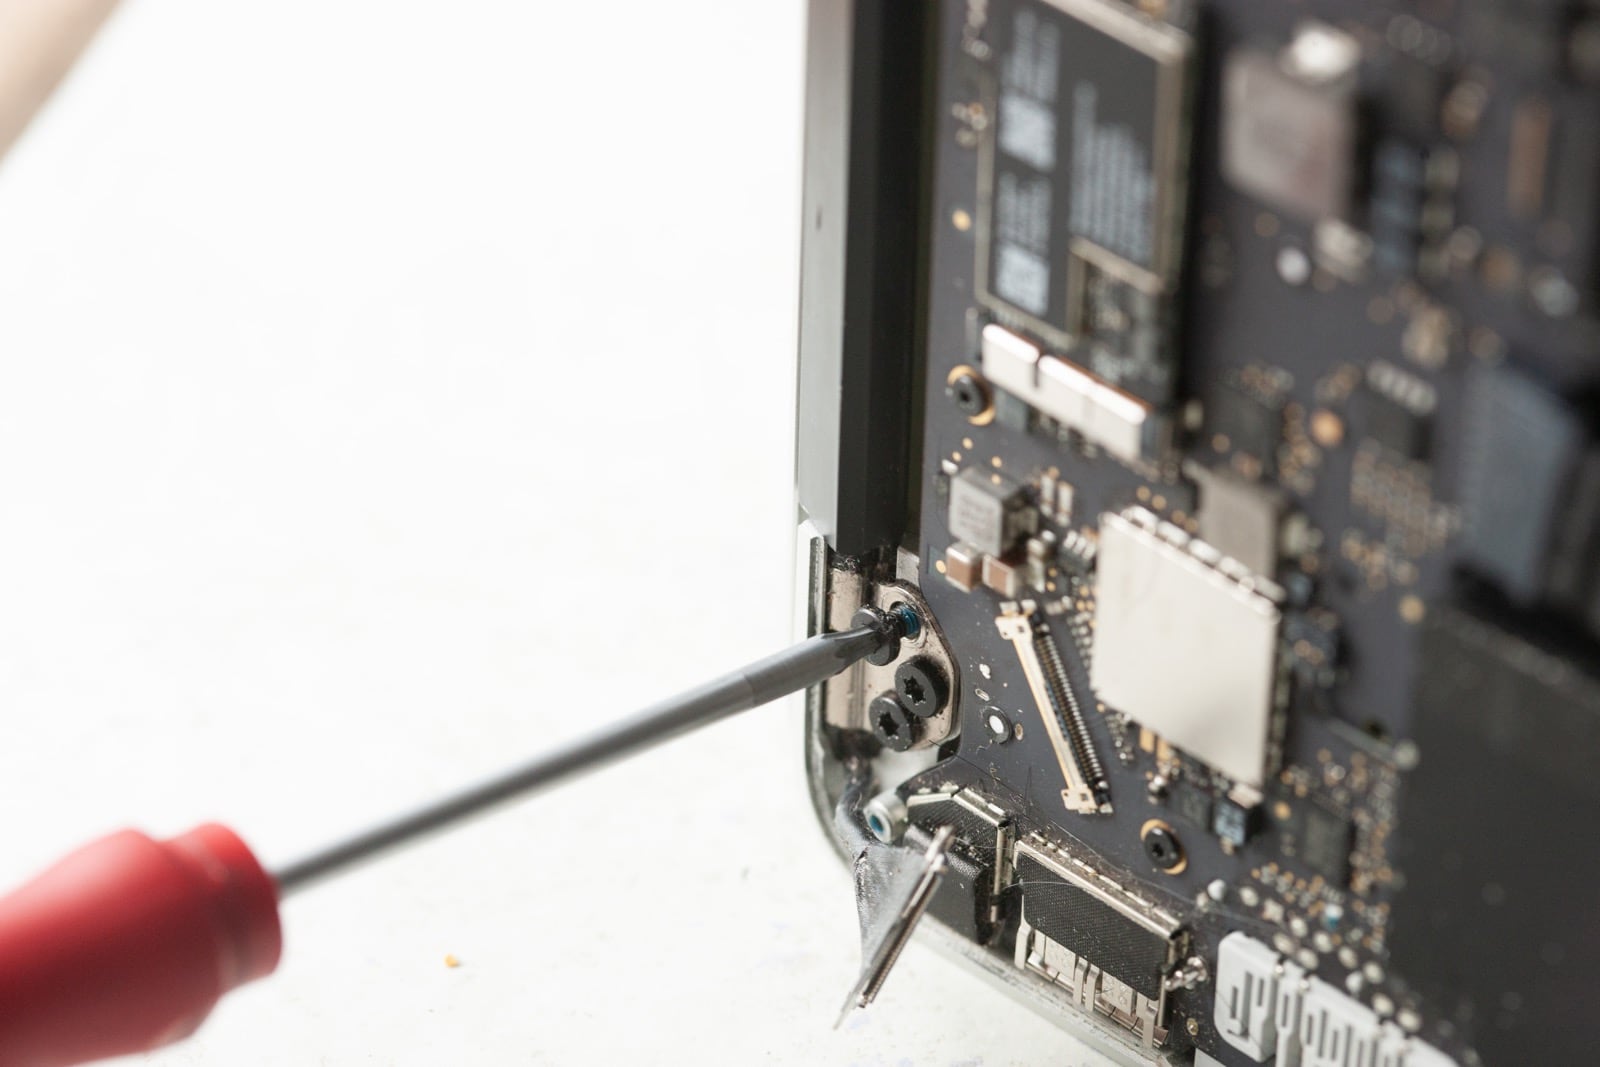
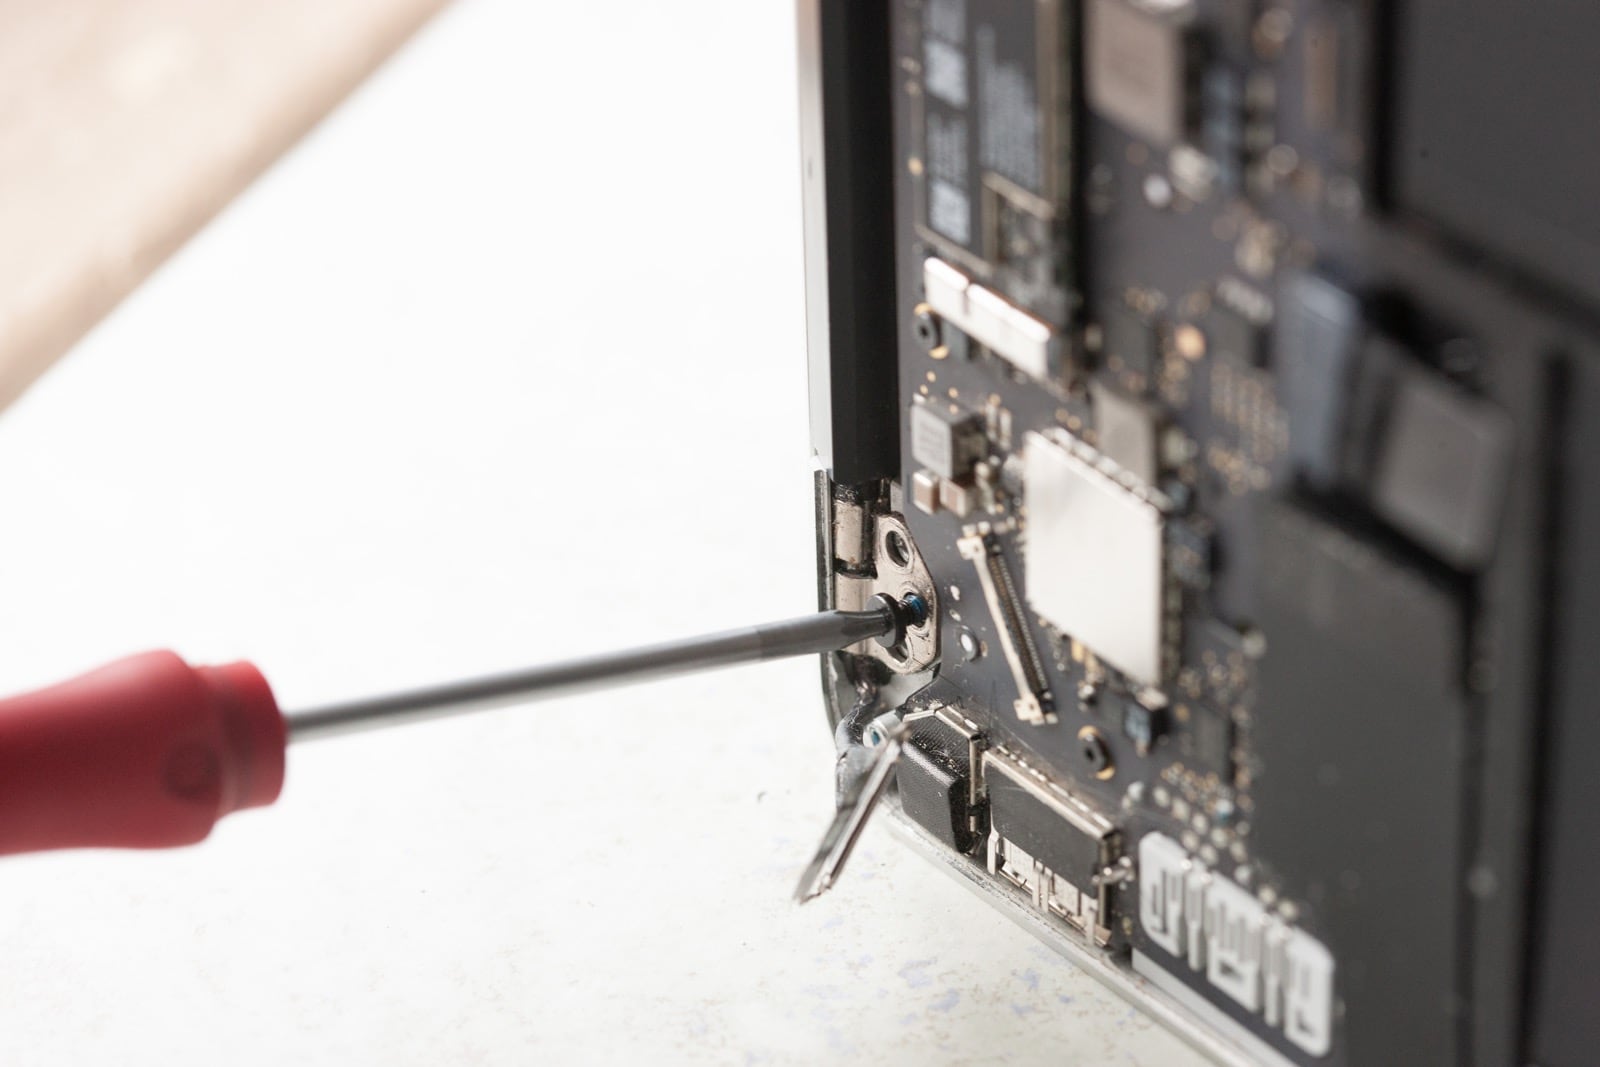
Step 15 – Removing the display assembly.
Now it is time to wiggle the display loose from the top case. And you are officially halfway done with this repair! Now you just follow these instructions but in reverse.
Step 16 – Reassembly.
Just follow these instructions backward to complete reassembly. If you want more guidance, you can watch the video below which shows the reassembly in detail.
Step 17 – Final testing and troubleshooting tips.
Now that the repair is done it is time to test everything out. There are a few things that the display assembly does that you want to be sure to test.
- Turn the computer on and verify the display does indeed work. Verify there are no cracks or issues with the screen itself.
- Close the display and verify that the computer actually goes to sleep when the lid is closed. There is a magnet in the display that tells the computer when the lid is closed.
- Open PhotoBooth or another program to test the camera function. Click to record and video and say a few words, then watch the video back and verify the sound is working. Note if the sound is coming from both speakers as it should be.
- Connect to your wifi and go to an area where the wifi may be a little weak, but where it worked in the past. Verify you are still able to browse the Internet as you did before the repair.
If there are any issues with the tests above, you can refer to my troubleshooting page for the A1466 MacBook Air. I cover common repair issues and how to fix them in depth.
Congratulations on completing the display repair on your MacBook Air! Let me know how it went, and if my instructions helped you enough that you want to show your gratitude with remuneration, I would love it if you bought me a donut!
MacBook Air LCD Only Replacement Guide
First, a word of warning: this repair is considered difficult even by full-time technicians. To become proficient at this particular repair requires a lot of practice. I personally practiced on damaged display assemblies that were bent or liquid damaged until I had mastered the procedure… but it was still very difficult to complete until I had done about 50+ repairs. If you are a beginner, this repair might end up causing more frustration than it is worth.
For those who enjoy a challenge and have some experience with small electric repair, buckle up!
Step 1 – Sourcing the replacement MacBook Air LCD panel.
Finding a new LCD panel to replace your cracked or failed LCD can be difficult. There are sellers on eBay and Amazon that source LCD panels that are grade B or have visual defects, then when you install it into your computer and notice the issue (after hours of work) they say you caused the damage. For this reason, it is best to go with a reputable repair shop to source the part.
In my experience, most reputable repair shops will not sell the part to a customer looking to repair the computer themselves. There are two reasons for this. 1. The rate of breaking the part is quite high on this repair when somebody doesn’t have the needed experience. 2. The rate of returns when people get 10% into the repair and realize it isn’t doable for them is quite high.
I have an entire page dedicated to sourcing the LCD panel for a 2010-2017 MacBook Air. Check it out to find places to purchase that give you the best chance of having a good outcome and more.
Step 2 – Purchase the tools needed to complete the repair.
The same tools are used to disassemble the MacBook Air as with the display assembly repair, but for LCD replacement you will also need a couple of additional tools and some special adhesive. The tools needed for the LCD panel replacement are:
- P5 Pentalobe Screwdriver
- T5 Torx Screwdriver
- TR8 Torx Security Screwdriver
- Plastic Spudger
- Precision tweeters
- Size 0 Philips screwdriver
- A roll of 12mm “red” tape
- A roll of 1mm “red” tape
- Blick Painting Knife Style 19
- X-Acto knife with #11 blades
- Hot air re-work station
Step 3 – Plan for the repair.
Be sure to set aside plenty of time for this repair. I recommend splitting it into two parts. You start with the display replacement guide above to get the display off the computer, then rest and do something fun for a few hours, then come back to this guide to replace the LCD panel on your display. Overall I recommend setting aside an entire day for this repair.
Step 4 – Complete the guide for removing the display assembly.
It is much easier to do this repair with the display assembly removed from the computer. My display replacement guide above will get you through to having the display separate from the computer, then you move on to the process of removing the LCD panel itself from the display assembly.
Step 5 – Apply heat to the bezel of the MacBook Air
The bezel is the silver strip that surrounds the screen on these A1466 MacBook Airs. Note that the bezel is held in place by a very strong adhesive, so the goal here is to heat up the adhesive to make removing the bezel easier.
Also, note that the bezel is made from a thin piece of aluminum. This means it is easy to bend or warp the bezel during removal. Great care should be taken to not bend the bezel at all. If you do end up with a warped or bent bezel, you can purchase replacements online at eBay or similar.
In my experience, a temperature of around 300 degrees with a small air nozzle works really well. Keep the nozzle close to the center of the bezel and work your way around using movements as shown in the video. It is important to not let the heat stay in one area too long. You want to take care not to melt the rubber gasket that surrounds the screen and also to not cause damage to the backlight sheets that are just under the LCD panel.
Step 6 – Remove the bezel.
Prepare yourself for a pretty long process here. What you want to do is keep the area you are working on hot, while also keeping the tip of your awesome new painting knife hot. This will allow the knife to cut through the adhesive as easily as possible.
You run the knife under the bezel starting at the bottom right corner of the screen. Work your way up and around until you have cut the adhesive between the bezel and the LCD panel all the way around the screen. Take extra care around the iSight camera. Just to the left of the iSight camera is the iSight camera board which is easily damaged during this process. Also, take extra care at the bottom left of the screen, this is where the iSight cable is easily nicked during the process.
Step 7 – Unscrew the screws holding down the LCD panel.
There are 5 screws along the bottom of the LCD panel that are covered in little black pieces of tape. Use your tweezers to remove those pieces of tape, and then remove the screws. There are also two black screws holding down the inverter board at the bottom of the LCD. These two screws also get removed.
Step 8 – Disconnect the backlight and LVDS cable.
Now you lift the board as shown in the pictures to disconnect the backlight and LVDS cable. Take extra care to remove the black tape holding the backlight cable in place first, then carefully lift the locking tab to remove the cable. The LVDS connector also needs to be unlocked as you can see in the pictures, then can be disconnected from the board.
Step 9 – Remove the LCD panel.
This is another part of the repair where you need to relax and take your time. Use the hot air and small nozzle to heat up the right-hand side of the LCD, right where it connects to the edge of the display assembly. There is a 2mm piece of double-sided tape under this area that is holding the LCD down.
I like to angle the hot air towards the edge of the screen and move it along pretty quickly, in order to keep the backlight sheets directly under the LCD from getting damaged.
Once the edge is warmed up, use your painting knife to slide under the screw post on the farthest right side of the display. This will lift the display just a little and cause upward pressure on the LCD panel. Keep heating the edge of the LCD panel until you see it start to lift a little, then work just the edge of a business card into the gab, and slowly move the business card up to separate the LCD from the housing.
This part of the repair takes a while, you want to work in sections, so heat up the tape holding down the LCD panel, then move the card a little bit up, then heat up the next area, and move the card up a little more. The better you do this part the easier the rest of the repair will be, so take your time.
You will continue this process until you are done with the right side and top of the display. For the left-hand side, there is a slightly different process.
The left-hand side of the LCD panel is held down by a larger piece of adhesive, this makes it quite a bit more difficult to use the business card method. For this part of the project, you will first heat the left side of the LCD where the adhesive is, then apply upward pressure by lifting on the right-hand side of the LCD panel.
Lift the right-hand side of the LCD panel very, very, very slowly while continually moving your heat up and down the left side of the LCD. This will allow the LCD to pull free of the tape, or the tape to pull free of the housing.
Step 10 – Remove the mount from the original LCD panel.
Now that the LCD panel is removed, you can see the piece of metal along the bottom that the screws were screwed into. This piece of metal needs to be moved back into the display assembly so it is ready for your new LCD panel to be installed.
Heat up the metal as it is attached with the same tape as the LCD panel was attached with, then use your painting knife to get between the metal and the LCD. This is usually pretty easy after just completing the more difficult LCD removal process.
Step 11 – Apply adhesive to replace any removed adhesive.
This is where your 1mm tape comes into play! You want to replace any of the black tape that was damaged or removed during the process so far so you can install the new LCD and have adhesive around the whole thing.
I like to start by replacing any tape that was removed from the metal piece that sits below the LCD panel at the bottom of the assembly, then carefully put that metal piece back into the housing and screw it in as shown in the pictures. Note that the adhesive you just put in faces up towards you.
Then I add any adhesive that was removed from the housing when we pulled the LCD panel off.
Step 12 – Installing the new LCD panel.
First, you want to use your can of compressed air to carefully blow any dust from the backlight sheets before installing the new LCD. Take care to not let those sheets get moved around in the process. They need to sit exactly where they are.
Remove any backing from the adhesive that you installed, and also remove the backing from the LCD panel. You can leave the plastic on the front of the LCD panel, but be sure you remove it from the back before installing.
Then you want to line up the circles on the top right and left of the display with the cross hairs on the LCD panel. Once those are lined up you can slowly sink the LCD into the housing, then gently run your finger around the whole LCD panel along the edge to make sure the adhesive is attached to the LCD panel as well as the back housing.
Step 13 – Connect the backlight and LVDS connector.
I like to install these so the flex cable is under the board instead of over as it was in the beginning. I have found by installing it this way, you decrease the number of issues with those flex cables being damaged over time.
Step 14 – Screw in the 2 black screws
Now it is time to screw in those two black screws that hold the backlight boarding place.
Step 15 – Apply 12mm tape.
Apply the 12mm tape all around the LCD assembly. Note you want 1-2mm of the tape to cover the LCD panel to help keep it in place. Cut a small piece of the 12mm tape to go above the sight camera. Be sure to leave the area to the left of the camera open where the light sensor is located. The pictures show how it should look when you have completed the work.
Step 16 – Install the bezel.
Remove all the backing from the tape and install the bezel. I like to start by lining up the top right and left of the bezel, then letting it drop in just like I did with the LCD panel. Gently push on the LCD around the edges to make sure the adhesive is sealed.
Step 17 – Reassembly.
Now go back to the display assembly replacement instructors, and follow them in reverse to put the computer back together.
Step 18 – Final testing and troubleshooting tips.
Now that the repair is done it is time to test your MacBook Air. There are a few things that the display assembly does that you want to be sure to test.
- Turn the computer on and verify the display does indeed work. Verify there are no cracks or issues with the screen itself.
- Close the display and verify that the computer actually goes to sleep when the lid is closed. There is a magnet in the display that tells the computer when the lid is closed.
- Open PhotoBooth or another program to test the camera function. Click to record and video and say a few words, then watch the video back and verify the sound is working. Note if the sound is coming from both speakers as it should be.
- Connect to your wifi and go to an area where the wifi may be a little weak, but where it worked in the past. Verify you are still able to browse the Internet as you did before the repair.
If there are any issues with the tests above, you can refer to my troubleshooting page for the A1466 MacBook Air. I cover common repair issues and how to fix them in depth.
Congratulations on completing the display repair on your MacBook Air! Let me know how it went, and if my instructions helped you enough that you want to show your gratitude with remuneration, I would love it if you bought me a donut!
Professional MacBook Air Screen Repair
If you have just read through this guide and decided you would rather have somebody else do the project for you, please consider letting me repair your Mac screen! I have completed literally thousands of these Mac screen repairs, and have them down to a science. I keep my overhead low and provide a quality service for an affordable price.
I would love to help you get your MacBook Air back up and running properly. If you would like me to repair anything on your computer, you can either go through filling out the order form for a MacBook Air repair, or you can use my quick quote form to get a quote on the project you would like to have done.
Thanks!
-Nathan
